Table of Contents
Advertisement
Quick Links
Advertisement
Table of Contents

Related Manuals for JDS Uniphase ValidatorPRO-NT, Cu

Summary of Contents for JDS Uniphase ValidatorPRO-NT, Cu
- Page 1 ValidatorPRO-NT, Cu User’s Guide www.jdsu.com/know...
-
Page 3: Table Of Contents
Table of Contents Introduction ..............1 ValidatorPRO-NT, Cu Capability......3 About Your ValidatorPRO-NT, Cu .........5 Main Unit Features...........5 Remote Unit Features..........8 ValidatorPRO-NT, Cu kit contents ......10 Battery and Power Management .........11 Integration with Plan-Um Software ......13 Summary of Auto Test Steps .........15 Basic Operation ............17... - Page 4 Table of Contents 9.5.2 Open Job............44 9.5.3 Export TuT ............45 9.5.4 Save ..............45 9.5.5 Save As............45 Manual Test Menu ............47 10.1 Data Cables............48 10.1.1 Cable Test............49 10.1.2 Hub Flash.............50 10.2 Phone Cables .............51 10.3 Two-Wire Cables ..........51 Network Test Menu ...........53 11.1 Power over Ethernet (PoE).........54 11.2...
-
Page 5: Introduction
To certify Ethernet speed performance of copper cable runs, the ValidatorPRO-NT, Cu handheld tester conducts Bit Error Rate (BER) tests by sending data packets down specified cable runs at defined data rates to check for errors at the maximum throughput of the link. - Page 6 The Network Tools feature provides a quick way to see the network architecture and a way to document moves, adds, and changes. It is strongly recommended that ValidatorPRO-NT, Cu units be registered at www.jdsu.com/know-register. Once registered, updated firmware and Plan-Um software can be...
-
Page 7: Validatorpro-Nt, Cu Capability
Introduction 1.1 ValidatorPRO-NT, Cu Capability Conducts Bit Error Rate (BER) testing to speed certify Ethernet data transmission speed up to 1000BASE-T (1 Gb/s) Measures Signal-to-Noise Ratio and Skew to uncover impairments to electrical Ethernet data transmission Tests for opens, shorts, split pairs, miswires, and reversals and measures distance to opens and shorts—supports all copper network, telco, and coax... -
Page 9: About Your Validatorpro-Nt, Cu
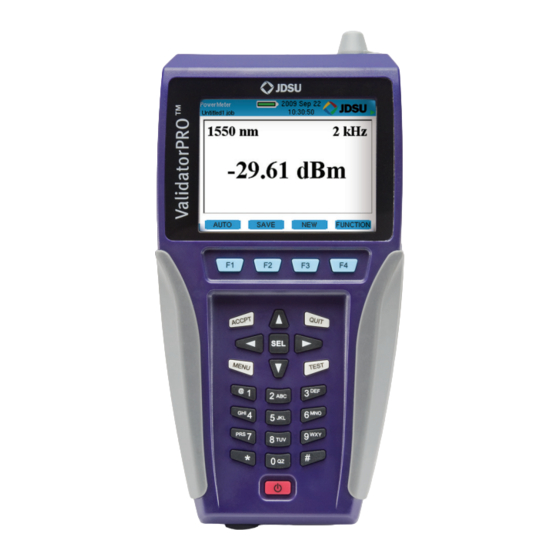
About Your ValidatorPRO 2 About Your ValidatorPRO-NT, Cu 2.1 Main Unit Features Figure 2.1: Main Unit Features... - Page 10 About Your ValidatorPRO Table 1: Main Unit Features Item Feature Description Power Key is pushed to power unit on/off. When unit is on a short tap changes the backlight from dim to bright. Holding key down for over a second turns the unit off. Menu Key opens a shortcut window of simple functions Accept Key accepts the...
- Page 11 About Your ValidatorPRO Table 2: Main Unit Features (Cont.) Item Feature Description Display 4 inch LCD color screen Data Jack RJ45 8 Position 8 Conductor (8P8C) modular connector. T568A/B Wiring Telephone Jack RJ11 6 Position 6 Conductor (6P6C) modular connector. USOC Wiring Coaxial Cable Connector Male “F”...
-
Page 12: Remote Unit Features
About Your ValidatorPRO 2.2 Remote Unit Features Figure 2.2: Remote Unit Features... - Page 13 Item Feature Description Link LED Turns on when a link is established with another network device (typically the ValidatorPRO-NT, Cu main unit). Charge LED Battery is charging when LED light is blinking. Battery State When selected the battery capacity is shown.
-
Page 14: Validatorpro-Nt, Cu Kit Contents
About Your ValidatorPRO 2.3 ValidatorPRO-NT, Cu kit contents One smart remote One set 1-8 wiremapping remotes (RJ11/RJ45) (TP612) Two lithium ion rechargeable batteries (NT93) Two universal AC adapter/charger units Two 30.48 cm (1 ft) patch cables with RJ45 connectors Two sacrificial cables for RJ45 mod plug One sacrificial coupler F-jack to F-jack USB drive including Plan-Um®... -
Page 15: Battery And Power Management
Properties/Battery Info. The batteries in the main unit and the remote unit are interchangeable. When powered on, the ValidatorPRO-NT, Cu reports the charging status at the top of the screen under the battery icon. A green full battery icon indicates the battery is fully charged. - Page 16 ValidatorPRO-NT, Cu will not be able to provide accurate test results if the AC power is not grounded properly. It is...
-
Page 17: Integration With Plan-Um Software
Once the job file is created in Plan-Um it can be transferred or saved to the USB thumb drive from the PC and then opened on the ValidatorPRO-NT, Cu. The cable test schedule will be available in the auto test menu. Cables can then be tested using the auto test function. - Page 18 Integration with Plan-Um Software Please refer to the auto test menu section for further details.
-
Page 19: Summary Of Auto Test Steps
Create job on PC using Plan-Um Transfer Plan-Um job file to USB thumb drive Open job file on ValidatorPRO-NT, Cu (can chose to transfer job file to ValidatorPRO-NT, Cu internal memory first or to simply open direct from USB thumb... -
Page 21: Basic Operation
Basic Operation 5 Basic Operation This section describes the basic operation and navigation of the ValidatorPRO-NT, Cu user interface (UI). The following sections provide details on how to perform specific functions and tests. The main unit is turned on by pressing the red power button. - Page 22 Basic Operation The MENU key opens a shortcut window of common functions. The content of this window is context sensitive to the screen that is currently active but will always show the following five choices: 1. Home 2. Save Job 3.
-
Page 23: Setup Menu
Setup 6 Setup Menu The Setup menu allows the user to adjust internal functions such as Display Contrast, the internal time clock, English or Metric units, the displayed language, Shutdown Timeouts, perform Response Tests, and turn on Auto-Save. Most of these functions can be set once and left alone unless a specific change is desired. -
Page 24: Display Contrast
Setup 6.1 Display Contrast The ValidatorPRO-NT, Cu main unit allows contrast settings for different environments. Use the + (F1) soft key to increase the contrast for a dark environment or – (F2) soft key to decrease the LCD contrast in a bright environment. -
Page 25: Shutdown Timeouts
Setup 6.2 Shutdown Timeouts Several power save options are available on the ValidatorPRO-NT, Cu to conserve battery life. The screen saver (Backlight) timeout will cause the display to blink. Pressing any key will bring back the full screen and reset the timer. -
Page 26: Date/Time
Setup 6.3 Date/Time Using the drop-down dialog boxes, select the current year, month, day, hour, and minute. Press Accept to select your choice and move to the next field. Press Set (F1) to confirm your choices and return to the Setup Screen. Figure 6.4 Real Time Clock... -
Page 27: Localization
Setup 6.4 Localization Using the drop-down dialog box, select Metric or English units to report length measurements. Press Accept. Do the same for the language selection. Press OK to confirm your choice and return to the Setup screen. Figure 6.5: Localization... -
Page 28: Calibration (Zero Length)
This can be used to compensate for the length of a test cable – the end of the test cable will be 0 feet/meters after this function is performed. Once calibration is performed, the ValidatorPRO-NT, Cu retains the information. Figure 6.6 Calibration 6.6 Other Settings... - Page 29 Setup ‘Screenshot Format’ select from PNG, JPG, BMP and XPM. Press Accept to set the selection. Press OK to confirm your choice and return to the Main menu screen. There are three different results that are generated and graphs plotted during a cable frequency response (attenuation) test: Near-end Crosstalk (NEXT), echo (return loss) response, and channel response.
-
Page 31: Properties Menu
Properties 7 Properties Menu The Properties menu displays buttons that contain information regarding: the state of charge associated with the battery, product revision levels, available free space on the internal memory, JDSU support information, and credit information for language translations. Figure 7.1: Properties Menu... -
Page 32: Battery Info
Properties 7.1 Battery Info This screen indicates whether the unit is operating on Battery Power or External Power (AC) and displays information that allows the user to monitor the remaining charge status and aging of the battery. The Battery Info screen also includes a Reset Charge (RST CHRG) F1 soft key. -
Page 33: Product Version
Properties 7.2 Product Version This screen displays the product’s electronic serial number plus the revision levels of the hardware, firmware and software in the ValidatorPRO- NT. NOTE: The actual serial number for warranty registration appears only on the rear decal for the unit and is not electronically stored in the unit. -
Page 34: Memory Usage
Properties 7.3 Memory Usage The ValidatorPRO-NT, Cu includes an internal memory and a USB thumb drive for transferring job files to and from the ValidatorPRO-NT, Cu. The memory usage screen can be used to view the amount of available memory for either internal or external memory. -
Page 35: Support Info
Properties 7.4 Support Info The Support Screen displays Technical Support contact information. Figure 7.5: Support Info... -
Page 37: File Management Menu
File Management 8 File Management Menu The File Management menu provides access to the Job Manager and the Copy/Move Utility. Note that external USB flash drives should be inserted and removed from the Start screen to ensure they are recognized by the ValidatorPRO- NT, Cu. -
Page 38: Job Manager
The Job Manager displays a list of jobs that have been uploaded from Plan-Um or have been created in the ValidatorPRO-NT, Cu and are on the internal or external memory. Highlight a job name and press the Open (F1) soft key to select an existing job to test or edit the job information using the Auto Test menu functions. -
Page 39: Copy/Move Utility
File Management 8.2 Copy/Move Utility The Copy/Move Utility allows for files to be transferred to/from the internal memory to/from an external USB thumb drive. This utility is useful for transferring several job files to/from the internal memory or for copying template files to/from the internal memory. - Page 40 File Management There are four function keys available: COPY (F1) - Copies selected files from selected memory location to other memory location. MOVE (F2) - Move selected files from selected memory location to other memory location. SEL ALL (F3) - Selects all files UNSEL (F4) - Deselects all selected files You can individually select files by using the SEL button and Up and Down keys.
-
Page 41: Auto Test Menu
Plan-Um and the ValidatorPRO-NT, Cu. Creating a job in Plan-Um and opening it on the ValidatorPRO-NT, Cu is the simplest way to create a Cable Test Schedule and enter Site Information, Tester Information, and Custom Cable Definitions. If it is desired to create or edit this information on the ValidatorPRO-NT, Cu, the Auto Test menu allows this. -
Page 42: Cable Test Schedule
TEST button. You will hear relays switching in the main unit and remote. A link is established with the remote, and ValidatorPRO-NT, Cu begins testing the cable to the parameters that have been defined for its... - Page 43 Results allows results of cable tests to be viewed on the ValidatorPRO-NT, Cu. Please see the following section for more details on viewing test results. Page up and page down can be used instead of the up and down arrows to allow for quicker scrolling through long cable test schedules.
-
Page 44: Viewing Test Results
Auto Test 9.1.1 Viewing Test Results When a cable is selected and the Results soft function key is pressed, the test results will be displayed on the screen along with details of the test such as the date and time of the test. -
Page 45: Site Information
Auto Test 9.2 Site Information Selecting the Site Info button displays the Customer Contact Information associated with the currently open job. By highlighting and selecting a field you can update or change the information in each field, i.e.; Job ID, Contact name, etc. Press Accept to accept the changes that were made and exit that field. -
Page 46: Tester Information
Auto Test 9.3 Tester Information Selecting the Contractor Info button displays the Contractor Information associated with the currently-open job. Information on this screen can be added or changed in the same manner as on the Site Info screen. Figure 9.5: Tester Information... -
Page 47: Custom Cable Definitions
9.4 Custom Cable Definitions Selecting the Custom Cable Definitions button displays all defined cable types loaded into the ValidatorPRO-NT, Cu from the current job and what auto tests will be performed for the cable type. The soft keys, F1 thru F3, allow for adding, editing, and deleting cable information. -
Page 48: Job Utilities
Auto Test 9.5 Job Utilities This screen has buttons to allow the creation of a new job file, open an existing job file, export a template file, save the file that is currently open, or save an open file as a file with a new name. -
Page 49: Export Tut
Auto Test 9.5.3 Export TuT The export TuT utility creates a new template from open job file. The template name and memory location can be specified. 9.5.4 Save The save utility saves the current job. 9.5.5 Save As The Save As utility allows the open job to be saved with a different name. -
Page 51: Manual Test Menu
Manual Tests 10 Manual Test Menu The Manual Tests menu gives access to individual tests that can be performed on Data, Phone, and 2-wire cables. The tests that can be performed for each selected cable type are listed on the Manual Test screen for that type. Manual Tests cannot be saved. -
Page 52: Data Cables
Manual Tests 10.1 Data Cables Data Cables are defined as cables wired to T568A/B pin numbering and pairing. Cable tests check cables for correct wiremap, length, Skew and Signal to Noise Ratio. Bit Error Rate Tests (BERT) can be performed to ensure the cable can carry 1000BASE-T Gigabit Ethernet signals. -
Page 53: Cable Test
Error message appears “Unable to Measure SNR”. To measure Signal to Noise Ratio you must use the ValidatorPRO-NT, Cu remote unit. Testing without a remote only allows for length to be measured. In order for split pairs to be correctly identified, the F4 softkey should be used to select if the cable is Screened or Unshielded Twisted Pair. -
Page 54: Hub Flash
Hub flash sends an intermittent link signal to flash the link status light on Ethernet equipment. A specific data rate or “Any” can be selected to have the hub and the ValidatorPRO-NT, Cu auto negotiate the speed. Pressing the F1 soft key starts this test. Figure 10.4: Hub Flash. -
Page 55: Phone Cables
Manual Tests 10.2 Phone Cables Phone Cables are defined as cables wired to the USOC 3- pair standard for pin numbering and pairing. The test shows opens, shorts and length of the run. The wiremap and length measurements are displayed. 10.3 Two-Wire Cables 2-wire cables are tested for wire map and length. -
Page 57: Network Test Menu
Network Tests 11 Network Test Menu There are four active network tests designed to provide insight into the functionality of wired Ethernet/IP networks. The five tests are: 1. Power over Ethernet 2. Port Discovery 3. Layer 2 Discovery Protocols 4. Wired Network Tests To run network tests, select Network Tests from the Start Menu then select the appropriate network test with the arrow keys and press SELect. -
Page 58: Power Over Ethernet (Poe)
The Power over Ethernet test detects and reports voltage presence on the line. If no voltage is present initially, the ValidatorPRO-NT, Cu proceeds to initiate IEEE802.3af PoE protocol to activate, test, and report whether PoE is found at the far end (the Power Source), the type and mode of PoE, polarity and wiring (e.g. -
Page 59: Port Discovery
Network Tests 11.2 Port Discovery Port discovery identifies telephone or network devices connected to the other end of the jack or cable. The test begins with a search for voltages that may be present. If voltages are found, the patterns for commonly used services are compared to the voltages observed and reported as phone, ISDN or legacy phantom power as appropriate. - Page 60 (1000Mbit only) are displayed. Speed testing, as well as placing tone on a cable, is performed in the Manual Test mode of the ValidatorPRO-NT, Cu only. If a remote is not found, a one-ended test for shorts and split pairs is run and the results are reported.
-
Page 61: Wired Network Tests
DHCP or manual addressing modes. To run tests, select Wired Network Tests from the Network Tests menu and connect the ValidatorPRO-NT, Cu main unit’s Network jack to the interface to be tested. In DHCP mode, the ValidatorPRO-NT, Cu’s assigned... - Page 62 Network Tests and Domain Name Server. Edit these fields as necessary using the keypad, Backspace (F1) and Delete (F2) soft keys. Press Accept to confirm your current selection and move to the next field. The Netmask is entered next to My IP as a count of ones starting from the left (255.255.0.0 = 16, 255.255.255.0 = 24, etc.).
- Page 63 IP addresses simultaneously. Press Quit to stop the Ping test. The ValidatorPRO-NT, Cu will issue a DHCP release request to the DHCP server when in DHCP mode. You can increase the length of the data packet used to ping by highlighting the target IP Address and using the right arrow key to highlight the word Long.
-
Page 64: Layer 2 Discovery Protocols
Network Tests from the Start menu then select L2 Discovery Protocols from the Network Tests menu. Next connect a patch cable from the ValidatorPRO-NT, Cu main unit’s network port to the Ethernet interface to be monitored for L2 discovery protocols. -
Page 65: Weee Directive Compliance
WEEE Directive Compliance 12 WEEE Directive Compliance JDSU has established processes in compliance with the Waste Electrical and Electronic Equipment (WEEE) Directive, 2002/96/EC, and the Battery Directive, 2006/66/EC. This product, and the batteries used to power the product, should not be disposed of as unsorted municipal waste and should be collected separately and disposed of according to your national regulations. -
Page 67: Customer Services And Warranty
Customer Services and Warranty 13 Customer Services and Warranty This section provides a description of customer services available through JDSU (including returns policies and procedures) and warranty information. 13.1 Customer Service (Standard Services) Customer Service accompanies the sale of every JDSU product. -
Page 68: Calibration
Customer Services and Warranty ensures products meet all published specifications, including any applicable product updates. 13.3.2 Calibration JDSU’s calibration methods are ISO approved and based on national standards. JDSU recommended factory calibration interval of this product is (24) months. The stated confirmation interval shall be regarded as a recommendation. -
Page 69: Warranty Information
Customer Services and Warranty The return authorization (RA) number (US customers), or reference number (European Customers). If possible, return the equipment using the original shipping container and material. If the original container is not available, the unit should be carefully packed so that it will not be damaged in transit;... - Page 70 www.jdsu.com/know Document Information Doc.# 21160445 Revision 000 English...
Need help?
Do you have a question about the ValidatorPRO-NT, Cu and is the answer not in the manual?
Questions and answers