Table of Contents
Advertisement
Available languages
Available languages
Quick Links
Advertisement
Table of Contents

Related Manuals for WEG CFW100-IOA


Summary of Contents for WEG CFW100-IOA
- Page 1 Motors | Automation | Energy | Transmission & Distribution | Coatings I/O Expansion Modules Módulo de Expansión de I/O Módulo de Expansão de I/O CFW100-IOA Installation, Configuration and Operation Guide Guía de Instalación, Configuración y Operación Guia de Instalação, Configuração e Operação...
-
Page 3: Table Of Contents
Summary / Índice SUMMARY 1 SAFETY INFORMATION .......5 1.1 SAFETY WARNINGS ........5 1.2 PRELIMINARY RECOMMENDATIONS ..5 2 GENERAL INFORMATION ......5 3 PACKAGE CONTENT ........5 4 INSTALLATION OF THE ACCESSORY ..5 5 CONFIGURATIONS ........6 APPENDIX A – FIGURES .......14 ÍNDICE 1 INFORMACIONES DE SEGURIDAD ...8 1.1 AVISOS DE SEGURIDAD ......8 1.2 RECOMENDACIONES PRELIMINARES ..8 2 INFORMACIONES GENERALES ....8... -
Page 5: Safety Information
„ Installation, configuration and operation guide. „ 4 INSTALLATION OF THE ACCESSORY The CFW100-IOA is easily connected to the CFW100 frequency inverter using the plug and play concept. The procedures below must be followed for the proper installation and operation:... -
Page 6: Configurations
Figure A1 on page 3. Power up the inverter. 5 CONFIGURATIONS The CFW100-IOA connections must be done to the I/O expansion connector according to Table 1 on page The pins of the accessory connector are presented in Figure A2 on page... - Page 7 Table 2 on page 7. For further details, refer to chapter 12 of the CFW100 programming manual. Table 2: Configurations of the connectors to select the type of signal at the analog input and output on the CFW100-IOA Setting of Signal Parameter...
-
Page 8: Informaciones De Seguridad
Solamente utilizar el módulo de expansión „ de I/O (CFW100-IOA) en los convertidores WEG se r i e CF W10 0 c o nve r s ió n d e firmware a partir de la versión V2.3X (ver P023). Se recomienda la lectura del manual del „... -
Page 9: Configuraciones
Figura A1 en la página 3. Energice el convertidor. 5 CONFIGURACIONES Las conexiones del accesorio CFW100-IOA deben ser hechas en el conector de expansión de I/O, conforme la Tabla 1 en la página 9. Los terminales del conector... - Page 10 4 ... 20 mA P253 = 2 o 5 ¡NOTA! L a ve r s ió n d e f ir mwa re d e l ac c e sor io CFW100-IOA puede ser visualizada en el parámetro P024 del convertidor CFW100. ¡ATENCIÓN! P a r a e l c o r r e c to f u n c i o n a m i e n to d e l convertidor CFW100 con el módulo CFW100-...
-
Page 11: Informações De Segurança
Guia de instalação, configuração e operação. „ 4 INSTALAÇÃO DO ACESSÓRIO O CFW100-IOA é facilmente conectado ao inversor de frequência CFW100 utilizando o conceito “plug-and- play”. Os procedimentos abaixo devem ser seguidos para a correta instalação e colocação em funcionamento:... -
Page 12: Configurações
2. Encaixe o acessório a ser instalado conforme indicado na Figura A1 na página 3. Energize o inversor. 5 CONFIGURAÇÕES As conexões do acessório CFW100-IOA devem ser feitas no conector de expansão de I/O conforme Tabela 1 na página 12. Os pinos do conector do acessório são apresentados na... - Page 13 Tabela 2 na página 13. Para mais detalhes consulte o capítulo 12 do manual de programação do CFW100. Tabela 2: Configurações dos conectores para seleção do tipo de sinal na entrada e saída analógica no CFW100-IOA Ajuste da Faixa do Ajuste de...
-
Page 14: Appendix A - Figures
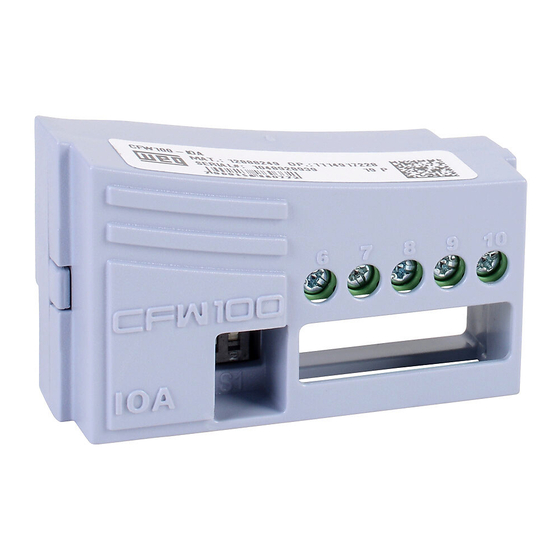
Appendix A - Anexo A APPENDIX A – FIGURES ANEXO A – FIGURAS a) Removal of front cover and accessory (a) Remoción de la tapa frontal y del accesorio (a) Remoção da tampa frontal e de acessório (b) Accessory connection (b) Conexión del accesorio (b) Conexão de acessório Figure A1: (a) to (b) Installation of accessory... - Page 15 I/O Figure A2: CFW100-IOA dimensions in mm [in] and connectors location Figura A2: Dimensiones del CFW100-IOA en mm [in] y localización de los conectadores Figura A2: Dimensões do CFW100-IOA em mm [in] e localização dos conectores CFW100 | 15...
- Page 16 NOTES / NOTAS / ANOTAÇÕES...
- Page 17 NOTES / NOTAS / ANOTAÇÕES...
- Page 18 NOTES / NOTAS / ANOTAÇÕES...
- Page 20 WEG Drives & Controls - Automação LTDA. Jaraguá do Sul - SC - Brazil Phone 55 (47) 3276-4000 - Fax 55 (47) 3276-4020 São Paulo - SP - Brazil Phone 55 (11) 5053-2300 - Fax 55 (11) 5052-4212 automacao@weg.net 12941158...
Need help?
Do you have a question about the CFW100-IOA and is the answer not in the manual?
Questions and answers