EverFocus EMV400S FHD Quick Installation Manual
4 channels 1080p full hd mobile dvr
Hide thumbs
Also See for EMV400S FHD:
- User manual (98 pages) ,
- User manual (250 pages) ,
- Quick installation manual (12 pages)
Table of Contents
Advertisement
Quick Links
EMV400S FHD / EMV400SSD
4 Channels 1080p Full HD Mobile DVR
Quick Installation Guide
EMV400S FHD
EMV400SSD
Copyright © EverFocus Electronics Corp.
Release Date: March, 2017
All the images including product pictures or screen shots in this document are for example only.
The images may vary depending on the product and software version. Information contained in
this document is subject to change without notice.
Advertisement
Table of Contents

Related Manuals for EverFocus EMV400S FHD


Summary of Contents for EverFocus EMV400S FHD
- Page 1 EMV400S FHD / EMV400SSD 4 Channels 1080p Full HD Mobile DVR Quick Installation Guide EMV400S FHD EMV400SSD Copyright © EverFocus Electronics Corp. Release Date: March, 2017 All the images including product pictures or screen shots in this document are for example only.
- Page 2 EMV400S FHD / EMV400SSD Mobile DVR Introduction The latest EverFocus H.264 full HD mobile DVR comes in two models: EMV400S FHD and EMV400SSD, delivering 1080p full HD resolution on live/recording streams. Its comprehensive features along with the 3G, 4G and Wi-Fi function, enables its mobility and functionality to be widely adopted in the vehicle environment.
-
Page 3: Packing List
Note: 1. Equipment configurations and supplied accessories vary by country. Please consult your local EverFocus office or agents for more information. Please also keep the shipping carton for possible future use. 2. Contact the shipper if any items appear to have been damaged in the shipping process. -
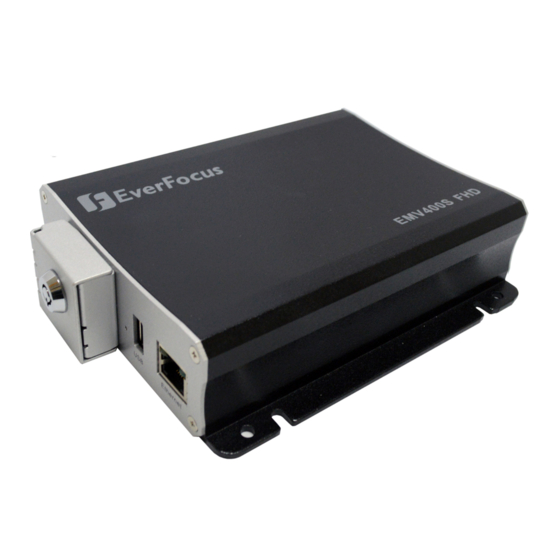
Page 4: Front Panel
EMV400S FHD / EMV400SSD Mobile DVR Front Panel EMV400S FHD EMV400SSD No. Name Description IR Receiver Receives data from the infrared remote control. Power: Lights red continuously when power is supplied. Blinks when power supply is insufficient. Storage: Lights green continuously when storage is reading or writing System LEDs data. -
Page 5: Rear Panel
EMV400S FHD / EMV400SSD Mobile DVR Rear Panel EMV400S FHD EMV400SSD No. Name Description Power harness cable for connecting to 8 ~ 35VDC power source. For DC Power Input details, please refer to 2.3.3 Power Harness Cable. Connects the antenna to the mobile DVR. Please refer to 2.3.6 Antenna Connection for more details. - Page 6 EMV400S FHD / EMV400SSD Mobile DVR Getting Started Installation Before installation, choose a location in the vehicle where it can: • Provide convenient access for installing or removing the hard disk • Allow air to flow around the fan vents. Inadequate or improper air flow can impede proper...
- Page 7 EMV400S FHD / EMV400SSD Mobile DVR 2.1.1 Dimensions 2.1.2 Mounting To mount the mobile DVR onto a surface inside a vehicle: 1. Optionally drill four holes on the mounting surface according to the hole-position on the mobile DVR and then insert the four supplied Anchors into the holes on the mounting surface.
-
Page 8: Vehicle Connection
EMV400S FHD / EMV400SSD Mobile DVR 2.2 Vehicle Connection The mobile DVR supports input power voltage between 8VDC ~ 35VDC. You can install the mobile DVR in all kinds of vehicles support the above power voltage. The diagrams below are examples to illustrate the connection inside a car / truck with 12VDC / 24VDC. -
Page 9: Connecting To A Car With 12Vdc
EMV400S FHD / EMV400SSD Mobile DVR 2.2.2 Connecting to a Car with 12VDC Glove box (inside or underneath) Trunk Passenger seat (underneath) Driver seat (between the seat and side panel) 12V+ GND IGN Black Yellow Fuse (7.5A) Relay (12V) 12V+ (Red) -
Page 10: Basic Connection
Camera NB / PC 1. To record videos, install a storage device to the mobile DVR: For EMV400S FHD: Insert an SD Card to the SD Card Slot (see 2.3.1 SD Card Installation). For EMV400SSD: Install an SSD to the SSD tray (see 2.3.2 SSD Installation). -
Page 11: Sd Card Installation
Up to 128GB SDHC / SDXC cards are supported (see Tested Card Brands on the next page). For EMV400S FHD, the SD card is used for general recording. For EMV400SSD, the SD card is used for alarm event backup recording only. - Page 12 30 ~ 60 seconds. Note that only the formatted SD card can be used for recordings. For EMV400S FHD, the SD card is used for general recording. For EMV400SSD, the SD card is used for alarm event backup recording only. After installing the SD Card, it’s recommended to enable the Record Overwrite function.
-
Page 13: Ssd Installation
EMV400S FHD / EMV400SSD Mobile DVR 2.3.2 SSD Installation Only the EMV400SSD features the SSD function. Users can install one 2.5” SSD into the mobile DVRs for recording. Please follow the steps below to install the SSD. Up to 4TB SSD is supported. - Page 14 SSD to resume the recording function. To enable Record Overwrite, please go to the OSD menu: System < Record < Record. SSD Compatibility List Please go to the EMV400SSD Web page on EverFocus’ website http://www.everfocus.com.tw to see the latest Hard Disk / SSD Compatibility List.
-
Page 15: Power Harness Cable
EMV400S FHD / EMV400SSD Mobile DVR 2.3.3 Power Harness Cable You can connect the mobile DVR to a power source between 8VDC ~ 35VDC. 12V+ / 24V+ Power Input Power Harness Cable DC Power In (Red) 8VDC ~ 35VDC GND (Black) IGN (Yellow) 2.3.4 D-Sub Cable... -
Page 16: Monitor Connection
EMV400S FHD / EMV400SSD Mobile DVR 2.3.5 Monitor Connection The mobile DVR has one Main Monitor port (VGA) and 1 Call Monitor port (BNC). You can connect the monitors to the system through VGA and BNC ports. The Main and Call Monitor ports can be used simultaneously. - Page 17 EMV400S FHD / EMV400SSD Mobile DVR 3G/4G SIM Card Installation: Before using the 3G/4G function, you have to insert a 3G/4G SIM card to the card slot. EMV400SSD: 1. On the front panel of the mobile DVR, unscrew the card protection plate.
-
Page 18: External I/O Box & Led Indicates Box
You can connect the mobile DVR to the Alarm I/O or RS-232 (CAN bus) devices using the External I/O Box, which is an optional device supplied by EverFocus. For more details about the External I/O Box, please refer to the User’s Manual of External I/O Box. -
Page 19: Turning On/Off The Power
EMV400S FHD / EMV400SSD Mobile DVR 2.4 Turning On / Off the Power Before powering on the mobile DVR, please make sure the internal HDD have been installed properly. Once you have completed the basic cable connections, you are ready to turn on the mobile DVR. - Page 20 EMV400S FHD / EMV400SSD Mobile DVR 2. Click the Finish button, the IP Utility will be automatically launched to search the IP devices connected on the same LAN. 3. To optionally configure the Machine Name, IP Address, IP Type or Port Number using the IPU: a.
- Page 21 EMV400S FHD / EMV400SSD Mobile DVR 4. To access the Live View window, double click the IP address of the desired device, the login window pops up. Type the user ID and password to log in. By default, the user ID is admin and the password is 11111111.
- Page 22 EMV400S FHD / EMV400SSD Mobile DVR If you encounter the following problem or still can’t access the remote Web interface, please see below: If the Error window appears, please be sure to close ALL the Web browser windows first and then click Retry.
- Page 23 EMV400S FHD / EMV400SSD Mobile DVR If your PC or laptop is running with Windows, it’s required to run the browser as administrator when first entering the remote web page of the device. Go to C:\Program Files (x86)\Internet Explorer, right-click the browser and then click Run as administrator.
- Page 24 FAX: +81 3 5625 8189 sales@everfocus.com www.everfocus.co.jp info@everfocus.co.jp Ihr EverFocus Produkt wurde entwickelt Your EverFocus product is designed and und hergestellt mit qualitativ manufactured with high quality materials hochwertigen Materialien und and components which can be recycled Komponenten, die recycelt und wieder and reused.
Need help?
Do you have a question about the EMV400S FHD and is the answer not in the manual?
Questions and answers