Advertisement
Quick Links
Bullet Network Camera
QUICK INSTALLATION GUIDE
Hardware Installation
Warning!
Only qualified service personnel should install and service this
product in order to avoid risk of injury from electrical shock and
energy hazard.
Observe all ESD (Electro-static Discharge) procedures during
installation to avoid damage to the camera and its components.
Tools Required
P hillips Screwdriver
●
Electric Drill
●
1
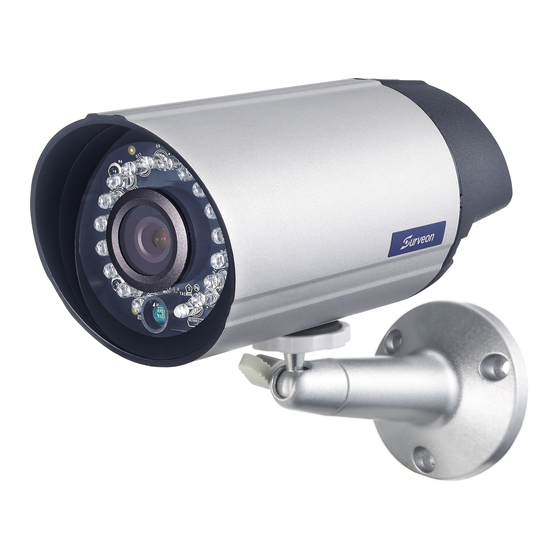
Hardware Overview
1
Front View
1
1
2
2
3
5
Network Connector
1
IR LED
3
Light Sensor
2
Lens
4
Power Connector
6
Reset Cable
Note: The power connector is provided for the solutions without PoE.
QMC 3 3 5 1 A E R 1 2
© by Surveon Technology, Inc. All rights reserved.
2
Installation
1. Use the camera bracket to mark the desired camera position on a flat interface.
Make one cable entry hole and three screw holes on the surface with the electric
drill.
Accessories
2. Fix the camera bracket on the surface with screws and screw anchors.
Quick Installation Guide x1
●
Product DVD x1 (including manuals)
●
Anchors and Mounting Screws x3
●
Camera Bracket x1
●
RoHs Compliance x1
●
(Optional) Power Adapter
●
User-provided Items
LAN Cable
●
PC with Windows (XP or above) and web
●
browsers (Internet Explorer 6.0 or above)
installed
3. Join the camera with the bracket.
4
5
6
The bracket is suggested to be tightened after positioning the camera to ensure the waterproof
characteristics of the camera are maintained.
4. Connect the camera to the network with the network connector.
5.
PoE (802.3af ) is supported. You can also c
connect the adapter to a power outlet.
6. Check if the live view displays normally after the camera is logged in. Please refer to Logging to the System
Section on p2 for more details.
onnect the power connector to the power adapter, and then
3
Camera Deployment
Before You Start
4
1
Please prepare a PC with Windows (XP or above) and web browsers (Internet Explorer 6.0 or above)
1 1
1
installed.
5
Appendix: Resetting the Camera with the Reset Cable
To reset the device to the factory default settings:
1. Make sure the device is in operation mode.
2. Poke the little hole on the reset cable cover or press and hold the red button with a needle after
removing the cable cover until the camera restarts (about 2 seconds). The status LED will change to
amber during startup.
3. When the status indicator changes back to green (which may take up to 1 minute), the process is
complete. The default IP address is 192.168.88.10 if not assigned by a DHCP server.
Note: (1) Resetting to the factory default settings using the reset cable will cause all parameters
(including IP address) to be reset. To reset the unit without changing parameters, disconnect
and reconnect the power connector. (2) Camera resets can also be performed under System
> Reset To Factory Default on the web interface.
Advertisement

Related Manuals for Surveon CAM3351


Summary of Contents for Surveon CAM3351
- Page 1 6. Check if the live view displays normally after the camera is logged in. Please refer to Logging to the System Section on p2 for more details. QMC 3 3 5 1 A E R 1 2 © by Surveon Technology, Inc. All rights reserved.
- Page 2 Logging out of the System Logging into the System Software Installation The following information will prompt for logging in: Logging off of the camera can be performed by closing the browser window. Users can also choose to click the Logout link located at the top of the screen. Obtaining IP Address through the IP Utility The IP address can be obtained using the IP Utility in your product CD 1.
Need help?
Do you have a question about the CAM3351 and is the answer not in the manual?
Questions and answers