Hunter Douglas Provenance Installation Operation Care
Woven wood shades
Hide thumbs
Also See for Provenance:
- Installation operation care (16 pages) ,
- Installation operation care (16 pages)

Subscribe to Our Youtube Channel
Related Manuals for Hunter Douglas Provenance


Summary of Contents for Hunter Douglas Provenance
- Page 1 Installation Operation Care • • Provenance Woven Wood Shades ® PowerView Automation ®...
-
Page 2: Table Of Contents
Removing the Shade (If Necessary) ........23 Cleaning Procedures ............23 CHILD SAFETY Warning ................24 DECLARATIONS ..............25 Questions? Call the Hunter Douglas Consumer Support at 1-888-501-8364. © 2018 Hunter Douglas. All rights reserved. All trademarks used herein are the property of Hunter Douglas or their respective owners. - Page 3 PRODUCT VIEW Installation Brackets Attached Battery Wand (Standard) DC Power Supply Satellite Battery Pack or DC Power Supply (Optional) Not shown: Top-Down/Bottom-Up shades...
-
Page 4: Getting Started
GETTING STARTED Thank you for purchasing Hunter Douglas Provenance Woven Wood Shades with ® PowerView Automation. With proper installation, operation, and care, your new shades will ® provide years of beauty and performance. Please thoroughly review this instruction booklet and the enclosed packing list before beginning the installation. -
Page 5: Step 1 - Install The Brackets
INSTALLATION STEP 1 — Install the Brackets The number of shade installation brackets required varies Shade/Valance Brackets ■ Width Required with headrail width, as shown in the table. 15" – 36" IMPORTANT: One outside mount spacer block per " – 72" installation bracket is required for outside mount shades "... - Page 6 INSTALLATION Mount the Shade Installation Brackets — Inside Mount Mark 2" in from each jamb. ■ With shades using one or two battery wands, there must be 16" between the edges of ➤ the two brackets on the motor end. If there are more than 3 brackets, space remaining brackets evenly.
- Page 7 INSTALLATION With Attached Battery Wand — ⁄ " Needed for Rear Clearance ⁄ " Minimum Inside Mount ⁄ " Fully Recessed Mount Bracket Bracket Battery Wand Battery Wand ⁄ " ⁄ " ⁄ " Satellite Battery Pack or DC Power Supply (Optional) ⁄...
- Page 8 INSTALLATION Mount the Shade Installation Brackets — Outside Mount The standard shade has an attached battery wand requiring spacer blocks to be used with the shade installation brackets. If using a DC power supply or satellite battery pack, spacer blocks are not required.
- Page 9 INSTALLATION Extension brackets provide up to 1½" of clearance. Extension ■ Bracket If used, center the brackets on your marks and mark the screw holes. Drill the screw holes using a ⁄ " drill bit. ■ WARNING: Product is heavy. Mount into wood/ metal studs or into concrete with concrete anchors.
- Page 10 INSTALLATION Mount the Brackets — Outside Mount with Optional Cornice Valance With the optional cornice valance, first the valance headboard is mounted and then the shade installation brackets are mounted to the wall under the headboard. Center the headboard above the window opening at the ■...
- Page 11 INSTALLATION Drill the screw holes for the L-bracket using a ⁄ " drill bit. ■ Valance Valance WARNING: Product is heavy. Mount into wood/ Headboard L-Bracket End Mark metal studs or into concrete with concrete anchors. Drywall anchors are not recommended. 3"...
- Page 12 INSTALLATION Mark the screw holes for the shade installation brackets on the wall underneath the ■ valance headboard. The top of the shade installation ➤ brackets must be ¼" below the bottom of the valance headboard. Mount the end shade installation ➤...
-
Page 13: Step 2 - Install The Shade
INSTALLATION STEP 2 — Install the Shade If You Have a Battery Wand Clip... Attach the battery wand clip to the headrail. Battery Wand Clip ■ IMPORTANT: Position the clip so that the battery wand will be between shade installation brackets. For two attached battery wands. - Page 14 INSTALLATION If You Have a Cornice Valance... With the bottom of the valance angled away from the valance headboard, align the top of ■ the valance with the top of the valance headboard and press into place. Spread the returns. ■...
-
Page 15: Step 3 - Connect The Power Source
INSTALLATION Attach the Optional Components STEP 3 — Connect the Power Source Refer to the appropriate page based on your order. For a battery wand, see “If You Have One Battery Wand...” on page 13. ➤ For an optional DC power supply, see “If You Have a DC Power Supply...” on page 15. ➤... - Page 16 INSTALLATION If You Have a Satellite Battery Pack... Mount the Satellite Battery Pack Wall Mount Bracket Decide where you want to attach the wall mount bracket. ■ A satellite battery pack may be mounted in any orientation. Mark the screw holes. ■...
- Page 17 INSTALLATION If You Have a DC Power Supply... Power Cable Connect the Power Supply from Shading Plug the power cable from the shade into ■ the extension cable. Wire Retainers Plug the other end of the extension cable ■ 15" into the DC power supply.
- Page 18 INSTALLATION If You Have a Y-Connector for Adapting Two Battery Wands..Mount the Battery Wand or Satellite Battery Pack Refer to “Mount the Battery Wand into the Battery Wand Clip” on page 13. ■ Refer to “Mount the Satellite Battery Pack” on page 14. ■...
-
Page 19: Operation
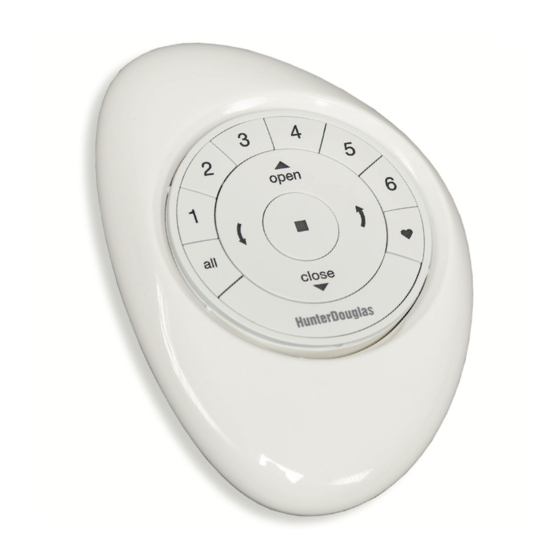
OPERATION Testing the Shade Testing the shade with the programming button will allow you to ensure that the motor and power source are working correctly. CAUTION: When raising the shade for the first time, observe how the fabric stacks. It should stack evenly. - Page 20 OPERATION Joining a Shade to a Group IMPORTANT: The shade will not operate using the remote until it has been joined to a group. 1. Press and hold ■ STOP on the remote until the indicator lights blink (approximately 6 seconds).
- Page 21 OPERATION Top-Down/Bottom-Up Operation 1. Press ▼ CLOSE to lower the bottom rail, closing the shade. 2. Press the left arrow to lower the middle rail. This opens the shade top-down on a Top- Down/Bottom-Up shade. (If the bottom rail is not fully lowered, pressing this button will lower the bottom rail first then lower the middle rail.) 3.
-
Page 22: Resetting The Shade (If Necessary)
OPERATION Resetting the Shade (If Necessary) If you need to reset a shade’s travel limits: Calibration Reset The calibration reset is used to reset the shade’s travel limits. This procedure will also reset ♥ FAVORITE position to its default (shade closed halfway). Bottom-Up shades: 1. -
Page 23: Troubleshooting
■ Refer to the following troubleshooting for specific solutions for your shade. ■ If questions remain, please contact the Hunter Douglas Consumer Support at 1-888-501-8364. Problem The shade will not fit into the shade installation brackets. Solution If the shade has a battery wand, check that the wand is not interfering with the shade installation brackets. - Page 24 Press the cap on until it latches. ■ Squeeze Latch NOTE: Hunter Douglas recommends AA alkaline batteries for use with our battery-powered shadings. These will provide more than one year of operation, depending on usage. Lithium and rechargeable batteries are not recommended.
-
Page 25: Care
You may also use a hair dryer on a cool setting or compressed air set to a low pressure. Vacuuming Use a low suction, hand-held vacuum for more thorough dust removal. ■ Spot-Cleaning Only the following Provenance fabrics can be spot-cleaned: ® Brisbane Palisade ➤... -
Page 26: Child Safety
CHILD SAFETY WARNING For more safety information, call 1-800-997-2389. Warning This product contains accessible cords on the back. Accessible cords on the back of Roman Style shades can be pulled out to form a loop, which can STRANGLE a young child. Move cribs, playpens and other furniture away from window coverings. -
Page 27: Declarations
20 cm or more away from person’s body. European Conformity We, the undersigned, Hunter Douglas Window Fashions One Duette Way, Broomfield, CO 80020, USA Hunter Douglas Europe B.V. Piekstraat 2, 3071 EL Rotterdam, The Netherlands certify and declare under our sole responsibility that assembly PV12 conforms with the essential requirements of the EMC directive 2004/108/EC and R&TTE directive 1999/5/EC. - Page 28 2. Visit hunterdouglas.com for additional warranty information, frequently asked questions and access to service locations. 3. Contact Hunter Douglas at (888) 501-8364 for technical support, certain parts free of charge, for assistance in obtaining warranty service or for further explanation of our warranty.
Need help?
Do you have a question about the Provenance and is the answer not in the manual?
Questions and answers