Table of Contents
Advertisement
Advertisement
Table of Contents

Related Manuals for AVMATRIX PVS0613


Summary of Contents for AVMATRIX PVS0613
- Page 1 PORTABLE 6 CHANNEL MULTI-FORMAT VIDEO SWITCHER...
- Page 2 USING THE UNIT SAFELY Before using this unit, please read below warning and precautions which provide important information concerning the proper operation of the unit. Besides, to assure that you have gained a good grasp of every feature of your new unit, read below manual. This manual should be saved and kept on hand for further convenient reference.
-
Page 3: Table Of Contents
CONTENTS 1. BRIEF INTRODUCTION..........................2 1.1. Overview..............................2 1.2. Main Features............................. 2 2. INTERFACES..............................3 2.1. Rear Interfaces............................3 2.2. Tally PIN Definition.............................3 3. SPECIFICATION............................4 4. FRONT CONTROL PANEL......................... 5 5. OPERATION INSTRUCTION........................6 5.1. Multiview Output Layout..........................6 5.2. PGM PVW Switching..........................7 5.2.1. -
Page 4: Brief Introduction
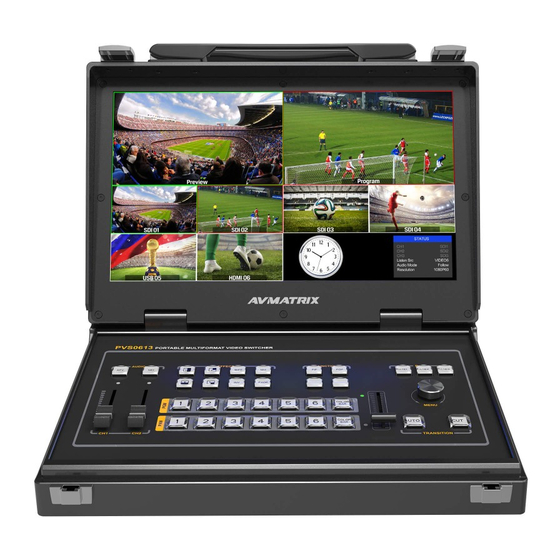
1. BRIEF INTRODUCTION 1.1. Overview PVS0613 is an all-in-one 6-channel video switcher that allows video switching, audio mixing, and different transition effects. Inputs signal is auto-detected while for PGM output can be scaled, which can be compatible with more different equipment and more flexible. The unit integrated a 13.3 inch Full HD LCD monitor which can be used in wide variety of venues for events,seminars,etc. -
Page 5: Interfaces
2. INTERFACES 2.1. Rear Interfaces GPIO (for tally) HDMI PGM OUT AUDIO IN HDMI & SDI MULTIVEW OUT 3.5mm AUDIO IN/ OUT SDI PGM OUT SDI AUX OUT SDI IN Power Switch HDMI IN LAN (for update) DC 12V AUDIO OUT 2.2. -
Page 6: Specification
3. SPECIFICATION Size 13.3 inch LCD Display Resolution 1920×1080 Video Inputs 4×3G/HD/SD-SDI, 2×HDMI 1080p 60/59.94/50/30/29.97/25/24/23.98 1080psF 30/29.97/25/24/23.98 SDI Input Format 1080i 60/59.94/50 720p 60/59.94/50/30/29.97/25/24/23.98 625i 50 PAL, 525i 59.94 NTSC 1080p 60/59.94/50/30/29.97/25/24/23.98/23.976 1080i 50/59.94/60 HDMI Input Format Inputs 720p 60/59.94/50/30/29.97/25/24/23.98 576i 50, 576p 50 SDI Video Rate Auto detection, SD/HD/3G-SDI... -
Page 7: Front Control Panel
4. FRONT CONTROL PANEL MIXER Support 2-Ch audio mixing Audio follow video mode FADE Fade transition effect Mix transition effect Wipe transition effect Picture in Picture Fade to Black, used for emergency situation RATE The transition rate PVW:1-6 Selecting the signal source for Preview PGM:1-6 Selecting the signal source for Program T-BAR... -
Page 8: Operation Instruction
5. OPERATION INSTRUCTION 5.1. Multiview Output Layout PGM and PVW as Preview and Program displayed as following image. The level meter of PGM audio is shown only in multiview. SDI/HDMI PGM out is without any overlays. The following 6 windows come from the 6 input signals. The lower right corner display of the menu and status information.The CH1,CH2 are the channel selection of the 2 audio sources for audio mixer.There is a real-time Digital clock/Analog clock displayed beside the menu. -
Page 9: Pgm Pvw Switching
5.2. PGM PVW Switching 5.2.1. PGM, PVW Channel Selection Below 1-6 buttons from PGM and PVW are corresponding with the 6 windows in the below of the multiview layout. The selected button from PGM turns on to red LED, and the selected button from PVW turns on to green LED. -
Page 10: Ftb (Fade To Black)
seamless switching and the selected transition effect WIPE, MIX or FADE is not used. 2) Transition with Effects AUTO performs an automated switch between Preview and Program views. The timing of the transition is set by the chosen speed button. The selected transition WIPE, MIX or FADE will also be used. -
Page 11: Transition Effects
5.5. Transition Effects 5.5.1. MIX Transition Pressing the MIX button selects a basic A/B Dissolve for the next transition. When button LED turns on it is active. Then use T-Bar or AUTO to operate the transition. The MIX transition effect as below 5.5.2. -
Page 12: Menu Setting
6. MENU SETTING 6.1. SDI PGM/ AUX and Multiview Output Format The output format of multiview is fixed at 1080p60, and for PGM output can be set by the knob. Except PVW and PGM output, there is a AUX for choice, you can quickly select the auxiliary output between PVW and PGM via Menu knob. -
Page 13: Pip Mode
6.3. PIP Mode When press PIP,there will be a small image display on the top left corner of PVW window as following image.And the menu will enter into an interface as below image.The window size,position and border of PIP can be set from menu. 6.4. -
Page 14: System Settings
Entering system settings from the menu to switch the real-time clock shown in Analog or Digital. Connect video switcher to a PC and download a time control software from AVMATRIX official website www.avmatrix.net/download/ Open the software and click Scan to search and connect the device, then the clock time will be changed to same time to the PC’s time. -
Page 15: Netmask
6.5.2. NetMask Set the NetMask. The default setting is 255.255.255.0. 6.5.3. GateWay Set the GateWay according to current IP address. Save the configuration when network setting finish.
Need help?
Do you have a question about the PVS0613 and is the answer not in the manual?
Questions and answers