Table of Contents
Advertisement
Advertisement
Table of Contents

Related Manuals for AVMATRIX HVS0401


Summary of Contents for AVMATRIX HVS0401
- Page 1 MINI 4 CHANNEL HDMI/DP LIVE STREAM MULTI-FORMAT VIDEO SWITCHER...
- Page 3 USING THE UNIT SAFELY Before using this unit, please read below warning and precautions which provide important information concerning the proper operation of the unit. Besides, to assure that you have gained a good grasp of every feature of your new unit, read below manual. This manual should be saved and kept on hand for further convenient reference.
-
Page 5: Table Of Contents
CONTENTS 1. BRIEF INTRODUCTION..........................2 1.1. Overview..............................2 1.2. Main Features............................. 2 2. INTERFACES..............................3 2.1. Rear Interfaces............................3 2.2. Tally PIN Definition.............................3 3. SPECIFICATION............................4 4. FRONT CONTROL PANEL..........................5 5. OPERATION INSTRUCTION........................6 5.1. Multiview Output Layout..........................6 6. USB CAPTURE..............................6 7. MENU SETTING............................6 7.1. -
Page 6: Brief Introduction
1. BRIEF INTRODUCTION 1.1. Overview HVS0401 is a micro-designed metal case with a 4-channel HDMI/DP multi-format video Switcher that allows video switching, audio mixing, and different conversion effects. Input signal automatic detection, PGM output can be scaled, compatible with a variety of equipment, more flexible. USB output can be directly connected to a computer. -
Page 7: Interfaces
2. INTERFACES 2.1. Rear Interfaces HDMI/DP IN HDMI PGM OUT HDMI MULTIVIEW OUT RJ45 FOR UPDATE DC 12V GPIO (for tally) ANALOG AUDIO OUT (3.5mm, LINE OUT) ANALOG AUDIO IN (3.5mm, LINE IN) ANALOG AUDIO (RCA L/R) IN USB TYPE-B, FOR WEB CAM RJ45 RESERVED FOR UPDATESTREAM DC 12V POWER SWITCH... -
Page 8: Specification
3. SPECIFICATION CONNECTION Video In CH1~CH3: HDMI type-A(100Ω) ×3; CH4: HDMI type-A(100Ω)/ Display Port×1 PGM: HDMI type-A(100Ω) ×2; Multiview: HDMI type-A(100Ω) ×1, Video Out USB CAM: USB2.0 type B×1; RJ45×1: Reserved for Live Stream Analog Audio In 3.5mm stereo audio (Line in) ×2, RCA(L/R) ×1 Analog Audio Out 3.5mm stereo audio (Line out) ×1 PC Control Port... -
Page 9: Front Control Panel
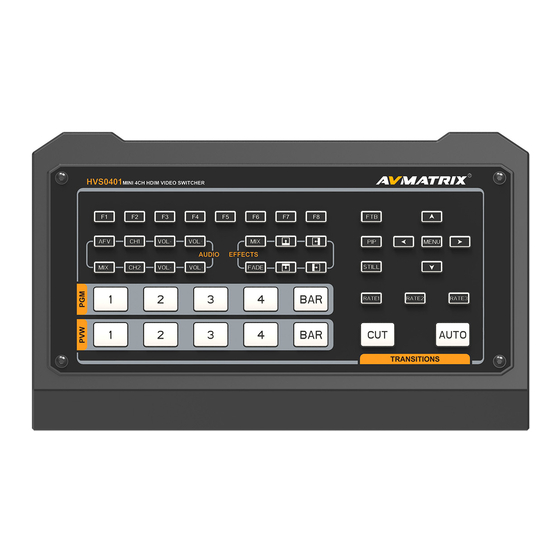
4. FRONT CONTROL PANEL PVW:1-4 Selecting the signal source for Preview. Bar for color bar. PGM:1-4 Selecting the signal source for Program. Bar for color bar. Support 2-ch audio mixing, AFV & MIX Audio mode, AUDIO Source selecting, volume + & volume - F1: Set PGM out format from 1080P 50/60/30/25/24Hz, 1080I 50/60Hz. -
Page 10: Operation Instruction
5. OPERATION INSTRUCTION 5.1. Multiview Output Layout The Multiview includes PGM (Program), PVW (Preview), 4 HDMI signal sources, menu, clock, and status display of Function key, Still, UVC, and working temperature. 6. USB CAPTURE The switcher's USB output is based on UVC (USB video class) and UAC (USB audio class) standard. No additional drivers must be installed. -
Page 11: Audio Setting
7.2. Audio Setting This video switcher is coming with 1 channel L/R analog audio input & output and 1 channel 3.5mm stereo audio input and output, support both Mxing mode and Follow mode (audio following video). 7.2.1. Mixing Mode Press button MIX to set audio mode as mixing. Press CHI/CH2 to switch the audio sources from IN1/ IN2 /IN3 /IN4 /RCA IN/MIC_IN. -
Page 12: Pip Mode
7.3. PIP Mode When press PIP, there will be a small image display on the top left corner of PVW window as below image. The menu will enter an interface as below image for PIP settings. The window size (Small, Large, Medium), position (Horizontal position and Vertical position) and border (Border enable, Border width, Border color) of PIP can be set from menu. -
Page 13: System Settings
7.4.1. System Settings Language Entering system settings from the menu to switch the system language between English and Chinese. Fanrpm Setting the cooling fan speed to control the temperature and noise of the switcher. There are Auto/ Mode1/ Mode2/ Mode3/ Mode4/ Mode5/ Mode6/ Mode7/ Mode8/ Mode9/ Mode10. ... -
Page 14: Device Info
8.2. Time Setting Connect video switcher to a PC via LAN port and download a time setting software from AVMATRIX official website www.avmatrix.net/download/. Open the software and click Scan to search and connect the device, then the clock time will be changed to same time to the PC's time.
Need help?
Do you have a question about the HVS0401 and is the answer not in the manual?
Questions and answers