Table of Contents
Advertisement
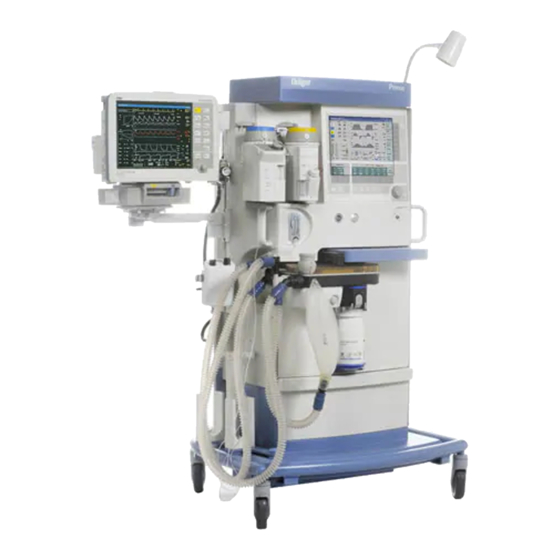
Primus Family Quick Guide
Primus Workbook
Workbook
V2.1
Warning: For full information concerning the
performance characteristics of the Dräger
Medical devices described in this Quick Guide,
each user must first carefully read and fully
comprehend the Instructions for Use before
operating the device.
Advertisement
Table of Contents

Related Manuals for Dräger Primus Series


Summary of Contents for Dräger Primus Series
- Page 1 Primus Family Quick Guide Primus Workbook Workbook V2.1 Warning: For full information concerning the performance characteristics of the Dräger Medical devices described in this Quick Guide, each user must first carefully read and fully comprehend the Instructions for Use before operating the device.
- Page 2 A quick guide to provide information on the basic functions of the Primus. This guide presupposes a knowledge of the Primus Instructions for Use and is not intended to replace them!
-
Page 3: Table Of Contents
Contents Preparation for Use • Checking Cylinder Supply and Central Gas Supply • Checking Electrical Supply • Checking Compact Breathing System • In Addition … Start Up • Self Test • Leak Test Operation • Monitoring • Setting Fresh Gas Concentrations •... -
Page 4: Preparation For Use
Preparation for Use Checking Cylinder Supply and Central Gas Supply (if available) • Connect hose fittings for O Air and N O to corresponding fittings on the back of the machine (1). • Plug wall fittings for O , Air and N O into central supply wall outlets. -
Page 5: Checking Compact Breathing System
Preparation for Use 1 34 Checking Compact Breathing System • Ensure that the compact breathing system (1) is connected and the ventilator is locked in place. • Check status of CO absorbent (2), breathing bag and patient hoses. In Addition … •... -
Page 6: Start Up
Start Up Start Up • Switch on Primus using the ON/OFF switch (1). • Close Y-piece (place firmly onto the corresponding cone of the breathing system). • Set the APL valve to MAN and 30 mbar (2). There are two versions of the APL valve. Your version may differ from the one shown. -
Page 7: Self Test
Start Up Self Test • Follow the self test instructions on the screen. Information about system leaks and compliance will be displayed. Primus will accept leaks of up to 150 mL/min. The most common causes of leakage are: • Faulty breathing hoses or breathing bag •... -
Page 8: Leak Test
Start Up There are three potential outcomes of the self test: Self Test Colour Result Action Example Outcome Green Test completed No action 100% functional successfully required Yellow Primus can be Faults must be Loudspeaker failure used with reported or remedied restrictions immediately after use The device has... -
Page 9: Monitoring
Operation Standby Screen Primus activates the standby mode after successful test completion, and will display the standby screen. From the standby screen, you can access the following functions: • Pre set carrier gas, O concentration and fresh gas flow • Set age •... -
Page 10: Operation
Operation • To begin monitoring without ventilation and fresh gas flow press the key while in standby. • To return to standby: press the key again and confirm using the rotary knob. Setting Fresh Gas Concentrations These may be preset in standby. •... - Page 11 Operation Hypoxic Guard Function (SORC) Primus is fitted with a hypoxic guard function (SORC). This is an electronic O minimum delivery system that guarantees at least 25% O whenever N 0 is used as the carrier gas. This prevents the delivery of hypoxic gas mixtures.
-
Page 12: Selecting A Ventilation Mode
Operation Spontaneous Breathing “SPONT” • Switch the APL (pressure limiting valve) to “SPONT”. The breathing system is open for spontaneous breathing. • Press the “Man. Spont.” key and confirm with the rotary knob. Manual Ventilation “MAN” • Switch APL pressure limiting valve to “MAN”. -
Page 13: Mechanical Ventilation
Operation Mechanical Ventilation • Press the desired key e.g. Press. Mode. • Using the soft key, select the ventilation parameter to be preset, then set and confirm with the rotary knob. • To start the ventilation mode confirm with the rotary knob. To return to Man/Spont mode: •... - Page 14 Operation Alarms Setting All alarms can be displayed and set from all 3 basic screens (standard/data/trend) • Press the alarm limits soft key • Use the rotary control to select the alarm limit you wish to change • Confirm change by pressing the rotary control Auto Set Alarm Limits The auto set limits soft key can be...
-
Page 15: Switching To Standby
Operation Switching to Standby/ End of Operation • To activate Standby mode, press hard key and press rotary knob to confirm. • To switch off Primus press the ON/OFF knob. • You will hear a series of beeps when you switch the Primus off. During these beeps, you can switch the Primus back on and the device will continue in the mode it was in. -
Page 16: Emergency Scenarios
Emergency Scenarios Emergency Start Ups • Release the oxygen safety control knob by pressing and set to desired oxygen flow, between 0 and 12 l/min. The oxygen flow is channelled through the vaporiser. Manual ventilation is available at any time. •... -
Page 17: Power Failure
Emergency Scenarios Power Failure In the event of central power supply the message “POWER FAIL” appears on the screen. If the battery is fully charged, Primus can continue operating for at least 30 minutes (typically 90 minutes). Remaining battery capacity will be shown on the screen. -
Page 18: Gas Supply Failure
Emergency Scenarios Gas Supply Failure If the central gas supply fails, the message “No N O, O or AIR DELIVERY” appears on the screen. Air or oxygen will be delivered in place of the gas mixture previously delivered; the amount of fresh gas flow (l/min) will remain the same. -
Page 19: Ventilator Failure
Emergency Scenarios Ventilator Failure In case of ventilator error, the ventilator will stop and display the error message “VENTILATOR FAIL” on the screen. • Fresh gas flow and full monitoring functionality are not affected. Operation automatically switches to Man. Spont.; only manual ventilation is possible. -
Page 20: Mixer Failure
Emergency Scenarios Mixer Failure The message “GAS MIXER FAIL” appears on the screen. • Ventilation and full monitoring functionality are not affected. • Release the oxygen safety control knob by pressing and set to desired oxygen flow, between 0 and 12 L/min. The oxygen flow is channelled through the vaporiser. -
Page 21: Cleaning
Cleaning Please refer to the Primus Instructions for Use for full cleaning and disinfection information. This is intended as a quick guide to disassembling/reassembling the breathing system. Disassembly instructions Removing the Breathing System from the Primus • Remove accessory items such as flow sensors, breathing circuit, filters etc •... - Page 22 Cleaning Disassembly of the Breathing System • Loosen the 5 sealing screws (A) using the Allen Key (B) – Diagram 1 • Remove the cover • Lift off the metal heater plate • Loosen the 3 remaining sealing screws to access the ventilator diaphragm and remove –...
- Page 23 Cleaning Reassembly instructions • Replace the ventilator diaphragm • Replace the breathing block (A) and tighten the 3 sealing screws • Replace the metal heater plate (B) • Replace the cover and tighten the 5 sealing screws (C) • Replace the inspiratory and expiratory ports •...
-
Page 24: Consumable Items
Consumable Items The items below are the most frequently used consumables on the Primus. Part Number Description Pack Size MP00301 Anaesthesia Set Basic 150cm (Latex Free) MP01805 Twinstar® HME Filter MP01850 Ergostar® CM50 (catheter mount) 8290286 Sample Line 8403735 Spirolog flow sensor 8401892 Adult Test Lung MX00001... - Page 25 Notes...
- Page 26 Notes...
- Page 28 Draeger Medical UK Ltd The Willows, Mark Road Hemel Hempstead Herts, HP2 7BW 01442 213542 01442 240327 med-marketing.uk@draeger.com W: www.draeger.co.uk Version 2.0 Reference Number ATT005...
Need help?
Do you have a question about the Primus Series and is the answer not in the manual?
Questions and answers