Minelab F3 Compact Operation Manual
Lightweight compact metal detector
Hide thumbs
Also See for F3 Compact:
- Service manual (77 pages) ,
- Operation manual (49 pages) ,
- Instructions manual (36 pages)
Table of Contents
Advertisement
Quick Links
Advertisement
Table of Contents
Troubleshooting

Related Manuals for Minelab F3 Compact


Summary of Contents for Minelab F3 Compact
- Page 1 COMPACT Lightweight Compact Metal Detector Operations Manual...
- Page 2 Disclaimer As a world leader in metal sensing technology, Minelab strives to continually improve its product range. Minelab reserves the right to introduce changes to the design, technical features and accessories of this product. Patents and Trademarks Patents and trademarks may apply to this product.
- Page 3 COMPACT Lightweight Compact Metal Detector Operations Manual 4901-0174-6...
-
Page 4: Table Of Contents
Contents Introduction ................................6 General Description and Preparation ..................7 Mine Detecting Set ..............................7 F3 Compact Main Components ......................... 8 F3 Compact Preparation ............................10 Functional Description ..........................14 Functional Controls and Displays ........................14 On/Off Switch .................................. 14 Sensitivity Knob ................................15 Ground Balance/Audio Reset Button ........................16... - Page 5 Optional Procedures ............................... 26 Noise Cancel ..................................26 Audio Reset ..................................27 Sweeping Procedure .............................. 29 Pinpointing Procedure..............................30 STEP 1 Mapping the Target ............................31 STEP 2 Pinpointing the Target ..........................32 Multiple Targets ................................. 33 STEP 1 Mapping Multiple Targets........................... 33 STEP 2 Determining the Centre of Target ......................
-
Page 6: Introduction
The inclusion of a Test Piece provides the operator with a quick and easy check to ensure that the detector is working at its operational capability. The F3 Compact also provides a visual indication of detection via a Light Emitting Diode (LED) display. Adjustments to sensitivity and volume settings are possible. If required, the F3 Compact can be programmed to user initiated customised volume and sensitivity selections using Minelab’s configuration software. -
Page 7: General Description And Preparation Mine Detecting Set
General Description and Preparation Mine Detecting Set The F3 Compact is supplied as a mine detecting set (Figure 2), comprising: • Hard Case (optional) • Operations Manual • Detector • Field Guide • Soft Carry Bag • Test Piece • Earset (Speaker On or •... -
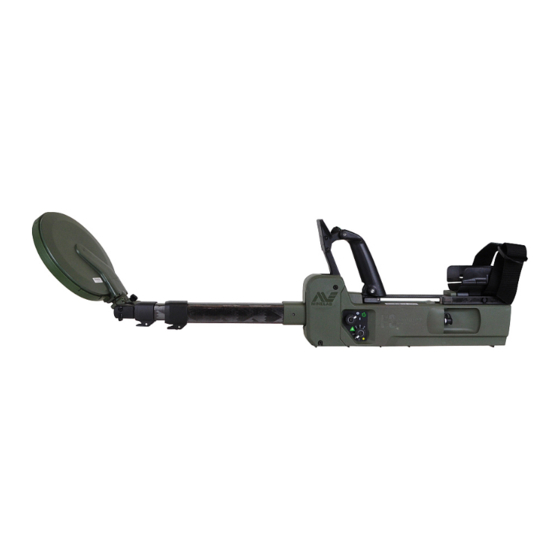
Page 8: F3 Compact Main Components
F3 Compact Main Components Figure 3 identifies the main components of the F3 Compact. Armrest Strap Battery Compartment Armrest Test Piece Earset Connector Handle Assembly Main Body Controls Shaft Hinge Upper Shaft Upper Camlock Middle Shaft Lower Camlock Lower Shaft... - Page 9 Coil — waterproof enclosed coil to eliminate possible interference from vegetation. Skid Plate — removable cover that protects and prolongs the life of the coil thereby reducing maintenance costs. F3 Compact Operations Manual General Description and Preparation | 9...
-
Page 10: F3 Compact Preparation
The F3 Compact requires four C cell batteries for operation. Use only high quality alkaline or rechargeable batteries. Minelab recommends that only rechargeable batteries with a capacity of 5000 mAH or greater be used with the F3 Compact. Rechargeable batteries have specific charge/discharge maintenance requirements, which should be strictly followed to ensure maximum battery life. - Page 11 Figure 5: Guide to unfolding and adjusting the F3 Compact NOTE When the Handle Assembly is locked into position (Frame 3) it will also lock the Upper Shaft in position. To unlock the Handle Assembly and to allow the Upper Shaft to fold when repacking the detector, gently but firmly impact the base of the palm against the top of the handle behind the LED display.
- Page 12 Figure 6: Stowing the handle Figure 7: F3 Compact in the standing, kneeling or prone positions g. Undo the dust caps from the Earset plug and Earset socket on the detector. Gently hold the Earset by the rubber collar using thumb and index finger, the raised double arrow should be uppermost (see Figure 8).
- Page 13 Do not attempt to connect or disconnect the Earset by pushing or pulling on the strain relief or wire at the rear of the rubber collar. The F3 Compact is now ready for use. Refer to "Functional Description" on page 14 for controls, display, and functional information. Refer to "Operating Procedures"...
-
Page 14: Functional Description
Functional Description Functional Controls and Displays For ease of use, all controls and displays for the F3 Compact are located on the Handle Assembly and Main Body. Figure 9 illustrates the location of all controls. LED On/Off and Volume Ground Balance/Audio Reset button... -
Page 15: Sensitivity Knob
(refer to "Functional Tones" on page 20 for a description of the alarm tones). To turn the F3 Compact off, pull out the On/Off Knob and rotate counter-clockwise to the Off position. Release the switch back to the locked position. -
Page 16: Ground Balance/Audio Reset Button
Ground Balance. (Press and hold the Green button) A key feature of the F3 Compact is its ability to detect metallic mines in all ground conditions. False alarms due to mineralised (magnetic/lateritic) soils are automatically removed through the Ground Balance procedure. -
Page 17: Volume Control
Volume Control The default volume level of the F3 Compact is close to maximum. However, volume can be lowered or slightly increased using the volume control feature of the F3 Compact. Volume can be reduced from default in seven steps by pressing and releasing the Noise Cancel button. -
Page 18: Led Display
Small/deep target response Medium target response Large/shallow target response Low battery alarm Figure 13: Typical LED responses NOTE The LED display will always be off when the detector is first switched on. 18 | Functional Description F3 Compact Operations Manual... -
Page 19: Battery Status
Earset Socket The F3 Compact has an internal speaker located inside the Main Body, and can also be fitted with an Earset via the Earset Socket. The procedure for connecting the Earset is described in step 'g' on page 12. -
Page 20: Functional Tones
Functional Tones The F3 Compact emits tones that vary in pitch and volume to alert the operator to targets, automatic detector functions or equipment alarm conditions. The following table summarises the tones that an F3 Compact can produce. Tones Event... -
Page 21: Test Piece - Functional Test
Battery Compartment. Test Piece — Functional Test The F3 Compact is supplied with a Test Piece designed to confirm that the detector is working to correct specifications. The detector should be checked with the Test Piece when the Sensitivity Knob is at Position 4 (default). In some instances, a user may prefer to use inert mines or targets as test pieces because they represent the local threat. -
Page 22: Operating Procedures
Operating Procedures Introduction The F3 Compact is designed to ensure that operation of the detector is as simple as possible. Additionally, the F3 Compact is extremely capable, robust and safe to use, eliminating the need for lengthy training requirements. This chapter describes procedures for safe and effective operation of the F3 Compact. -
Page 23: Step 1 Switch On
Noise Cancel (page 26). c. If the F3 Compact sounds steady but has a constant tone when the coil is away from the ground and metallic targets, perform an Audio Reset (page 27). -
Page 24: Step 2 Ground Balance
‘forget’ the Ground Balance conditions by pressing and holding the green Ground Balance button for five seconds. This will allow the operator to practise the Ground Balance procedures against the same mineralised ground. 24 | Operating Procedures F3 Compact Operations Manual... -
Page 25: Step 3 Test Piece
Type 72A at 150 mm. (Sensitivity knob set to Position 4) Figure 18: Test Piece procedure F3 Compact Operations Manual Operating Procedures | 25... -
Page 26: Optional Procedures
Optional Procedures If after Step ONE the F3 Compact is not quiet and steady, conduct one or both of the following procedures: a. Noise Cancel (page 26) b. Audio Reset (page 27) Noise Cancel If the detector is noisy or affected by interference, conduct Noise Cancel as follows: a. -
Page 27: Audio Reset
Audio Reset Whenever the F3 Compact sounds louder than normal with a constant tone perform the Audio Reset procedure as follows: a. Hold the coil away from any metallic objects. Press and immediately release the green Ground Balance button (green button located on top of the handle). - Page 28 Hold for two seconds DETECTOR NOISE CANCEL NOISY/UNSTABLE AUDIO RESET CONSTANT TONE Beep Beep STEP 2 150 mm GROUND (6 in) BALANCE STEP 3 TESTING WITH TEST PIECE Figure 21: Standard and optional procedures 28 | Operating Procedures F3 Compact Operations Manual...
-
Page 29: Sweeping Procedure
Sweeping Procedure The F3 Compact should be swept with a smooth even motion at a speed of 0.6 m/s (2 ft/s). If the detector is swept too fast or too slow, small or deep targets may be missed. -
Page 30: Pinpointing Procedure
Procedures take precedence). When a target is initially detected, an operator should stand in place and continue to sweep the F3 Compact beyond the target in an attempt to find clear ground. In doing so the operator will: a. Immediately gain an impression of the size of the target prior to commencing the pinpointing procedure;... -
Page 31: Step 1 Mapping The Target
Having detected a target using the sweeping procedure and obtained a rough idea of its size and location, the precise location of the target can be ‘mapped’ using the F3 Compact’s ‘Edge Detection’ technique. Edge detection makes use of the coil’s consistent sensitivity around its circumference to detect the area of a target. -
Page 32: Step 2 Pinpointing The Target
In doing so the volume of the Detection Tone should decrease from maximum, as the coil leaves the centre, and return to maximum as the coil returns to the centre. 32 | Operating Procedures F3 Compact Operations Manual... -
Page 33: Multiple Targets
Figure 25: Mapping multiple targets NOTE To an experienced operator the shape of the mapped area can indicate whether multiple targets may be present. F3 Compact Operations Manual Operating Procedures | 33... -
Page 34: Step 2 Determining The Centre Of Target
WARNING The volume from a large target may mask that of a small target if the small target is located very close to the large target. Figure 26: Multiple targets Maximum Volume 34 | Operating Procedures F3 Compact Operations Manual... -
Page 35: Operating Multiple Detectors In Close Proximity
Operating Multiple Detectors in Close Proximity On occasion it may be necessary to operate F3 Compact detectors in close proximity. In normal circumstances, an F3 Compact detector can operate as close as two metres (seven feet) to another without suffering excessive mutual interference. -
Page 36: Completion Of Operations
Completion of Operations At the completion of operations, the F3 Compact should be checked with the Test Piece before switching off to ensure satisfactory performance before being packed away. Once completed: a. Turn the detector off. b. Clean the detector and inspect for any signs of damage. -
Page 37: Care And Troubleshooting
Do not use solvents or chemicals to clean the F3 Compact. If any part of the detector comes into contact with corrosive substances (including salt water), wash the detector with clean fresh water and dry with a clean cloth. -
Page 38: Troubleshooting
Table 2 provides several troubleshooting procedures in response to a variety of possible problems. Problem Recommended Procedure F3 Compact will not switch on 1. Check batteries have been inserted correctly into the Battery Compartment, or 2. Replace batteries. After switching on there is a 1. -
Page 39: Specifications
–22°F to +176°F Environmental Endurance To MIL-STD-810G Batteries Alkaline 4 × C cell LR14 4 × NiCad or NiMh C cell minimum Rechargeable 5000 mAh capacity Battery Reverse Polarity Protection Battery Status Indicator F3 Compact Operations Manual Specifications | 39... - Page 40 Notes F3 Compact Operations Manual...
- Page 41 Notes F3 Compact Operations Manual...
- Page 42 Notes F3 Compact Operations Manual...
- Page 43 No part of this document may be used or reproduced by any means or by any process, in any form, without the prior written permission of the copyright owner Minelab Electronics Pty Ltd of 2 Second Avenue, Mawson Lakes SA 5095, Australia. COMPLIANCE THIS DEVICE COMPLIES WITH PART 15 OF THE FCC RULES.
- Page 44 Europe & Russia +353 21 423 2352 Minelab Americas Inc. North, South & Central America +1 877 767 6522 Minelab MEA General Trading LLC Middle East & Africa +971 4 254 9995 Minelab Do Brasil Brazil +55 47 3406 3898 countermine@minelab.com.au...
Need help?
Do you have a question about the F3 Compact and is the answer not in the manual?
Questions and answers