Table of Contents
Advertisement
Quick Links
DCHR
Digital Camera Hop Receiver
Fill in for your records:
Serial Number:
Purchase Date:
INSTRUCTION MANUAL
Quick Start Steps
1) Install receiver batteries and turn power on (pg. 5).
2) Set compatibility mode to match the transmitter (pg.
10).
3) Set or sync frequency to match transmitter (see
page 10).
5) Set encryption key type and sync with transmitter
(see page 11).
6) Choose analog or digital (AES3) output (see page
10).
7) Verify RF and audio signals are present.
Rio Rancho, NM, USA
www.lectrosonics.com
Advertisement
Table of Contents

Subscribe to Our Youtube Channel
Related Manuals for Lectrosonics DCHR


Summary of Contents for Lectrosonics DCHR
-
Page 1: Quick Start Steps
INSTRUCTION MANUAL DCHR Digital Camera Hop Receiver Quick Start Steps 1) Install receiver batteries and turn power on (pg. 5). 2) Set compatibility mode to match the transmitter (pg. 10). 3) Set or sync frequency to match transmitter (see page 10). -
Page 2: Table Of Contents
DCHR Table of Contents Quick Start Steps ..............1 DCHR Digital 2-Channel Receiver ........3 Smart Tuning (SmartTune ) ..........3 ™ Encryption ................3 RF Front-End with Tracking Filter ........3 Panels and Features ............. 4 Battery Status LED ............. 5 RF Link LED ................ -
Page 3: Dchr Digital 2-Channel Receiver
(noise bursts and drop- The DCHR has a single audio output jack that can be outs). To alleviate this interference, high-quality front- configured as 2 independent balanced line level out- end filters are needed in the receiver to suppress RF puts or as a single 2 channel AES3 digital output. -
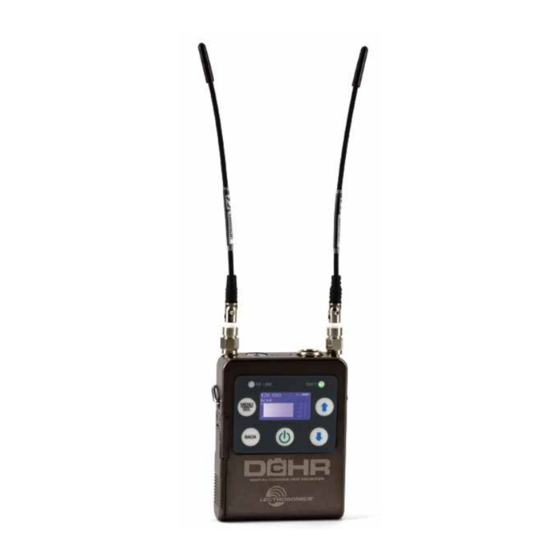
Page 4: Panels And Features
DCHR Panels and Features Audio Output IR (Infrared) Headphone Output Jack Port Jack RF Link Battery Status Belt Clip Mounting Sockets Port Battery Compartment Door When on Main Screen, UP and DOWN buttons will adjust headphone volume. LECTROSONICS, INC. -
Page 5: Battery Status Led
Digital Camera Hop Receiver Battery Status LED USB Port When the battery status LED on the keypad glows Firmware updates via Wireless Designer software are green the batteries are good. The color changes to red made easy with the USB port on the side panel. at a midpoint during the runtime. -
Page 6: Installing Batteries
In the transmitter, use “GET FREQ” or “GET ALL” in the menu to transfer frequency or other information via the IR ports. Hold the DCHR receiver IR port close to the front panel IR port on the transmitter and press GO on the transmitter. - Page 7 UP and DOWN arrows to highlight the desired setup item. Press MENU/SEL to enter the setup screen for that item. Refer to the menu 520.000 RF Level map on the following page. DCHR Headphone Volume 520.000 DCHR Battery life...
-
Page 8: Dchr Lcd Menu Map
DCHR Diversity Select option with arrow buttons Diversity Mode: auto Setup to select. BACK DCHR LCD Menu Map Main Searching... Smart Tune RF Setup Selects open frequency. 470.1 492.6 614.3 Frequency Select frequency with arrow buttons. RF Frequency 607.900 MHz to toggle. - Page 9 BACK Edit Names Edit Names to select. Locale Select option with arrow buttons Locale Locale: to select. BACK Restore Default? Restore Select option with arrow buttons Default to select. BACK About About DCHR V9.00 / V1.00A Rio Rancho, NM...
-
Page 10: Menu Item Descriptions
Duet channel Frequency Scan Output Type Use the scan function to identify a usable frequency. The DCHR has a single audio output jack with two Allow the scan to continue until the entire band has output type options: been scanned. -
Page 11: Tools/Settings
The user must select a key type and create a key Choose to receive (get) settings via IR port from a in the DCHR, and then sync the key with a transmitter transmitter. or receiver. Not available in Universal key mode. - Page 12 608-614 MHz in the tuning range. These frequen- cies are not allowed in North America, so they are not available when NA locale is selected. About Displays general information about the DCHR, includ- ing main firmware running in the receiver. LECTROSONICS, INC.
- Page 13 DCHR. MCTA5PT2 TA5F mini female locking XLR to dual pig tails for two channels of analog audio from DCHR; allows custom connectors to be installed. MCTA5TA3F2 TA5F mini locking female XLR to dual TA3F mini locking XLRs, for two channels of analog audio from DCHR.
-
Page 14: Accessories
Diversity Type: Switched antenna, during digital This optional kit includes the accessories needed to packet headers mount the DCHR on a standard cold shoe, using the Audio Output: wire belt clip that comes with the receiver. Analog: 2 balanced outputs... -
Page 15: Service And Repair
There are no adjustments inside that will make a malfunctioning unit start working. LECTROSONICS’ Service Department is equipped and staffed to quickly repair your equipment. In warranty repairs are made at no charge in accordance with the terms of the warranty. Out-of-warranty repairs are charged at a mod- est flat rate plus parts and shipping. - Page 16 This warranty does not apply to used or demonstrator equipment. Should any defect develop, Lectrosonics, Inc. will, at our option, repair or replace any defective parts without charge for either parts or labor. If Lectrosonics, Inc. cannot correct the defect in your equipment, it will be replaced at no charge with a similar new item.
Need help?
Do you have a question about the DCHR and is the answer not in the manual?
Questions and answers