ZIEHL-ABEGG ZAtop SM180.24/B Assembly Instructions Manual
Hide thumbs
Also See for ZAtop SM180.24/B:
- Original operating instructions (76 pages) ,
- Assembly instructions manual (22 pages)
Table of Contents
Advertisement
Quick Links
Advertisement
Table of Contents

Related Manuals for ZIEHL-ABEGG ZAtop SM180.24/B


Summary of Contents for ZIEHL-ABEGG ZAtop SM180.24/B
-
Page 2: Table Of Contents
General ............RTW 250 - ZAtop SM180.24/B and SM180.35/B ...... -
Page 3: General Information
Exclusion of liability ZIEHL-ABEGG SE is not liable for damage due to misuse, incorrect use, improper use or as a consequence of unauthorized repairs or modifications. -
Page 4: General Safety Instructions
Assembly instructions – model series ZAtop Safety instructions General safety instructions Danger! " " The elevator machine has attachment points: integrally cast eyelets or screwed-on eye bolts, eye plates or steel cable loops. The attachment points are designed exclusively for transporting the elevator machine including brake and traction sheave. -
Page 5: Safety Precautions
Assembly instructions – model series ZAtop Safety precautions 3 Safety precautions Danger! In case safety precautions are not taken: ✓ Can it lead to death or severe injury or significant property damage! ✓ Brake malfunction may result! On installed drives, before replacement of the brake, following safety measures have to be taken: "... -
Page 6: Scope Of Delivery
Designation Pos. Count varistor RTW 250 - ZAtop SM180.24/B and SM180.35/B hexagon head bolt M8 x 130 - 10.9 with washer RTW 350 - ZAtop SM180.45/B hexagon head bolt M10 x 130 - 8.8 with washer RTW 450 - ZAtop SM180.46/B hexagon head bolt M12 x 130 - 8.8 with washer... -
Page 7: Tools Required
Torque wrench for tightening torque 46 Nm, size 17 • Mounting sleeve (ZIEHL-ABEGG article number 70029119) • Lifting eye bolt M10 RTW 250 - ZAtop SM180.24/B and SM180.35/B • Screw wrench size 13 • Torque wrench for tightening torque 32 Nm, size 13 RTW 350 - ZAtop SM180.45/B... -
Page 8: Dismounting The Brake
Assembly instructions – model series ZAtop Dismounting the brake 7 Dismounting the brake During the mounting as well as the dismounting also the operating manual of the brake has to be observed. Risk of death! When dismounting the brake make sure that the cabin and the counterweight are mechanically secured against movement! Caution! "... - Page 9 12. Gradually unscrew the hexagon head bolts (13) alternately in a diagonal configuration with a screw wrench. RTW 250 - ZAtop SM180.24/B and SM180.35/B: Unscrew the hexagon head bolts M8 x 130 - 10.9 (13) with a screw wrench size 13 RTW 350 - ZAtop SM180.45/B:...
- Page 10 14. Detach the brake body (14). ATTENTION! Be aware of the weight of the brake body: RTW 250 - ZAtop SM180.24/B and SM180.35/B approx. 28 kg RTW 350 - ZAtop SM180.45/B approx. 36 kg RTW 450 - ZAtop SM180.46/B approx. 46 kg...
-
Page 11: Mounting The Brake
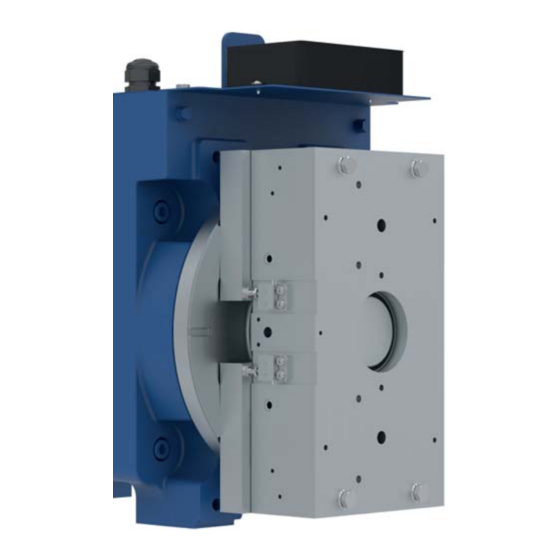
7. Position the brake body (14) on the bearing bracket. ATTENTION! Be aware of the weight of the brake body: RTW 250 - ZAtop SM180.24/B and SM180.35/B approx. 28 kg RTW 350 - ZAtop SM180.45/B approx. 36 kg RTW 450 - ZAtop SM180.46/B approx. 46 kg A-TIA19_13-GB 2027 Index 002 Part.-No. - Page 12 9. Coat the hexagon head bolts (13) with threadlocker Loctite 243 RTW 250 - ZAtop SM180.24/B and SM180.35/B hexagon head bolts M8 x 130 - 10.9 (13) RTW 350 - ZAtop SM180.45/B hexagon head bolts M10 x 130 - 8.8 (13) RTW 450 - ZAtop SM180.46/B hexagon head bolts M12 x 130 - 8.8 (13)
- Page 13 Assembly instructions – model series ZAtop Mounting the brake Figure 8-08 15. Check the air gap "A" between the coil carrier and armature disk when de-energised: Air gap: 0.4 mm ≤ "A" ≤ 0.65 mm This air gap must be present in the area of the horizontal central axis of both armature disks (17).
-
Page 14: Functional Test On Microswitch/Inductive Proximity Switch For Release Monitor
Assembly instructions – model series ZAtop Functional test on microswitch/inductive proximity switch for release monitor 19. Bundle the connection cables (5) of the magnet coils and the release monitoring and lead it into the terminal box (1). 20. Connect the magnet coils, the release monitoring and the varistors (4) according to the wiring diagram (18) in the top cover of the junction box (1). -
Page 15: Adjustment Of The Microswitch/Inductive Proximity Switch For Release Monitor
Assembly instructions – model series ZAtop Adjustment of the microswitch/inductive proximity switch for release monitor 10 Adjustment of the microswitch/inductive proximity switch for re- lease monitor Figure 10-01 Figure 10-02 Adjustment of the microswitches/inductive proximity switches is only necessary if they are not working correctly. - Page 16 Customer Service phone +49 7940 16-308 +49 7940 16-249 drives-service@ziehl-abegg.com Headquarters ZIEHL-ABEGG SE Heinz-Ziehl-Straße · 74653 Künzelsau Germany phone +49 7940 16-0 · fax +49 7940 16-249 drives@ziehl-abegg.de · www.ziehl-abegg.com...
Need help?
Do you have a question about the ZAtop SM180.24/B and is the answer not in the manual?
Questions and answers