
Subscribe to Our Youtube Channel
Related Manuals for Retsch SM 400


Summary of Contents for Retsch SM 400
- Page 1 Manual Cutting Mill SM 400 Translation © Retsch GmbH, 42781 Haan, Retsch-Allee 1-5, Germany | 30.01.2020 Version 0002...
- Page 2 Copyright © Copyright by Retsch GmbH Retsch-Allee 1-5 42781 Haan Germany...
-
Page 3: Table Of Contents
Table of Contents Notes on the manual ..........................6 Disclaimer ............................6 Copyright............................6 Explanation of signs and symbols ..................... 6 Explanations of the Safety Instructions ..................... 6 General Safety Instructions ....................... 7 Repairs ............................... 9 Responsibility of the operating company ................... 9 Personnel qualification and target group of this manual .............. - Page 4 7.2.1 Replacing the cutting bars ......................36 Maintenance ............................ 37 7.3.1 Adjusting the cutting bars ......................37 7.3.2 Checking the safety switch ......................38 Return for Service and Maintenance ....................40 Accessories ............................41 Disposal ..............................42 Index ..............................43...
- Page 5 Notes on the manual...
-
Page 6: Notes On The Manual
This manual does not contain any repair instructions. Please contact your supplier or contact Retsch GmbH directly if anything is unclear or you have questions about these guidelines or the device, or in the case of any faults or necessary repairs. -
Page 7: General Safety Instructions
Notes on the manual − Possible consequences if the danger is ignored. • Instructions and information on how to avoid the risk. Fatal or serious injuries may result if the “Danger” sign is disregarded. There is a very high risk of a life-threatening accident or lasting personal injury. The signal word DANGER additionally used in the running text or in instructions. - Page 8 All those operating, cleaning or working with or on the device. This device is a modern, powerful product from Retsch GmbH and has been developed in line with the state-of-the art. The device is safe to use when operated correctly and when following the instructions in this manual.
-
Page 9: Repairs
1.6 Repairs This manual does not contain any repair instructions. For safety reasons, repairs may only be carried out by Retsch GmbH or an authorised representative or by qualified service technicians. In case of repair, please inform… …the Retsch GmbH representative in your country, …your supplier, or... - Page 10 Notes on the manual Training must be provided in the language of the personnel concerned so that all instructions are understood. As such the following personnel qualifications are necessary: Skilled technical staff as well as external service providers who Assembly, speak German and the language of the operating personnel.
-
Page 11: Confirmation Form For The Managing Operator
Confirmation Form for the Managing Operator Confirmation Form for the Managing Operator This manual contains essential instructions for operating and maintaining the device which must be strictly observed. It is essential that they be read by the user and by the qualified staff responsible for the device before the device is commissioned. -
Page 12: Technical Data
Technical Data Technical Data 3.1 Protective Equipment − This device can only be started when the collecting receptacle has been inserted and screwed tight. − A safety switch on the side of the housing, which is connected to the collecting receptacle, prevents the device starting in an unsafe state. -
Page 13: Motor Rotation Speed
Technical Data ~ 3 000 W (VA) / 400 V / 16 A 3.6 Motor Rotation Speed − 280 revolutions per minute (rpm) 3.7 Dimensions and Weight − Height: ~ 1 768 mm (with standard hopper) − Width: ~ 695 mm − Depth: ~ 648 mm (without standard hopper) −... -
Page 14: Installation Drawing
Technical Data 3.11 Installation drawing... - Page 15 Technical Data...
-
Page 16: Packaging, Transport And Installation
N5.0014 Complaints Incomplete delivery or transport damage − The forwarding agent and Retsch GmbH must be notified immediately in the event of transport damage. It is otherwise possible that subsequent complaints will not be recognised. • Please check the delivery on receipt of the device for its completeness and intactness. -
Page 17: Temperature Fluctuations And Condensation
CAUTION Only deploy suitable lifting apparatus that has been approved for the weight of the device. The SM 400 has a base frame (Z), by which the device can be lifted and transported with the help of lifting apparatus. Using lifting apparatus, e.g. a forklift, drive under the base frame (Z). -
Page 18: Electrical Connection
Packaging, Transport and Installation 33 °C 73.3 % 35 °C 66.7 % 37 °C 60 % 39 °C 53.3 % 40 °C 50 % NOTICE N8.0015 Humidity High relative humidity − Electronic and mechanical components may be damaged. − The performance data alter to an unknown extent. •... - Page 19 Packaging, Transport and Installation Fig. 2: Type plate 1 Device designation 2 Year of production 3 Part number 4 Serial number 5 Manufacturer’s address 6 CE marking 7 Disposal label 8 Bar code 9 Power version 10 Mains frequency 11 Capacity 12 Amperage 13 Number of fuses 14 Fuse type and fuse strength...
-
Page 20: First Commissioning
On delivery, the device is screwed tight onto the transport pallet. Remove the four hexagon screws (SC) from the transport pallet. Using a forklift, lift the SM 400 Secure the four device feet supplied (vibration dampers) to the base frame. -
Page 21: Installing The Fill Hopper
If the device is erected without the feet (vibration dampers), it must be screwed to an even, firm base. Using four suitable hexagon screws, screw the SM 400 tightly to the base. Fig. 4: Device feet: do not push or pull device NOTICE N13.0002... - Page 22 First Commissioning Fig. 6: Universal hopper Fig. 7: Option: Long product hopper...
-
Page 23: Operating The Device
Operating the Device Operating the Device 6.1 Use of the Device for the Intended Purpose CAUTION C6.0005 Risk of injury Potentially explosive atmosphere − The device is not suitable for use in potentially explosive atmospheres. Operating the device in a potentially explosive atmosphere can lead to injuries caused by an explosion or fire. -
Page 24: Principle Of Operation
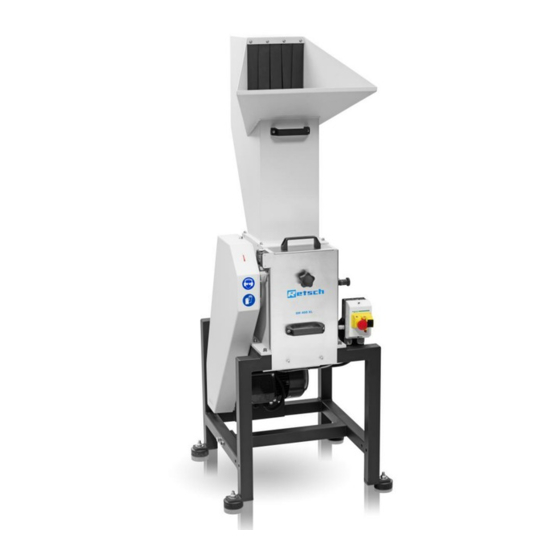
PET preforms, parts of plants, pharmaceutical products, plastic toys, polymers, secondary fuels, straw, textiles, animal feed etc. The Cutting Mill SM 400 is suitable for the preliminary crushing of large pieces of sample material, but depending on the application, frequently achieves the desired final fineness in a single step. - Page 25 Operating the Device Fig. 8: Front view of the device Element Description Function On switch Switching the device on Off switch /Emergency stop Switching the device off Collecting receptacle Receives the crushed sample material and closes the grinding chamber Feed hopper Hopper with hand protection for feeding the sample material Collecting receptacle handle...
-
Page 26: Side View
Operating the Device V-belt cover Covers the V-belt of drive H Base frame Base frame of the device 6.3.2 Side view Fig. 9: Side view of the device Element Description Function Lock Locks the collecting receptacle (drawer) Locking bolt Secures the bottom sieve support Tilt joint Tilt joint on the tipping mechanism Pneumatic spring... -
Page 27: Switching On / Off
Operating the Device Fig. 10: Grinding chamber: bottom sieve and sealing lip Element Description Function Locking bolt Secures the support of the bottom sieve to prevent it falling Mounting screws tipping Secures the tipping mechanism and the bottom mechanism sieve Bottom sieve Replaceable bottom sieve for different levels of final fineness in the grinding material... -
Page 28: Opening And Closing Of The Device
The off button (B) is also used as the emergency stop button. Release the emergency stop button before restarting. Switch the SM 400 on using the on button (A) on the front of the device. Switch the SM 400 off using the off button (B) on the front of the device. -
Page 29: Operation
Fig. 13: Opening and closing the device Opening the device Switch the SM 400 off. Unscrew the locking screw (G). Using the handle (E), pull the collecting receptacle (C) forwards out of the device. Unscrew the two mounting screws (L) of the tipping mechanism. -
Page 30: Adding Sample Material
NOTICE First start the SM 400 before you begin adding sample material! The SM 400 can only be started when a collecting receptacle has been inserted and screwed tight. The maximum feed size must not exceed 170 mm x 220 mm. -
Page 31: Stopping The Grinding Process
Removing the sample material Removing the sample material Switch the SM 400 off. Unscrew the locking screw (G) of the collecting receptacle (C). Using the handle (E), pull the collecting receptacle (C) forwards out of the device. -
Page 32: Replacing The Bottom Sieve
Press the emergency stop button (B) on the front of the device. The emergency stop button (B) engages and prevents an unintentional restart. Turn the emergency stop button (B) to the right to release it and to start the SM 400 again using the on button (A). - Page 33 Operating the Device Remove the bottom sieve (O) from the support (P). Fig. 18: Replacing the bottom sieve NOTICE Due to a cut-out (U) on the side, bottom sieves can only be inserted in one direction. Inserting the bottom sieve ...
-
Page 34: Cleaning, Wear And Maintenance
Improper repairs − Unauthorised and improper repairs can cause injuries. • Repairs to the device may only be carried out by the Retsch GmbH , an authorised representative or by qualified service technicians. • Do not carry out any unauthorised or improper repairs to the device! 7.1 Cleaning... -
Page 35: Removing And Installing The Feed Hopper
Removing the feed hopper Switch the SM 400 off. Disconnect the SM 400 from the power supply and secure to prevent it restarting. Unscrew the four M6 Allen screws (DS). Lift the feed hopper (D) off upwards. -
Page 36: Wear
Removing the feed hopper Switch the SM 400 off. Disconnect the SM 400 from the power supply and secure to prevent it restarting. Remove the four M6 Allen screws (DS). Lift the feed hopper (D) off upwards. -
Page 37: Maintenance
Fig. 21: Replacing the cutting bars Switch the SM 400 off. Disconnect the SM 400 from the power supply and secure to prevent it restarting. Open the SM 400. Tilt the feed hopper backwards. Replacing the rotor cutting bars ... -
Page 38: Checking The Safety Switch
Fig. 22: Adjusting the stator cutting bars Switch the SM 400 off. Disconnect the SM 400 from the power supply and secure to prevent it restarting. Open the SM 400. Tilt the feed hopper backwards. NOTICE The three rotor cutting bars (Q) and the two stator cutting bars (R) are now freely accessible. - Page 39 Result: The safety switch (J) must turn off the drive motor (H). Tighten the locking screw (G) of the collecting receptacle (C). Result: the drive motor (H) does not start. Restarting is only possible using the on button. Switch the SM 400 on using the on button.
-
Page 40: Return For Service And Maintenance
When returning a device, attach the return form to the outside of the packaging. In order to eliminate any health risk to the service technicians, Retsch GmbH reserves the right to refuse the acceptance and to return the respective delivery at the expense of the sender. -
Page 41: Accessories
Retsch GmbH homepage (http://www.retsch.com) under the heading "Downloads" of the device. Information on wear parts and small accessories can be found in the Retsch GmbH general catalogue also available on the homepage. In case of any questions concerning spare parts please contact the Retsch GmbH... -
Page 42: Disposal
Disposal Disposal In the case of a disposal, the respective statutory requirements must be observed. In the following, information on the disposal of electrical and electronic devices in the European Community are given. Within the European Community the disposal of electrically operated devices is regulated by national provisions that are based on the EU Directive 2012/19/EU on Waste Electrical and Electronic Equipment (WEEE). -
Page 43: Index
10 Index Accessories ............41 Electrical connection .......... 18 Adjustment screw ..........27 Electromagnetic compatibility ......12 Ambient temperature .......... 17 EMC ..............12 Amendment status ..........6 Emergency stop ..........25 Amperage ............19 Emergency stop button ........32 Assembly personnel .......... - Page 44 Lock ..............26 replacing ............37 Locking bolt ........25, 26, 27, 32 Rotor cutting bar ..........27 Locking screw ......25, 29, 31, 32, 39 Rotor cutting bars ......... 36, 38 Long product hopper (option) ....... 22, 30 Long-term operation ........... 23 Safety Officer ............
- Page 45 Warranty claims ............ 8 Wrong direction of rotation motor ...... 18 Wear ............. 34, 36 Wear parts ............41 Year of production ..........19 Weight ..............13...
- Page 47 Copyright © Copyright by Retsch GmbH Retsch-Allee 1-5 42781 Haan Germany...
Need help?
Do you have a question about the SM 400 and is the answer not in the manual?
Questions and answers