
Subscribe to Our Youtube Channel
Related Manuals for Retsch PP 25


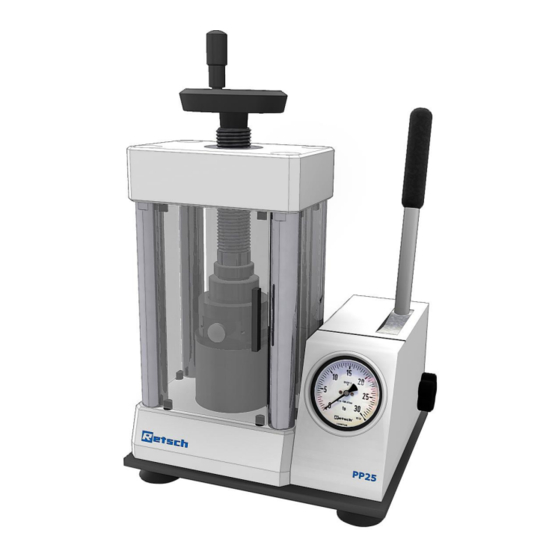
Summary of Contents for Retsch PP 25
- Page 1 Manual Pellet Press PP 25 Translation © Retsch GmbH, 42781 Haan, Retsch-Allee 1-5, Germany | 18.08.2017 Version 0001...
- Page 2 Copyright © Copyright by Retsch GmbH Retsch-Allee 1-5 42781 Haan Germany...
-
Page 3: Table Of Contents
Table of Contents Notes on the Manual ..........................5 Explanations of the Safety Instructions ..................... 6 General Safety Instructions ....................... 7 Repairs ............................... 8 Confirmation ............................9 Packaging, Transport and Installation ....................10 Packaging ............................10 Transport............................10 Temperature fluctuations and condensed water ................10 Conditions for the Installation Site .................... - Page 4 Notes on the Manual...
-
Page 5: Notes On The Manual
This operating manual does not contain any repair instructions. If faults arise or repairs are necessary, please contact your supplier or get in touch with Retsch GmbH directly. Application technology information relating to samples to be processed is not included but can be read on the Internet on the respective device’s page at www.retsch.com. -
Page 6: Explanations Of The Safety Instructions
Notes on the Manual 1.1 Explanations of the Safety Instructions In this Operating Manual we give you the following safety warnings Serious injury may result from failing to heed these safety warnings. We give you the following warnings and corresponding content. WARNING Type of danger / personal injury Source of danger... -
Page 7: General Safety Instructions
Target group : All persons concerned with the machine in any form This machine is a modern, high performance product from Retsch GmbH and complies with the state of the art. Operational safety is given if the machine is handled for the intended purpose and attention is given to this technical documentation. -
Page 8: Repairs
Notes on the Manual 1.3 Repairs This operating manual does not contain any repair instructions. For your own safety, repairs may only be carried out by Retsch GmbH or an authorized representative or by Retsch service engineers. In that case please inform:... -
Page 9: Confirmation
Confirmation Confirmation This operating manual contains essential instructions for operating and maintaining the device which must be strictly observed. It is essential that they be read by the operator and by the qualified staff responsible for the device before the device is commissioned. This operating manual must be available and accessible at the place of use at all times. -
Page 10: Packaging, Transport And Installation
Packaging, Transport and Installation Packaging, Transport and Installation 3.1 Packaging The packaging has been adapted to the mode of transport. It complies with the generally applicable packaging guidelines. 3.2 Transport NOTICE Transport – Mechanical or electronic components may be damaged. •... -
Page 11: Type Plate Description
Packaging, Transport and Installation 3.6 Type Plate Description Fig. 1: Type plate marking 1 Instrument name 2 Year of manufacture 3 Article number 4 Serial number 5 Manufacturer’s address 6 CE marking 7 Waste disposal marking 8 Barcode When making enquiries, please quote the name of the instrument (1) or the article number (3) and serial number (4) of the instrument. -
Page 12: Technical Data
Technical Data 4.1 Use of the Device for the Intended Purpose This manual hydraulic press for a 25-t pressure load is a Retsch laboratory instrument and is suitable for, among other things, preparing samples for X-ray fluorescence analysis and the potassium bromide pellet technique. -
Page 13: Required Floor Space
Technical Data Depth : up to approx. 300 mm Weight : net approx. 50kg 4.6 Required Floor Space 360 mm x 300 mm; no safety spacing required... -
Page 14: Operating The Device
Operating the Device Operating the Device 5.1 Views of the Instrument Fig. 2: Front view of the press... -
Page 15: Overview Table Of The Parts Of The Device
Operating the Device Fig. 3: View of the die tool 5.2 Overview table of the parts of the device Description Function Element Handle hand wheel Grip for turning the hand wheel (hinged) Hand lever Lever for operating the pump Hand wheel For turning the spindle into the pressing position Threaded spindle For tensioning the die tool... -
Page 16: Preparing The Sample Material
Essentially, this improves the durability and surface of the pellets for the subsequent XRF analysis. We recommend the Retsch MM400 for producing a homogeneous mixture of sample material and the wax. Use a plastic beaker made of polystyrenefor mixing (Art. no. 22.041.0003) and 4 grinding balls made of polyamide (Art. -
Page 17: Operating The Die Tool
Operating the Device Operating the Die Tool 5.5.1 Preparing the die tool NOTE Before using the die tool parts for the first time, please clean them with an organic detergent in order to remove any oil residue. • Remove every bit of dirt from the die tool. Fig. -
Page 18: Filling Sample Material Into The Die Tool
Operating the Device Fig. 6: Inserting the lower pressure piece The pressure pieces are ground and polished on one side. • Insert a pressure piece (O) with the ground and polished side (T) facing upwards. Use an aluminium container to increase the durability of the pellets or if you have not mixed any wax with the sample. -
Page 19: Pressing The Tablet
Operating the Device 5.5.3 Pressing the tablet Fig. 4: Inserting the die tool NOTE Damage to the seals and constant loss of pressure A constant build-up of pressure while the cylinder (J) is moved out to the full extent damages the seals. - Page 20 Operating the Device Fig. 5: After the Pressing Procedure • Pull the slide (S) out of the die tool. Fig. 6: Ejecting the pellet • Close the valve (H) by turning in a clockwise direction. • Build up some pressure force by moving the hand lever (B) forwards and backwards until the pellet (PR) along with the pressure pieces fall out of the die tool.
-
Page 21: Instructions On Handling The Die Tool And The Pressing Plates
Operating the Device Fig. 7: Turning the die tool to allow removal • Turn the die tool backwards by 180°. • Remove the die tool. • Then clean the die tool. 5.5.5 Instructions on Handling the Die Tool and the Pressing Plates NOTE Depending on the material and its composition, sample residue (e.g. -
Page 22: Removing The Die Tool And Tablet (2)
Operating the Device The plunger is loose! This means that there is a risk of the plunger (M) dropping downwards when the die tool is being inserted. • Hold the plunger (M) securely when inserting the die tool! Fig. 9: The plunger drops down Fig. - Page 23 Operating the Device Fig. 12: Inserting the pressing plate • Turn the spindle upwards to some degree. • Place the pressing plate (PP) onto the die tool. • Close the valve (H) by turning in a clockwise direction. Fig. 13: Alternative ejection of the pellets CAUTION Risk of fingers being pinched The (P) die tool’s basic body drops downwards as the pellets are being ejected.
-
Page 24: Ventilation
Operating the Device Fig. 14: Removing the pellet • Remove the pellet. CAUTION Risk of fingers being pinched The plunger is loose! This means that there is a risk of the plunger (M) dropping downwards when you take the die tool out. •... -
Page 25: Pressure Test
Operating the Device Fig. 16: • Pull the cylinder plate (G) upwards and off. • Use the supplied hex key to loosen the ventilation screw (ES). • Close the shut-off valve (H). • Using the lever (B), pump very slowly until oil appears in the ventilation opening (ES). It may be necessary to wait until no more air bubbles rise upwards. -
Page 26: Cleaning And Service
Cleaning and service Cleaning and service 6.1 Cleaning Do not clean the press with running water. Use only a cloth dampened with water. Do not use any solvents or aggressive cleaning agents! 6.2 Maintenance The press is for designed for many yearsof operation and requires only very little servicing . From time to time, you should check if the threaded spindle on the press can move easily. -
Page 27: Disposal
Disposal Disposal Please observe the respective statutory requirements with respect to disposal. Information on disposal of electrical and electronic machines in the European Community. Within the European Community the disposal of electrically operated devices is regulated by national provisions that are based on the EU Directive 2002/96/EC on Waste Electrical and Electronic Equipment (WEEE). -
Page 28: Index
Index Index Ambient temperature .......... 10 Maintenance ............26 Article number ............. 11 Maintenance ............26 Manufacturer’s address ........11 Many years of operation ........26 Ball mill..............16 Mixing ..............16 Barcode............... 11 Mixing ratio ............16 Moderate or mild injury ........6 CE marking ............ - Page 29 Index Weight ..............13 Width ..............12 Ventilation ............24 Views of the instrument ........14 XRF ..............16 Waste disposal marking........11 Water ..............26 Year of manufacture .......... 11 Wax ..............16 Wax powder ............16 Weight ..............12...
- Page 36 Copyright © Copyright by Retsch GmbH Retsch-Allee 1-5 42781 Haan Germany...
Need help?
Do you have a question about the PP 25 and is the answer not in the manual?
Questions and answers