
Related Manuals for Retsch PT 300


Summary of Contents for Retsch PT 300
- Page 1 Manual Rotating Sample Divider PT 300/600 Translation © Retsch GmbH, 42781 Haan, Retsch-Allee 1-5, Germany | 27.10.2020 Version 0002...
- Page 2 Copyright © Copyright by Retsch GmbH Retsch-Allee 1-5 42781 Haan Germany...
-
Page 3: Table Of Contents
Table of Contents Notes on the manual ..........................6 Disclaimer ............................6 Copyright............................6 Safety ..............................6 Explanations of the Safety Instructions ..................... 8 General Safety Instructions ....................... 9 Repairs ............................. 10 Responsibility of the operating company ..................10 Personnel qualification and target group of this manual ..............10 Confirmation Form for the Managing Operator................ - Page 4 Disposal ..............................37 Index ..............................39...
- Page 5 Notes on the manual...
-
Page 6: Notes On The Manual
This manual does not contain any repair instructions. Please contact your supplier or contact Retsch GmbH directly if anything is unclear or you have questions about these guidelines or the device, or in the case of any faults or necessary repairs. - Page 7 Safety This device is a modern, powerful product from Retsch GmbH and has been developed in line with the state-of-the art. The device is safe to use when operated correctly and when following the instructions in this manual. People under the influence of intoxicating substances (medications, drugs, alcohol) or who...
-
Page 8: Explanations Of The Safety Instructions
Safety 2.1 Explanations of the Safety Instructions The following warnings in this manual warn of possible risks and damage: DANGER D1.0000 Risk of fatal injuries Source of danger − Possible consequences if the danger is ignored. • Instructions and information on how to avoid the risk. Fatal or serious injuries may result if the “Danger”... -
Page 9: General Safety Instructions
− The conformity declared by Retsch GmbH with the European Directives will lose its validity. − Any warranty claims will be terminated. • Do not make any modification to the device. • Use spare parts and accessories that have been approved by Retsch GmbH exclusively. -
Page 10: Repairs
2.3 Repairs This manual does not contain any repair instructions. For safety reasons, repairs may only be carried out by Retsch GmbH or an authorised representative or by qualified service technicians. In case of repair, please inform… …the Retsch GmbH representative in your country, …your supplier, or... -
Page 11: Confirmation Form For The Managing Operator
Safety Training must be provided in the language of the personnel concerned so that all instructions are understood. As such the following personnel qualifications are necessary: Skilled technical staff as well as external service providers who Assembly, speak German and the language of the operating personnel. commissioning, The usual skills communicated during training, e.g. - Page 12 Safety The managing operator should for legal protection have the user confirm the instruction about the operation of the device. I have read and taken note of the contents of all chapters in this manual as well as all safety instructions and warnings. User Surname, first name (block letters) Position in the company...
-
Page 13: Packaging, Transport And Installation
N5.0014 Complaints Incomplete delivery or transport damage − The forwarding agent and Retsch GmbH must be notified immediately in the event of transport damage. It is otherwise possible that subsequent complaints will not be recognised. • Please check the delivery on receipt of the device for its completeness and intactness. -
Page 14: Conditions For The Installation Site
Packaging, Transport and Installation 3.4 Conditions for the Installation Site NOTICE N7.0021 Ambient temperature Temperatures outside the permitted range − Electronic and mechanical components may be damaged. − The performance data alter to an unknown extent. • Do not exceed or fall below the permitted temperature range (5 °C to 40 °C ambient temperature) of the device. -
Page 15: Electrical Connection
Packaging, Transport and Installation 3.5 Electrical Connection WARNING W2.0015 Risk to life caused by an electric shock Connection to socket without a protective earth conductor − Connecting the device to sockets without a protective earth conductor can lead to life-threatening injuries caused by an electric shock. •... -
Page 16: Transport
Packaging, Transport and Installation 3.6 Transport WARNING W4.0005 Risk of injury due to the device falling down Lifting the device above head height − The device can fall causing serious injuries when lifted above head height. • Never lift the device above head height! NOTICE N10.0018 Transportation lock... -
Page 17: Installing The Device
3.7 Installing the device Place the machine on a firm surface. Only operate the PT 300/600 at an installation site with adequate lighting. Further parameters can be found in the “Technical data” chapter. The machine must be secured before putting it into operation. -
Page 18: Technical Data
Target group: User (operating company), operators Machine type designation: PT 300/600 The PT 300/600 sample divider is used for fast, loss-free and reproducible sample division on free-flowing materials. The dividing process takes place under dry conditions. By using the appropriate module, the PT 300/600 may be deployed both in continuous and batch processing mode. -
Page 19: Divider Modules
Technical data – Parameters can be easily adjusted using the display – Lärm dämm endes Gehäus e NOTICE N12.0007 Range of application of the device Long-term operation − This laboratory device is designed for eight-hour single-shift operation with a duty cycle of 30 %. •... -
Page 20: Emissions
Technical data 4.6 Emissions CAUTION C6.0020 Risk of injury caused by the failure to hear acoustic signals Loud noise during the division process − Loud noise during the division process may lead to the inability to hear acoustic warning signals, and this can result in injuries. •... -
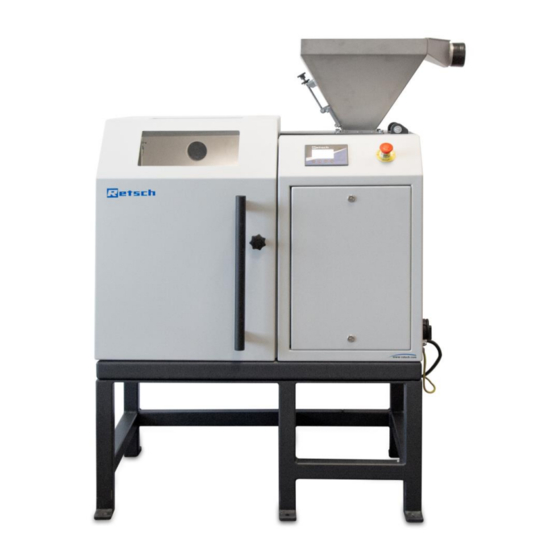
Page 21: Installation Drawing
Technical data 4.11 Installation drawing Fig. 3: PT 300 – Housing door closed Fig. 4: PT 300 – Housing door open... - Page 22 Technical data Fig. 5: PT 600 – Housing door closed Fig. 6: PT 600 – Housing door open...
-
Page 23: Views Of The Device
Views of the device Views of the device 5.1 Front view Fig. 7: Front view Element Description Function Dust extraction for hopper For connecting a dust extraction mechanism using a special adapter. Hopper For filling the material. Knurled screw for gap size For regulating the material flow. -
Page 24: Interior View
Views of the device Element Description Function Housing door Closes the dividing area. Electrical connection For connecting the machine to the power supply. 5.2 Interior view Fig. 8: Interior view Element Description Function Dust extraction for dividing To connect a dust extraction mechanism using a area special adapter. -
Page 25: Operating Elements And Displays
Operating the device 5.3 Operating elements and displays Fig. 9: View of the control panel Element Description Function Control buttons For selecting the settings for the division process. Display Displays the control functions and parameters. Operating the device CAUTION C7.0006 Risk of injury Sample material that is harmful to health −... -
Page 26: Opening The Device
Operating the device 6.1 Opening the device Fig. 10: Opening the housing door • Turn the hand wheel (F) anticlockwise to unlock and open the housing door (G). 6.2 Closing the device Fig. 11: Closing the housing door • Turn the hand wheel (F) clockwise to close and lock the housing door (G). -
Page 27: Preparing The Division Process
Operating the device 6.3 Preparing the division process 6.3.1 Inserting the divider module NOTICE N13.0066 Wear or damage to the machine Operation without a divider module and overloading − Operating the machine without a divider module may lead to increased wear or damage to the machine. -
Page 28: Inserting The Vibratory Feeder
Operating the device 6.3.2 Inserting the vibratory feeder Fig. 14: Hopper Fig. 15: Inserting the vibratory feeder • Open the housing door (G) and swing the hopper (B) to one side in order to insert the vibratory feeder (J) into the slot. •... -
Page 29: Adjusting The Gap Size
Operating the device Use the normal vibratory feeder for material with a feed size of between 15 mm and 30 The vibratory feeder with splashback is recommended for material with a feed size of less than 15 mm. Fig. 3: Machine with inserted vibratory feeder with splashback 6.3.3 Adjusting the gap size Fig. -
Page 30: Connecting The Dust Extraction
Connect a dust extraction mechanism to the hopper (A) or the dividing area (I) if the properties of the material so require. A special adapter for connecting a dust extraction mechanism is available from Retsch GmbH. 6.4 Control panel – Operating the machine 6.4.1 Start menu... -
Page 31: Settings
Operating the device Fig. 19: Start menu – machine is ready for use F1: Start Starts the division process. F2: Stop Stops the division process. F3: Lock Switches to ready for use. “Ready” appears in the display once the housing door has been locked using the hand wheel. - Page 32 Operating the device Runtime (duration of the division process) F1: +1 Extends the duration of the division process. F2: - 1 Shortens the duration of the division process F3: m/s Switches between the minutes/seconds setting F4: Next Opens the next page of the menu. After pressing F4 the following setting appears on the display: Fig.
-
Page 33: Starting The Division Process
Operating the device In this menu you can specify the vibration intensity of the vibratory feeder during the division process. Vibration feeder (vibration strength of the vibratory feeder( F1: +1 Increases the vibration intensity. F2: -1 Reduces the vibration intensity. No function in this selection menu. - Page 34 Operating the device Fig. 24: Display after starting the division process Confirm the safety query by pressing F1 if the hopper (funnel) has been closed. The division process will then start. Confirm the safety query by pressing F4 if the hopper has not been closed. The division process will then not be started, and you will return to the start menu .
-
Page 35: Finishing The Division Process
Operating the device Time Time Provides information about the time left until the division (in minutes and process has been completed. seconds) The division process can be ended at any time by pressing F2. 6.5 Finishing the division process Fig. 26: Front view Fig. -
Page 36: Cleaning
Cleaning The collecting receptacle beneath the dividing area has been filled when using the continuous divider module. Cleaning WARNING W5.0003 Risk to life caused by an electric shock Cleaning live parts with water − Cleaning the device with water can lead to life-threatening injuries caused by an electric shock if the device has not been disconnected from the power supply. -
Page 37: Return For Service And Maintenance
When returning a device, attach the return form to the outside of the packaging. In order to eliminate any health risk to the service technicians, Retsch GmbH reserves the right to refuse the acceptance and to return the respective delivery at the expense of the sender. - Page 38 Retsch GmbH homepage (https://www.retsch.com) under the heading "Downloads" of the device. Information on wear parts and small accessories can be found in the Retsch GmbH general catalogue also available on the homepage. In case of any questions concerning spare parts please contact the Retsch GmbH...
- Page 39 11 Index 15A ..............19 Feed size ............19 Finishing the division process ......35 Frequency ............15 370W..............19 Front view ............ 23, 35 Fuse design ............17 Fuse rating ............17 Adjusting the gap size ......... 29 Ambient temperature .......... 14 Amendment status ..........
- Page 40 Operating instructions ......... 11 Spare parts ............38 Operating the device ........... 25 Start menu ........30, 31, 33, 34 Operation ............16 Starting the division process ......33 Operators ............10 Supply frequency ..........17 Output ..............17 Target group ............6 Packaging ............
- Page 42 Copyright © Copyright by Retsch GmbH Retsch-Allee 1-5 42781 Haan Germany...
Need help?
Do you have a question about the PT 300 and is the answer not in the manual?
Questions and answers