Advertisement
Quick Links
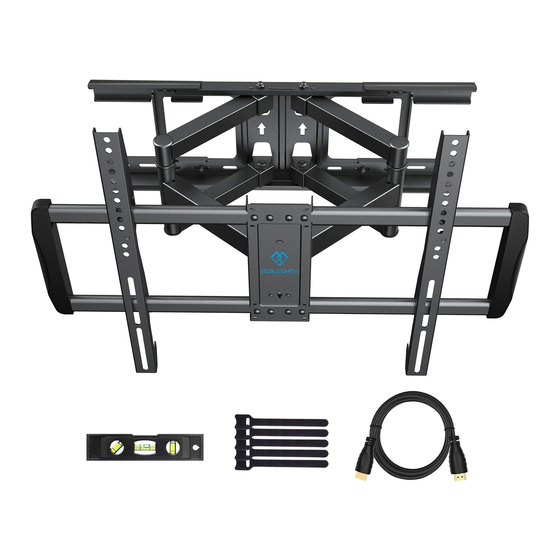
LARGE FULL-MOTION TV WALL MOUNT
E n g l i s h - - - - - - - - - - - - - - - - - - - - - - - -
D e u t s c h - - - - - - - - - - - - - - - - - - - - - - - -
F r a n ç a i s - - - - - - - - - - - - - - - - - - - - - - - -
E s p a ñ o l - - - - - - - - - - - - - - - - - - - - - - - -
I t a l i a n o - - - - - - - - - - - - - - - - - - - - - - - -
Thank you for choosing our product! We strive to provide the best quality and
services for our customers. Would you kindly share your experience on Amazon if
PSLFK3-24
V1.0
1 - 1 0
11 - 2 0
2 1 - 3 0
3 1 - 4 0
4 1 - 5 0
Advertisement

Related Manuals for Perlesmith PSLFK3-24


Summary of Contents for Perlesmith PSLFK3-24
- Page 1 I t a l i a n o - - - - - - - - - - - - - - - - - - - - - - - - 4 1 - 5 0 PSLFK3-24 Thank you for choosing our product! We strive to provide the best quality and...
-
Page 2: Getting Started
The installer is responsible for verifying that the wall structure/surface will safely support the total load. This product may contain moving parts. Use with caution. DO NOT EXCEED THE MAXIMUM WEIGHT CAPACITY FOR THIS PRODUCT. Please check www.perlesmith.com for more products and company information. Tools Needed 1/2 in. 7/32 in. -
Page 3: Hardware Included
Hardware Included Arm and Front Support Arm Extensions TV Brackets Wall Plate End Caps Wall Extension B Wall Extension A Hardware WARNING: This product contains (Wall /Product) small items that could be a choking hazard if swallowed. Before starting assembly, verify Washers Allen Wrench Lag Bolts... - Page 4 STEP 1-1 Select TV Screw Diameter Thread screws by hand into the threaded holes on the back of your TV to select which screw diameter fits your TV. STEP 1-2 Select TV Screw Length Too Short Too Long Correct Correct Measurement...
- Page 5 STEP 1-3 Attach the TV Bracket Position your TV brackets over your TV hole pattern - making sure the brackets are centered and level over the TV hole pattern. Secure the brackets using your screw/washer/spacer selection: (a) for Flat Back (b) for Round Back / Extra space CAUTION: Ensure TV bracket is securely fastened before moving on to the next step.
- Page 6 STEP 2A Wall Plate Installation (Wood stud) Attach the Extensions to the wall plate 2A-1 For studs with the sapce between For 18”(457mm) to 24”(610mm) space studs 16.5“(420mm) to 18”(457mm) only one side need to attach each of the wall plate extensions can be moved extensions A and B 0.6”(15mm) for both side if necessary.
- Page 7 Holes pattern for Mark the 4 inside holes for Use wall plate to mark 16.5”(420mm) to 18” 2A-2 18”(457mm)space studs mounting location x4 locations (457mm) space studs. Only for 24”(420mm)space one sied need to install the Wall studs. Extension left right OPT A OPT B...
- Page 8 STEP 2B Wall Plate Installation (Concrete or brick, No need wall extensions 06A and 06B ) CAUTION: Avoid potential personal injury or property damage! All lag bolts MUST BE firmly tightened to prevent unwanted movement of the wall plate CAUTION: Ensure the wall plate is securely fastened to the wall before continuing on to the next step.
- Page 9 STEP 3 Install Front support and extensions and End cap together. Install the extensions [03] to Front support [02] with the pre-assembled screws. Pre-assembled scews Install the extensions [03] to Front support [02] withe the pre-assembled screws. Pre-assembled scews Finished...
- Page 10 Hang 02 onto 01 and using a screwdriver, secure with preassembled screws STEP 4 Hang TV with brackets [04] onto the arm extensions [02] and [03]. Remove the preassembled screws [S2] and Press the safety locks save to use, then then fasten the removed raise the safety screws [S2].
- Page 11 To adjust the tilt in both sides, loosen both tilt nuts and move panel to Adjustments desired position. Tighten both tilt nuts to hold desired tilt. TIGHTEN ! ! LOOSEN TIGHTEN TO ADJUST TV LEVEL, loosen the two screws [S1] on the rear of the arm plate, adjust level, and retighten to secure.
Need help?
Do you have a question about the PSLFK3-24 and is the answer not in the manual?
Questions and answers