Advertisement
Quick Links
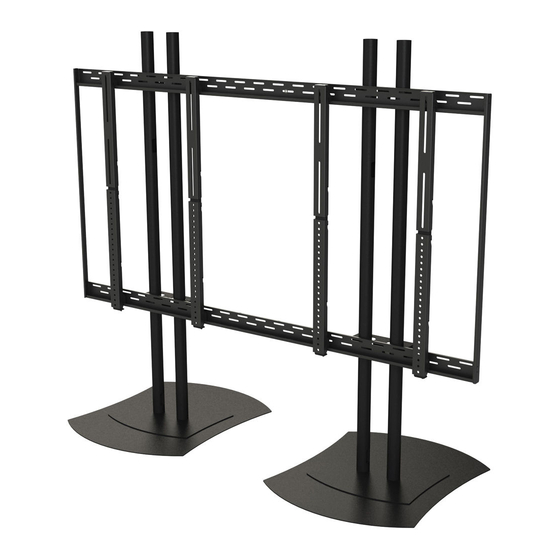
Installation and Assembly:
Universal 2x2 Video Wall Stand for 40" - 46" Flat Panel Displays
Model: DS-VWS546-2X2
COMPATIBILITY FORMULA
Display must be at least 36" wide and 20.75" high
Width of the display + width of the mounting hole pattern < 1733 mm
Height of the display + height of the mounting hole pattern < 1136 mm
1 of 11
ISSUED: 01-16-13 SHEET #: 125-9398-1 01-16-13
Advertisement

Related Manuals for peerless-AV DS-VWS546-2X2


Summary of Contents for peerless-AV DS-VWS546-2X2
- Page 1 Installation and Assembly: Universal 2x2 Video Wall Stand for 40" - 46" Flat Panel Displays Model: DS-VWS546-2X2 COMPATIBILITY FORMULA Display must be at least 36” wide and 20.75” high Width of the display + width of the mounting hole pattern < 1733 mm Height of the display + height of the mounting hole pattern <...
-
Page 2: Table Of Contents
NOTe: Read entire instruction sheet before you start installation and assembly. WARNING • Do not begin to install your Peerless product until you have read and understood the instructions and warnings contained in this Installation Sheet. If you have any questions regarding any of the instructions or warnings, for US customers please call Peerless customer care at 1-800-865-2112, for all international customers, please contact your local distributor. • This product should only be installed by someone of good mechanical aptitude, has experience with basic building construction, and fully understands these instructions. • Always use an assistant or mechanical lifting equipment to safely lift and position equipment. • Tighten screws firmly, but do not overtighten. Overtightening can damage the items, greatly reducing their holding power. • This product is intended for indoor use only. Use of this product outdoors could lead to product failure and personal injury. Tools Needed for Assembly • PHILLIPS SCREW DRIVER •... -
Page 3: Parts List
Parts List Part Description Quantity Part Number clamp 145-1734 FPZ-600 base 201-1037 FPZ-600 main tube 580-1159 fender washer 540-1008 M6 x 40mm phillips screw 520-1584 set screw 520-9566 bumper strip 570-1030 security wrench 560-9646 wall plate 145-1342 left bracket 145-1345 right bracket 145-1344 hook on bracket 145-1356 top bracket 145-1347 bottom bracket 145-1348 M6 x 12mm phillips screw 520-1128 M8 x 15mm phillips screw 520-9257 nylon shoulder washer... - Page 4 4 of 11 ISSUED: 01-16-13 SHEET #: 125-9398-1 01-16-13...
-
Page 5: Wall Plate Assembly
WALL PLATe ASSeMBLY Attach two wall plates (I) together using left and right connection brackets (j and k) with eight M5 x 12 mm phillips screws (S), #10 flat washer (W), #10 lock washer (V) as shown below. 5 of 11 ISSUED: 01-16-13 SHEET #: 125-9398-1 01-16-13... -
Page 6: Base Plate Assembly
BASe PLATe ASSeMBLY OPTIONAL: LeVeLLINg BASe USINg BUMPeR STRIP For some situations, bumper strip (g) may be required Attach FPZ-600 main tubes (C) to FPZ-600 base (B) to keep base (B) level. cut bumper strip into five equal using eight set screws (F). pieces and adhere one piece to each corner and one piece to center of bottom side of base. Note: The bumper strip pieces may also be used in other locations to properly level stands. BRACkeT ASSeMBLY Secure video wall mount assembly to FPZ-600 main tubes (C) to clamps (A) using twelve M6 x 40mm phillips screws (e) with fender washers (D). 6 of 11 ISSUED: 01-16-13 SHEET #: 125-9398-1 01-16-13... -
Page 7: Display Bracket Assembly
DISPLAY BRACkeT ASSeMBLY Note: Determine Display being used and select appropriate bracket assembly length based on dimension "Y". Fasten eight M5 x 12 mm phillips screws (S) into each hook on bracket (L) leaving 1/8" of exposed thread Y-RANGE as shown below. Repeat step for each hook on bracket. BACK Of DISPLAYS 40.41" 44.73" (1026mm) (1136mm) Hook one the bottom adapter bracket (N) onto the exposed threads on the hook on bracket (L) as shown below. Hook one the top adapter bracket (M) onto the exposed threads on the hook on bracket (L) as shown below. NOTe: Do not tighten the screws on the hook on bracket (L). 7 of 11 ISSUED: 01-16-13 SHEET #: 125-9398-1 01-16-13... -
Page 8: Attaching Brackets To Display
ATTAChINg BRACkeTS TO DISPLAYS Attach top and bottom adapter brackets (M and N) to back of displays using eight M6 x 12 mm phillips screws (O) with nylon shoulder washer (q); eight M8 x 15 mm phillips screws (P); or eight M6 x 16 mm phillips screws (Y) as shown below. NOTe: Make sure that nylon shoulder washer (q) is positioned as show. O,P, or Y O,P, or Y M or N SeCURINg BRACkeTS TO WALL PLATeS Detach hook on bracket (L) from top and bottom adapter brackets (M and N) as shown below. 8 of 11 ISSUED: 01-16-13 SHEET #: 125-9398-1 01-16-13... - Page 9 Attach two hook on brackets (L) onto wall plate as shown. Determine screen VESA mounting pattern and use measure plate (X) to space hook on bracket as show below. Repeat step with remaining hook on brackets (L). MeASURe PLATe DeTAIL MAIN TUBES Hook bottom adapter brackets (N) onto exposed AND BASES NOT threads on hook on bracket (L) as shown below. ILLUSTRATED Repeat step with second display. Position displays together so they sit flush. MAIN TUBES AND BASES NOT ILLUSTRATED 9 of 11 ISSUED: 01-16-13 SHEET #: 125-9398-1 01-16-13...
- Page 10 Hook one top adapter bracket (M) onto exposed threads on hook on bracket (L) as shown below. Repeat step with second display. MAIN TUBES AND BASES NOT ILLUSTRATED Secure top adapter brackets (M) to hook on brackets (L) using four M5 x 10 mm socket pin type-F screws (R) as shown below. MAIN TUBES AND BASES NOT ILLUSTRATED 10 of 11 ISSUED: 01-16-13 SHEET #: 125-9398-1 01-16-13...
- Page 11 Once displays are in desired position, secure using four security screws located on bottom of hook on brackets (L). MAIN TUBES AND BASES NOT ILLUSTRATED COMPLeTe DS-VWS546-2X2 11 of 11 ISSUED: 01-16-13 SHEET #: 125-9398-1 01-16-13 © 2013, Peerless Industries, Inc. All rights reserved. Peerless Industries, Inc. 2300 White Oak Circle All other brand and product names are trademarks or registered trademarks of their respective owners. Aurora, Il 60502 www.peerless-av.com...
Need help?
Do you have a question about the DS-VWS546-2X2 and is the answer not in the manual?
Questions and answers