
Subscribe to Our Youtube Channel
Related Manuals for peerless-AV DS-VW755S


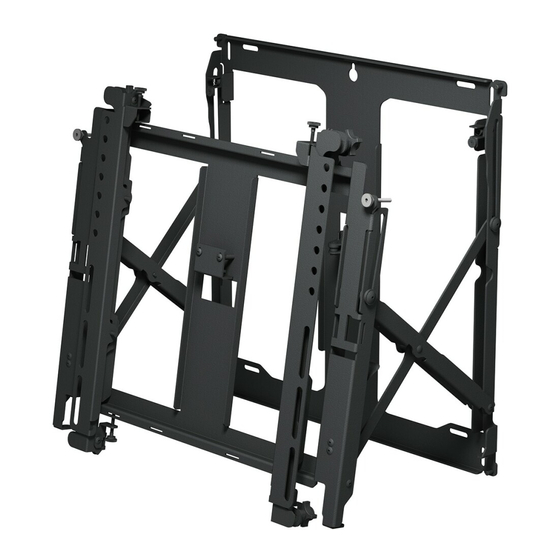
Summary of Contents for peerless-AV DS-VW755S
- Page 1 DS-VW755S 46" - 65" 80 lb (117 - 165 cm) (36 kg) ČEŠ TÜR 2017-06-12 #:146-9016-5 (2022-11-01)
- Page 2 WARNING ENG - This product is designed to be installed on plywood and wood stud. Hardware is included for wood stud and plywood installation. Before installing make sure the supporting surface will support the combined load of the equipment and hardware. Screws must be tightly secured. Do not overtighten screws or damage can occur and product may fail.
- Page 3 VÝSTRAHA ČEŠ - Před instalací se ujistěte, že podpůrný povrch udrží součet zatížení zařízení a hardwaru. Šrouby je třeba dotáhnout napevno. Nedotahujte šrouby nadměrně, jinak by mohlo dojít ke škodám a selhání funkce výrobku. Nikdy nepřekračujte maximální kapacitu zatížení. Vždy používejte pomoc druhé osoby nebo mechanického zdvižného zařízení...
- Page 4 Symbols Símbolos Symboles Symbole Symbolen WARNING Simboli ADVERTENCIA ČEŠ Symboly Skip to step. ADVERTISSEMENT Symboly Continúe con el ACHTUNG Screws must get at least three Símbolos paso. WAARSCHUWING full turns and fit snug. Semboller TÜR Passez à l’étape. AVVERTENZA Los tornillos tienen que dar, Weiter mit Schritt.
- Page 5 Tools Needed for Assembly. Herramientas necesarias para el ensamblaje. Outils nécessaires au montage. To properly tighten screws: Tighten until screw Für den Zusammenbau erforderliche Werkzeuge. head makes contact, then tighten another 1/2 Voor montage benodigd gereedschap. turn. Do not overtighten screws. Attrezzi necessari per l’assemblaggio.
- Page 6 Parts (Before beginning, make sure you have all parts shown below). Piezas (antes de iniciar, asegúrese de tener todas las piezas siguientes). Pièces (avant de commencer, assurez-vous d’avoir toutes les pièces illustrées ci-dessous). Teile (Achten Sie vor Beginn der Arbeiten darauf, dass alle unten abgebildeten Teile vorhanden sind). Onderdelen (hoort u zich ervan te overtuigen dat u alle onderdelen hebt, die hieronder te zien zijn).
-
Page 7: Table Of Contents
E ( 5 ) I ( 4 ) #14 x 2.5" wood screw cable tie D ( 2 ) K ( 2 ) H ( 2 ) J ( 1 ) thumb screw #10-32 x 1" 10-32 x 1/2" 4mm allen wrench N ( 4 ) O ( 4 ) M ( 4 ) - Page 8 Optional. Reference (DS-VWRS series) instructions for additional information (sold separately). Opcional. Consulte las instrucciones de los (serie DS-VWRS) para obtener más información (vendidas por separado). Facultatif. Reportez-vous aux instructions des modèles (gamme de DS-VWRS) pour plus de renseignements (vendue séparément). Fakultativ.
- Page 9 Plywood. Wood stud wall. Madera contrachapada. Pared de madera. Contreplaqué. Mur en bois. Sperrholz. Holzwand. Multiplex. Houten muur. Legno compensato. Parete di legno. Překližka. ČEŠ Dřevěná stěna. ČEŠ Preglejka. Drevená stena. Contraplacado. Parede de madeira. Kontraplak. TÜR Ahşap duvar. TÜR WARNING ENG - When installing Peerless wall mounts on a wood stud wall covered with gypsum board (drywall), verify that the wood studs are a minimum of 2"...
- Page 10 AVVERTENZA ITL - In sede d’installazione dei sostegni Peerless per parete su una parete con montanti di legno ricoperti con muro a secco (cartongesso), verificare che i montanti di legno abbiano una dimensione nominale minima di 5 cm x 10 cm. Non installare su cartongesso spesso più di 1,60 cm. Se su una parete a montanti di legno vengono installati più...
- Page 11 2a-1 ENG When installing more than one display to a wood stud wall reinforced with plywood (minimum Grade BC, 1/2" thick) that may be covered in gypsum board (drywall) up to 5/8" thick, the mounting surface must be plumb (+/- .25") across the height of the video wall and straight (+/- .25") across the width of the video wall. Al instalar más de una pantalla en una pared con montantes de madera con contrachapado reforzante (de grado BC mínimo, 1/2"...
- Page 12 2a-2 Locate display center for bottom left display. Localice el centro de la pantalla inferior izquierda. Localisez le centre de l'écran inférieur gauche. 9-7/8" Bestimmen Sie die Bildschirmmitte des unteren (251mm) linken Bildschirms. Bepaal het midden van het linkerscherm op de onderste rij.
- Page 13 2a-5 Use stud finder to locate and mark stud center lines. Marque las líneas centrales del montante. Marquez la ligne médiane du montant. Markieren Sie die Ständer-Mittellinien. Markeer het midden van de balken. Contrassegna le linee centrali dei montanti. ČEŠ Vyznačte střední...
- Page 14 2a-7 2.5" (64mm) 5/32" 5/32" (4mm) (4mm) Drill mounting holes into supporting surface (2.5" (64mm) minimum depth required). Taladre los agujeros de montaje en la superficie de apoyo; se requiere una profundidad mínima de Mounting hole must center on stud. 2.5"...
- Page 15 This page intentionally left blank. Página en blanco. Cette page a été laissée en blanc intentionnellement. Diese Seite wurde absichtlich freigelassen. Deze pagina is met opzet blanco gelaten. Pagina lasciata intenzionalmente vuota. Tato strana je záměrně prázdná. ČEŠ Táto strana je zámerne prázdna. Esta página foi intencionalmente deixada em branco.
- Page 16 WARNING ENG - When installing Peerless wall mounts on a wood stud wall covered with plywood, verify that the wood studs are a minimum of 2" x 4" nominal size and plywood is a minimum Grade BC, 1/2" (13mm) thick. Plywood may be covered by gypsum board (drywall) up to 5/8"...
- Page 17 2b-1 ENG When installing more than one display to a wood stud wall reinforced with plywood (minimum Grade BC, 1/2" thick) that may be covered in gypsum board (drywall) up to 5/8" thick, the mounting surface must be plumb (+/- .25") across the height of the video wall and straight (+/- .25") across the width of the video wall. Al instalar más de una pantalla en una pared con montantes de madera con contrachapado reforzante (de grado BC mínimo, 1/2"...
- Page 18 2b-2 Locate display center for bottom left display. Localice el centro de la pantalla inferior izquierda. Localisez le centre de l'écran inférieur gauche. 9-7/8" Bestimmen Sie die Bildschirmmitte des unteren (251mm) linken Bildschirms. Bepaal het midden van het linkerscherm op de onderste rij.
- Page 19 2b-5 Level wallplate. Mark mounting hole on plywood (must be minimum Grade BC, 1/2" (13mm) thick). Nivele la placa de pared. Marque los puntos de los agujeros de montaje en el contrachapado (tiene que ser de Grado BC como mínimo, de un grosor de 1/2"...
-
Page 20: E ( 5 )
2b-7 3/8" 1/4" (10mm) (6mm) 2b-8 2017-06-12 #:146-9016-5 (2022-11-01) - Page 21 2b-9 Level wallplate. Mark mounting holes on plywood (must be minimum Grade BC, 1/2" (13mm) thick). Nivele la placa de pared. Marque los puntos de los agujeros de montaje en el contrachapado (tiene que ser de Grado BC como mínimo, de un grosor de 1/2" (13mm)).
-
Page 22: D ( 2 )
2b-11 Level wallplate. Install using wood screws provided. Nivele e instale. Mettez à niveau et procédez au montage. 3/8" Waagerecht ausrichten und anbringen. (10mm) Installeer de schroeven waterpas. Livella e installa. Vyrovnejte a namontujte. ČEŠ Vyrovnajte a namontujte. Tighten. Nivelar e instalar. Apretar. - Page 23 Verify that adaptor brackets are nominal before proceeding. Verifique que los soportes adaptadores estén en la misma posición antes de proceder con la instalación. Assurez-vous que les supports adaptateurs sont dans la position nominale avant de procéder à l'installation. Vergewissern Sie sich vor den nächsten Schritten, dass alle Adapterhalterungen die vorgeschriebene Stellung aufweisen.
-
Page 24: J ( 1 )
Remove. Quite. Retirez. Entfernen. Verwijderen. Rimuovere. Odstranit. ČEŠ Odstrániť. Remova. Çıkartın. TÜR Optional security screws. Tornillo de seguridad opcional para trabar el soporte cerrado. Vis de sécurité facultative pour verrouiller le support en position fermée. Optionale Sicherheitsschraube zum Verriegeln der Halterung. Facultatieve veiligheidsschroef om de bevestiging mee in de gesloten positie vast te zetten. -
Page 25: F ( 4 )
Use of spacers is optional. Uso de espaciadores opcional. Facultatif utilisation d’entretoises. Fakultativ Verwendung von Abstandhaltern. Facultatief gebruik van tussenringen. Uso opzionale di distanziatori. Volitelné použití rozpěr. ČEŠ Voliteľné použitie rozpierok. Opcional utilize espaçadores. Ayırıcıların ísteğe bağli kullanımı. TÜR G (2) G (2) 2017-06-12 #:146-9016-5... - Page 26 Tighten. Apretar. Serrer. Anziehen. Aandraaien. Stringere. ČEŠ Utáhněte. Utiahnite. Apertar. Sıkmak. TÜR ± 3/8" (± 9.5mm) Optional: Adjustment. Opcional: Ajuste. ± 1/2" Facultatif: Réglage. (± 12.7mm) Fakultativ: Instellung. Facultatief: Aanpassing. Opzionale: Regolazionei. Volitelné: Nastavení. ČEŠ Voliteľné: Nastavenie. Opcional: Ajuste. İsteğe bağli: Ayarı. TÜR 2017-06-12 #:146-9016-5...
- Page 27 Optional: Adjustment. Opcional: Ajuste. Facultatif: Réglage. Fakultativ: Instellung. Facultatief: Aanpassing. Opzionale: Regolazionei. Volitelné: Nastavení. ČEŠ Voliteľné: Nastavenie. Opcional: Ajuste. İsteğe bağli: Ayarı. TÜR 2017-06-12 #:146-9016-5 (2022-11-01)
-
Page 28: I ( 4 )
Optional: Cable management. Opcional: Manejo de cables. Facultatif: Gestion des câbles. Fakultativ: Kabelführung. Facultatief: Kabelbeheer. Opzionale: Gestione dei cavi. Volitelné: Vedení kabelů. ČEŠ Voliteľné: Vedenie káblov. Opcional: Gestão de cabos. İİsteğe bağli: Kablo yönetimi. TÜR 2017-06-12 #:146-9016-5 (2022-11-01) -
Page 29: K ( 2 )
11-1 Fully extend for servicing only. Close after servicing. Extiéndalo totalmente solo para realizar reparaciones. Ciérrelo después de realizarlas. Entièrement déployé pour entretien seulement. Fermez après l’entretien. Nur zu Wartungszwecken ganz ausziehen. Nach der Wartung schließen. Alleen geheel uittrekken voor onderhoud. Na de onderhoudsbeurt sluiten. Allungare completamente solo per la manutenzione. -
Page 30: H ( 2 )
11-3 Gently press on the front of the display with ACC-DHK pads until the mount is re-engaged. Presione delicadamente la parte delantera de la pantalla con las almohadillas ACC-DHK hasta que el soporte se vuelva a enganchar. Appuyez délicatement sur l'avant de l'écran muni des plaques ACC- DHK jusqu'à... - Page 31 Hand tighten. Apriete a mano. Serrer à la main. Handfest anziehen. Draai met de hand aan. Serrare a mano. Dotáhněte rukou. ČEŠ Utiahnite rukou. Aperte à mão. Elle sıkıştırılabilir. TÜR Optional. Opcional. Facultatif. Optional. Facultatief. Opzionale. Volitelné. ČEŠ Voliteľné. Opcional. İsteğe Bağli.
- Page 32 Garantia TÜR Garantı̇ Garanzia Záruka www.peerless-av.com/warranty Peerless-AV Peerless-AV Europe Peerless-AV América Latina 2300 White Oak Circle Unit 3 Watford Interchange, Av. de las Industrias 413 Aurora, IL 60502 Colonial Way, Watford, Herts, Parque Industrial Escobedo Email: tech@peerlessmounts.com WD24 4WP, United Kingdom General Escobedo N.L., México 66062...
Need help?
Do you have a question about the DS-VW755S and is the answer not in the manual?
Questions and answers