Welbilt Convotherm easyTouch OES 6.10 mini Operating Manual
Combi oven
Hide thumbs
Also See for Convotherm easyTouch OES 6.10 mini:
- Installation, operation and maintenance manual (62 pages) ,
- User manual (177 pages) ,
- Installation manual (148 pages)
Table of Contents
Advertisement
Advertisement
Chapters
Table of Contents
Troubleshooting

Related Manuals for Welbilt Convotherm easyTouch OES 6.10 mini


Summary of Contents for Welbilt Convotherm easyTouch OES 6.10 mini
- Page 1 Combi Oven OES 6.10 mini easyTouch Operating manual UL, USA – Original, ENG...
- Page 3 FOR THE INSTALLER, OPERATOR, RESPONSIBLE OWNER FOR YOUR SAFETY Do not store or use gasoline or other flammable vapors or liquids in the vicinity of this or any other unit. WARNING Improper installation, adjustment, alteration, service or maintenance can cause property damage, injury and death. Read the installation, operating and maintenance instructions thoroughly before installing or servicing this equipment.
-
Page 5: Table Of Contents
Table of Contents Table of Contents General Environmental Protection Identifying Your Combi Oven Customer Documentation Structure Safety Information That Must Be Read without Exception About this operating manual Configuration and Functions Basic overview of how the combi oven works The Combi Oven's Configuration and Functions Control Panel Layout and Functions For Your Safety Basic Safety Instructions... - Page 6 Table of Contents 5.3.7 The 'Sounds' menu 5.3.8 The 'Password' menu 5.3.9 The 'Backup/Restore' menu 5.3.10 The 'Import/Export' menu How to Work with the Touchscreen Entering Cooking Data 6.1.1 Setting Up a Cooking Program 6.1.2 Setting Up a Rethermalization Program Using Extra Functions and Special Programs 6.2.1 Using Delta-T Cooking...
- Page 7 Table of Contents 9.2.2 Cooling Down the Oven 9.2.3 Cleaning the oven automatically 9.2.4 Cleaning a Cold Oven Cavity Semi-Automatically 9.2.5 Cleaning a Hot Oven Cavity Semi-Automatically 9.2.6 Using the ConvoClean System's Fully Automatic Cleaning Sequence to Clean the Oven When It Is Cold 9.2.7 Using the ConvoClean System's Fully Automatic Cleaning Sequence to Clean the Oven When It Is Hot...
-
Page 8: General
1 General 1 General Purpose of this section This section provides information on how to identify your combi oven and how to use this manual. 1.1 Environmental Protection Policy statement Our customers' expectations, the legal regulations and standards we have to follow, and our compa‐ ny's reputation are what drives the quality and service behind all our products. -
Page 9: Identifying Your Combi Oven
1 General 1.2 Identifying Your Combi Oven Nameplate location The nameplate is found on the left side of the combi oven. Nameplate layout and structure The nameplate makes it easy to identify your unit. The nameplate has the following layout: Designation Unit name Combi Oven Trade name... -
Page 10: Customer Documentation Structure
1 General 1.3 Customer Documentation Structure Customer documentation parts The customer documentation for the combi oven is made up of the following: Installation manual ■ Operating manual (this manual) ■ Operating instructions for easyStart mode ■ Help pages integrated into the software (excerpt from the operating manual) ■... -
Page 11: Safety Information That Must Be Read Without Exception
1 General 1.4 Safety Information That Must Be Read without Exception Safety information found in the documentation for the customer The most important safety information for the combi oven is essentially found in the installation manual and operating manual. The installation manual provides safety information for the transportation, setup, installation, placing- into-operation, and removal-from-service tasks it describes. -
Page 12: About This Operating Manual
1 General 1.5 About this operating manual Purpose The purpose of this operating manual is to provide everyone working with/on the combi oven with the information they will need to carry out operation, cleaning, and limited maintenance work safely and correctly. Target groups This operating manual is intended for the following target groups: Name of target group... - Page 13 1 General Section / sub-section Purpose Target group Cleaning and mainte‐ Includes the cleaning schedule Cook ■ nance Operator Provides the maintenance schedule where relevant to the ■ operator Provides cleaning instructions ■ The cooking programs in Goes over the cooking programs Cook your combi oven Coming Up with Your...
-
Page 14: Configuration And Functions
2 Configuration and Functions 2 Configuration and Functions Purpose of this section This section describes the combi oven's configuration and explains its functions. 2.1 Basic overview of how the combi oven works Basic cooking programs Your combi oven can be used to cook a variety of food. To do this, you can use any of the following basic cooking programs on the combi oven: Steam ■... -
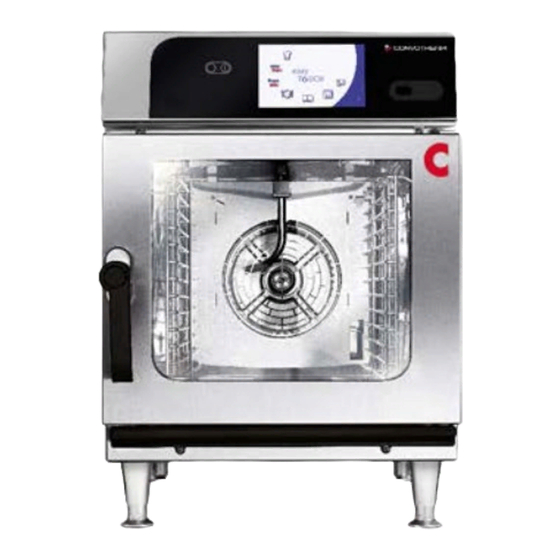
Page 15: The Combi Oven's Configuration And Functions
2 Configuration and Functions 2.2 The Combi Oven's Configuration and Functions Combi oven's configuration The following figure illustrates the combi oven: The combi oven's parts and what they do Following is a description of what the combi oven's parts do: Designation Function Ventilation port Draws in ambient air in order to remove moisture... - Page 16 2 Configuration and Functions Only use standard size bakeware (containers, oven racks, and sheet pans) with appropriate dimen‐ sions. The rack can accommodate a variety of sheet pans, bakeware, and oven racks. The specific ones lis‐ ted above are provided only as an example. In addition, custom rack configurations with customized loading capacities are available.
-
Page 17: Control Panel Layout And Functions
2 Configuration and Functions 2.3 Control Panel Layout and Functions Control panel layout The figure below shows the control panel: Control panel parts Following is an explanation of what the control panel's parts do: Designation Function Main switch Used to turn the combi oven on and off Touchscreen Central combi oven controls Used by touching the icons on the touchscreen... -
Page 18: For Your Safety
3 For Your Safety 3 For Your Safety Purpose of this section The purpose of this section is to provide you with all the information you will need in order to safely work with/on the combi oven without putting yourself and others at risk. Read this section very carefully! 3.1 ... -
Page 19: Your Combi Oven's Intended Use
3 For Your Safety 3.2 Your Combi Oven's Intended Use The combi oven's intended use The combi oven has been designed and built exclusively for cooking a variety of food in standard- ■ size bakeware (steam table pans, sheet pans, etc.). Steam, convection, and combi-steam (steam superheated without pressure) are used for this purpose. - Page 20 3 For Your Safety Prerequisites for cleaning Only use the cleaning agents approved by the manufacturer. ■ Do NOT use a pressure washer to clean the unit. ■ Do NOT use a water jet to clean the outside of the unit. Do not use a water jet for anything other ■...
-
Page 21: Warning Labels On The Combi Oven
3 For Your Safety 3.3 Warning Labels on the Combi Oven Warning label locations The warning labels are found at the following locations on the combi oven: Warning labels on unit door The following warning labels (1) are located on the unit door: Warning Description Hot food, hot bakeware, and hot liquid warning... - Page 22 3 For Your Safety Warning Description CAUTION Surface(s) and Handle(s) may be hot. ATTENTION Surface(s) et poignée(s) chaudes INTERIOR CLEANING INSTRUCTION WARNING To clean the cooking compartment see the operator's manual for complete instructions. ConvoClean cleaning solutions followed by the ConvoRinse solution.
-
Page 23: Overview Of Hazards
3 For Your Safety 3.4 Overview of Hazards General rules on how to deal with hazards and safety measures The combi oven has been designed in such a way as to ensure that users will be protected from all hazards that can be reasonably prevented using design-based measures. However, the combi oven's intended use entails a series of residual risks that will require you to take precautions in order to avoid them. - Page 24 3 For Your Safety Live parts (3) The combi oven has live parts in it. This poses the following risks: Hazard posed by live parts when the covers for electrical components are not in their place ■ Electric shock hazard when the combi oven's outside is cleaned using a spray head. ■...
-
Page 25: Hazards And Safety Measures During Operation
3 For Your Safety 3.5 Hazards and Safety Measures During Operation Safety hazard: heat – hot surfaces When operating the unit, keep the following hazards in mind and take the actions required in order to eliminate and/or minimize these hazards: Risk / hazard Where and in which situa‐... - Page 26 3 For Your Safety When opening the unit door Be ready for a rush of hot Unit door ■ while the oven is being steam cracked-open cooled down with the Cool Use the unit door's position ■ down function cracked-open position Do not put your head in‐...
- Page 27 3 For Your Safety Safety hazard: microbiological food contamination When operating the unit, keep the following hazards in mind and take the actions required in order to eliminate and/or minimize these hazards: Risk / hazard Where and in which situa‐ What to do Safety device tions will the risk/hazard ex‐...
- Page 28 3 For Your Safety Safety hazard: moving units on bases with casters Risk / hazard Where and in which situa‐ What to do Safety device tions will the risk/hazard ex‐ ist? Pinch point hazard (for When units are being moved Do not pull the base with Retaining ele‐...
- Page 29 3 For Your Safety Safety hazard: water When operating the unit, keep the following hazards in mind and take the actions required in order to eliminate and/or minimize these hazards: Risk / hazard Where and in which situa‐ What to do Safety device tions will the risk/hazard ex‐...
-
Page 30: Hazards And Safety Measures During Cleaning
3 For Your Safety 3.6 Hazards and Safety Measures During Cleaning Safety hazard: cleaning agents When cleaning the unit, keep the following hazards in mind and take the actions required in order to eliminate and/or minimize these hazards: Risk / hazard Where and in which situa‐... - Page 31 3 For Your Safety Safety hazard: microbiological food contamination When cleaning the unit, keep the following hazards in mind and take the actions required in order to eliminate and/or minimize these hazards: Risk / hazard Where and in which situa‐ What to do Safety device tions will the risk/hazard ex‐...
- Page 32 3 For Your Safety Behind the suction panel. (This is where the heating system is located.) On the unit's top: Air vent ■ Risk of scalding posed Inside the entire oven cavity Before starting to clean None ■ by hot steam whenever the unit, wait until the water is sprayed into oven cavity has cooled...
- Page 33 3 For Your Safety Safety hazard: moving units on bases with casters Risk / hazard Where and in which situa‐ What to do Safety device tions will the risk/hazard ex‐ ist? All the risks and haz‐ When units are being moved Before moving the unit Retaining ele‐...
- Page 34 3 For Your Safety Safety hazard: electricity When cleaning the unit, keep the following hazards in mind and take the actions required in order to eliminate and/or minimize these hazards: Risk / hazard Where and in which situa‐ What to do Safety device tions will the risk/hazard ex‐...
- Page 35 3 For Your Safety Safety hazard: mechanical unit components When cleaning the unit, keep the following hazards in mind and take the actions required in order to eliminate and/or minimize these hazards: Risk / hazard Where and in which situa‐ What to do Safety device tions will the risk/hazard ex‐...
-
Page 36: Hazards And Safety Measures During Maintenance
3 For Your Safety 3.7 Hazards and Safety Measures During Maintenance Safety hazard: heat When maintaining the unit, keep the following hazards in mind and take the actions required in order to eliminate and/or minimize these hazards: Risk / hazard Where and in which situa‐... - Page 37 3 For Your Safety Safety hazard: moving units on bases with casters Risk / hazard Where and in which situa‐ What to do Safety device tions will the risk/hazard ex‐ ist? All the risks and haz‐ When units are being moved De-energize the unit be‐...
- Page 38 3 For Your Safety Safety hazard: electricity When maintaining the unit, keep the following hazards in mind and take the actions required in order to eliminate and/or minimize these hazards: Risk / hazard Where and in which situa‐ What to do Safety device tions will the risk/hazard ex‐...
-
Page 39: Safety Devices
3 For Your Safety 3.8 Safety Devices Meaning The combi oven features a series of safety devices and guards that protect the user from a variety of hazards. All safety devices and guards must be present, fully functional, and locked properly without exception when the combi oven is being used. - Page 40 3 For Your Safety Safety device Function Check Suction panel inside Prevents staff from reaching Please refer to the oven cavity; can on‐ into the moving fan and en‐ 'Removing and installing the ly be removed with sures proper heat distribution suction panel' on page 118 tools Automatic safety rins‐...
-
Page 41: Staff And Work Area Requirements
3 For Your Safety 3.9 Staff and Work Area Requirements Staff requirements The table below specifies the qualifications needed for each role. Provided that they have the required qualifications, a single person can take over more than one role if necessary. Staff Required qualifications Tasks... -
Page 42: Personal Protective Equipment
3 For Your Safety 3.10 Personal protective equipment Operation and Maintenance Task Tools used Personal Protective Equipment Placing food inside / tak‐ None Wear appropriate work clothes for kitchen work as ing food out required by your country-specific standards and regulations, especially: Protective clothing ■... -
Page 43: Getting Started
4 Getting Started 4 Getting Started 4.1 Turning the Combi Oven On and Off Checks before turning on the unit Before turning on the combi oven, check whether the prerequisites below are being met. Do not place the unit into operation unless all specified prerequisites are met. The unit does not have any obvious damage. -
Page 44: Switching From Easystart To Easytouch
4 Getting Started 4.2 Switching from easyStart to easyTouch Prerequisites Check whether the following prerequisites are met: You are on the easyStart mode home page. ■ Switching from easyStart to easyTouch Follow the steps below to switch from easyStart to easyTouch: Step Procedure Button... -
Page 45: Basic Steps For Cooking With Easytouch
4 Getting Started 4.3 Basic Steps for Cooking with easyTouch How to do it Your combi oven makes cooking extremely easy in five simple steps: Step Procedure How to do it: Turn the combi oven on. Turning the combi oven on and off on page Select or set up the cooking program you Accessing a cooking profile in the cookbook want. -
Page 46: Basic Steps For Rethermalization With Easytouch
4 Getting Started 4.4 Basic Steps for Rethermalization with easyTouch How to do it Your combi oven makes rethermalizing food extremely easy in five simple steps: Step Procedure How to do it: Turn the combi oven on. Turning the combi oven on and off on page Select or set up the rethermalization program Accessing a cooking profile in the cookbook you want. -
Page 47: How The Touchscreen's Pages Are Laid Out
5 How the Touchscreen's Pages Are Laid Out 5 How the Touchscreen's Pages Are Laid Out The touchscreen and its buttons Your combi oven can be controlled using the touchscreen. In other words, all of the combi oven's func‐ tions can be found on the various pages in the form of buttons. To use one of these functions, simply touch the corresponding button with your finger. - Page 48 5 How the Touchscreen's Pages Are Laid Out Button Meaning Function Cancel On input pages: Cancels the input Help Opens the help page The page indicator icons and what they mean The page indicator icons are negatives of the button icons used to open the corresponding pages. The table below only shows examples of these indicator icons and is not exhaustive.
-
Page 49: The On-Screen Help Home Page
5 How the Touchscreen's Pages Are Laid Out 5.1.2 The on-screen help home page What it looks like The buttons and what they do Following is an explanation of the buttons on the home page and what they do: Button Meaning Function Cooking Opens the 'Cooking' page:... -
Page 50: Cooking Page
5 How the Touchscreen's Pages Are Laid Out 5.1.3 Cooking page How to access the 'Cooking' page The 'Basic selection' buttons Following is an explanation of the 'Basic selection' buttons on the 'Cooking' page and what they do: Button Meaning Function Steam Used to select the Steam basic cooking program Combi-steam... - Page 51 5 How the Touchscreen's Pages Are Laid Out The 'Management' buttons Following is an explanation of the 'Management' buttons on the 'Cooking' page and what they do: Button Meaning Function Previous cooking step Jumps back one step in the cooking program ■...
- Page 52 5 How the Touchscreen's Pages Are Laid Out Keyboard used to enter the cooking time Following is an explanation of the buttons on the keyboard and what they do: Button Meaning Function Numbers Used to enter hours, minutes, and seconds Delete Deletes all input Confirm...
-
Page 53: The Easystart Page
5 How the Touchscreen's Pages Are Laid Out 5.1.4 The easyStart page How to access the 'easyStart' page! Reference to easyStart Operating Instructions For information on how the easyStart work pages are laid out, please refer to the easyStart operating instructions. Operating Manual... -
Page 54: Press&Go Page
5 How the Touchscreen's Pages Are Laid Out 5.1.5 Press&Go page How to access the 'Press&Go' page The 'Press&Go' buttons The Press&Go Page will take you directly to the cooking profiles stored under Favorites in the Cook‐ book. Following is an explanation of the buttons on the 'Press&Go' page and what they do: Button Meaning Function... -
Page 55: Rethermalization Page
5 How the Touchscreen's Pages Are Laid Out 5.1.6 Rethermalization page How to access the 'Rethermalization' page The 'Basic selection' buttons Following is an explanation of the 'Basic selection' buttons on the 'Rethermalization' page and what they do: Button Meaning Function Plates Used to select the 'Plates' rethermalization program Gastronorm... - Page 56 5 How the Touchscreen's Pages Are Laid Out The 'Management' buttons Following is an explanation of the 'Management' buttons on the 'Rethermalization' page and what they Button Meaning Function TrayTimer Starts the use of unoccupied shelf levels while a (while a rethermalization pro‐ main rethermalization program is running gram is running) Save rethermalization profile...
- Page 57 5 How the Touchscreen's Pages Are Laid Out The 'Extra Rethermalization Functions' page Following is an explanation of the buttons on the 'Extra Rethermalization Functions' page and what they do: Button Meaning Function Reduced fan speed Reduces the flow speed inside the oven Steam reducer Reduces the amount of steam coming out from the air vent.
-
Page 58: Cleaning Page
5 How the Touchscreen's Pages Are Laid Out 5.1.7 Cleaning page How to access the 'Cleaning' page The 'Cleaning program' buttons Following is an explanation of the standard cleaning program buttons and what they do: Button Meaning Function Semi-automatic cleaning Starts semi-automatic cleaning. The 'Fully automatic cleaning' buttons Following is an explanation of the fully automatic cleaning buttons and what they do: Button... -
Page 59: The Cookbook
5 How the Touchscreen's Pages Are Laid Out 5.2 The Cookbook The Cookbook This section goes over each of the Cookbook pages on the touchscreen. Moreover, it explains the but‐ tons on these pages and what they do. 5.2.1 How the Cookbook Pages Are Laid Out How the main Cookbook pages are laid out The following figure shows the layout for the 'Product groups' page as an example representing the three main Cookbook pages. - Page 60 5 How the Touchscreen's Pages Are Laid Out Functions that can be used on more than one page and what they do Page-specific buttons are covered in the separate sections for each page. Meanwhile, the navigation pane features a number of buttons that have the same function on more than one page: Button Meaning...
-
Page 61: The 'Favorites' Page
5 How the Touchscreen's Pages Are Laid Out 5.2.2 The 'Favorites' page How to access the 'Favorites' page The 'Favorites' buttons Following is an explanation of the buttons on the 'Favorites' page and what they do: Button Meaning Function Basic selection Favorites Shows all cooking profile favorites available for se‐... - Page 62 5 How the Touchscreen's Pages Are Laid Out Button Meaning Function Remove Removes the selected cooking profile from the Fa‐ vorites list Adds the selected cooking profile to the Favorites list Delete Deletes the selected cooking profile from the system Change icon This button does not do anything on the 'Edit Favor‐...
-
Page 63: The 'Product Groups' Page
5 How the Touchscreen's Pages Are Laid Out 5.2.3 The 'Product groups' page How to access the 'Product groups' page! The 'Product groups' buttons Following is an explanation of the buttons on the 'Product groups' page and what they do: Button Meaning Function Basic selection... - Page 64 5 How the Touchscreen's Pages Are Laid Out Button Meaning Function Press to scroll up Scrolls up Press to scroll down Scrolls down Create product group Opens the 'Create product group' page Edit product group Opens the 'Edit product group' page for the selected product group.
- Page 65 5 How the Touchscreen's Pages Are Laid Out The 'Manage Icons' page Following is an explanation of the buttons on the 'Manage Icons' page and what they do: Button Meaning Function Basic selection Press to scroll up Scrolls up Press to scroll down Scrolls down Folder Selects the folder as the source for the images...
-
Page 66: The 'Cooking Profiles' Page
5 How the Touchscreen's Pages Are Laid Out 5.2.4 The 'Cooking profiles' page How to access the 'Cooking profiles' page! The 'Cooking profiles' buttons Following is an explanation of the buttons on the 'Cooking profile' page and what they do: Button Meaning Function Basic selection... - Page 67 5 How the Touchscreen's Pages Are Laid Out The 'Manage Icons' page Following is an explanation of the buttons on the 'Manage Icons' page and what they do: Button Meaning Function Basic selection Press to scroll up Scrolls up Press to scroll down Scrolls down Folder Selects the folder as the source for the images...
-
Page 68: Settings
5 How the Touchscreen's Pages Are Laid Out 5.3 Settings Settings This section goes over the various touchscreen pages that can be used to configure the unit's settings. Moreover, it explains the buttons on these pages and what they do. 5.3.1 Settings Pages How to access the 'Settings' page The 'Settings' buttons Following is an explanation of the buttons on the 'Settings' page and what they do:... -
Page 69: The 'General' Menu
5 How the Touchscreen's Pages Are Laid Out 5.3.2 The 'General' menu How to access the 'General' menu 'General' tab The following functions can be accessed by opening the 'General' tab: Menu type Meaning Function Number of shelves Used to set the number of shelves that can be used Temperature unit Used to select °C or °F as the temperature unit 'Food monitoring' tab... -
Page 70: The 'Language / Cookbook' Menu
5 How the Touchscreen's Pages Are Laid Out 5.3.3 The 'Language / Cookbook' menu How to access the 'Language / Cookbook' menu! The 'Language / Cookbook' menu The following functions can be accessed by opening the 'Language / Cookbook' menu: Button Meaning Function Language... -
Page 71: The 'Transfer' Menu
5 How the Touchscreen's Pages Are Laid Out 5.3.4 The 'Transfer' menu How to access the 'Transfer' menu! The 'Transfer' buttons Following is an explanation of the buttons on the 'Transfer' page and what they do: Button Meaning Function Transfer time Calendar Used to select the transfer date Transfer interval... -
Page 72: The 'Logbook' Menu
5 How the Touchscreen's Pages Are Laid Out 5.3.5 The 'Logbook' menu How to access the 'Logbook' menu How the 'Logbook' menu is laid out The following figure shows the layout for the 'Logbook' menu: The sections in the 'Logbook' menu and what they show/do Following is a description of what the sections in the 'Logbook' menu show/do: Menu type Designation... -
Page 73: The 'Date / Time' Menu
5 How the Touchscreen's Pages Are Laid Out 5.3.6 The 'Date / Time' menu How to access the 'Date / Time' menu The 'Date / Time' menu The following functions can be accessed by opening the 'Date / Time' menu: Menu type Meaning Function Calendar... -
Page 74: The 'Sounds' Menu
5 How the Touchscreen's Pages Are Laid Out 5.3.7 The 'Sounds' menu How to access the 'Sounds' menu 'Volume' tab The following functions can be accessed by opening the 'Volume' tab: Menu type Meaning Function Volume Used to adjust the volume 'Sounds' tab The following functions can be accessed by opening the 'Sounds' tab: Menu type... -
Page 75: The 'Password' Menu
5 How the Touchscreen's Pages Are Laid Out 5.3.8 The 'Password' menu How to access the 'Password' menu The 'Password' menu The following functions can be accessed by opening the 'Password' menu: Menu type Meaning Function Current password Shows the current password in encrypted format New password Used to enter a new password Default password... -
Page 76: The 'Backup/Restore' Menu
5 How the Touchscreen's Pages Are Laid Out 5.3.9 The 'Backup/Restore' menu How to access the 'Backup/Restore' menu The 'Backup/Restore' buttons Following is an explanation of the buttons on the 'Backup/Restore' page and what they do: Button Meaning Function Backup Used to open the 'Backup' tab: Used to transfer data from the unit to the SD card ■... -
Page 77: The 'Import/Export' Menu
5 How the Touchscreen's Pages Are Laid Out 5.3.10 The 'Import/Export' menu How to access the 'Import/Export' menu! The 'Import/Export' buttons Following is an explanation of the buttons on the 'Import/Export' page and what they do: Button Meaning Function Import Used to open the 'Import' tab: Used to transfer data from the USB drive to the ■... - Page 78 5 How the Touchscreen's Pages Are Laid Out Button Meaning Function Controls Used to export the unit's operating parameters Purpose: Checking the corresponding status ■ Format: XML Information for each operating parameter: ■ Name ■ Unit ■ Minimum value ■ Maximum value ■...
-
Page 79: How To Work With The Touchscreen
6 How to Work with the Touchscreen 6 How to Work with the Touchscreen Basic instructions for using the touchscreen This section provides step-by-step instructions for the most important tasks involving the touchscreen. 6.1 Entering Cooking Data How it works This section goes over the basic steps required in order to operate the combi oven. 6.1.1 Setting Up a Cooking Program How to access the 'Cooking' page Setting Up a Cooking Program... - Page 80 6 How to Work with the Touchscreen Add a cooking step. Repeat steps 1 through 7. To access the 'Cooking Step Overview' page, press: For more information... Next steps Day-to-Day Cooking Operating Manual...
-
Page 81: Setting Up A Rethermalization Program
6 How to Work with the Touchscreen 6.1.2 Setting Up a Rethermalization Program How to access the 'Rethermalization' page Setting Up a Rethermalization Program Follow the steps below to set up the rethermalization program you want: Step Procedure Button Select a basic rethermalization program. Enter the rethermalization temperature you want. -
Page 82: Using Extra Functions And Special Programs
6 How to Work with the Touchscreen 6.2 Using Extra Functions and Special Programs How it works This section goes over the basic steps required in order to operate the combi oven. 6.2.1 Using Delta-T Cooking How to access the 'Cooking' page Using Delta-T Cooking Follow the steps below to set up a cooking program with Delta-T cooking: Step... -
Page 83: Using Functions While A Program Is Running
6 How to Work with the Touchscreen 6.3 Using Functions While a Program Is Running How it works This section goes over the basic steps required in order to operate the combi oven. 6.3.1 Changing Cooking Parameters While a Program Is Running Prerequisites Check whether the following prerequisites are met: You have selected a cooking or rethermalization program. -
Page 84: Working With The Cookbook
6 How to Work with the Touchscreen 6.4 Working with the Cookbook The combi oven cookbook This section explains how you can create, edit, and manage cooking profiles in the Cookbook. 6.4.1 Accessing a cooking profile in the cookbook How to access the 'Favorites' page Opening a cooking profile from your Favorites Follow the steps below to open a cooking profile from your Favorites: Step... - Page 85 6 How to Work with the Touchscreen How to access the 'Cooking profiles' page! Opening a Cooking Profile from Stored Cooking Profiles Follow the steps below to open a cooking profile from the cooking profiles stored in the Cookbook: Step Page Procedure Button...
-
Page 86: Opening A Bakepro Cooking Profile From The Cookbook
6 How to Work with the Touchscreen 6.4.2 Opening a BakePro Cooking Profile from the Cookbook How to access the 'Product groups' page! Opening a BakePro Cooking Profile from the Cookbook BakePro is a pre-programmed baking profile with three different settings Each BakePro cooking profile consists of four cooking steps. -
Page 87: Create Cooking Profile
6 How to Work with the Touchscreen 6.4.3 Create cooking profile Create cooking profile Follow the steps below to create a cooking profile: Step Page Procedure Button Set up a cooking program. Use the 'Cooking' page to do so. Save the program as a cooking profile. Give the cooking profile a name. - Page 88 6 How to Work with the Touchscreen Step Page Procedure Button Assign an icon to the rethermalization profile. Confirm the name and icon. For more information... Next steps Adding and removing cooking profile to/from your favorites Storing / Removing Cooking Profiles in / from a Product Group Operating Manual...
-
Page 89: Changing The Name And Icon For A Cooking Profile
6 How to Work with the Touchscreen 6.4.4 Changing the name and icon for a cooking profile How to access the 'Cooking profiles' page! Changing the name and icon for a cooking profile Follow the steps below to change the name and icon for a cooking profile: Step Page Procedure... -
Page 90: Delete The Cooking Profile From The Cookbook
6 How to Work with the Touchscreen 6.4.5 Delete the cooking profile from the cookbook How to access the 'Cooking profiles' page! Delete the cooking profile from the cookbook Follow the steps below to delete a cooking profile from the cookbook: Step Page Procedure... -
Page 91: Adding And Removing Cooking Profile To/From Your Favorites
6 How to Work with the Touchscreen 6.4.6 Adding and removing cooking profile to/from your favorites How to access the 'Favorites' page Adding a cooking profile to your favorites Follow the steps below to add a cooking profile to your favorites: Step Page Op‐... - Page 92 6 How to Work with the Touchscreen Delete the cooking profile from the cookbook If you need to, you can also delete a cooking profile from the cookbook using the favorites page. Fol‐ low the steps below: Step Page Op‐ Procedure Button tion...
-
Page 93: Creating New Product Groups
6 How to Work with the Touchscreen 6.4.7 Creating New Product Groups How to access the 'Product groups' page! Creating New Product Groups Follow the steps below to create a new cooking profile group: Step Page Procedure Button Open the 'Manage product group' page. Open the 'Create product group' page. -
Page 94: Changing The Name And Icon For A Product Group
6 How to Work with the Touchscreen 6.4.8 Changing the name and icon for a product group How to access the 'Product groups' page! Changing the name and icon for a product group Follow the steps below to change the name and icon for a product group: Step Page Op‐... -
Page 95: Storing / Removing Cooking Profiles In / From A Product Group
6 How to Work with the Touchscreen 6.4.9 Storing / Removing Cooking Profiles in / from a Product Group How to access the 'Product groups' page! Storing a Cooking Profile in a Product Group Follow the steps below to store a cooking profile in a product group: Step Page Op‐... - Page 96 6 How to Work with the Touchscreen Delete the cooking profile from the cookbook If you need to, you can also delete a cooking profile from the cookbook using the product group page. Follow the steps below: Step Page Op‐ Procedure Button tion...
-
Page 97: Press To Delete The Product Group
6 How to Work with the Touchscreen 6.4.10 Press to delete the product group How to access the 'Product groups' page! Press to delete the product group Follow the steps below to delete a product group: Step Page Op‐ Procedure Button tion Open the 'Manage product group' page. -
Page 98: Making Changes With The Settings
6 How to Work with the Touchscreen 6.5 Making changes with the settings Making changes with the settings This section goes over the considerations that must be observed when making changes with the set‐ tings. 6.5.1 Options that can be configured with the service interface Configurable options There are additional functions that must be enabled with the service interface in order to make the use of your combi oven even safer. -
Page 99: Cooking And Rethermalizing
7 Cooking and Rethermalizing 7 Cooking and Rethermalizing Cooking in detail This section goes over the steps you need to follow when cooking or rethermalizing food and how you can take full advantage of all the functions featured by your combi oven. 7.1 ... - Page 100 7 Cooking and Rethermalizing Hot surfaces Risk of burns posed by high temperatures inside the oven cavity and on the inside of the unit door Touching any interior oven cavity parts, the inside of the unit door, or any parts that are found inside the cooking compartment during cooking may result in burns.
-
Page 101: Cooking With Press&Go
7 Cooking and Rethermalizing 7.2 Cooking with Press&Go For your safety when working with/on the combi oven Before starting work, read and understand the rules, risks, and hazards specified in Safely Using the Unit on page 112 and follow all the corresponding instructions without exception. Prerequisites Check whether the following prerequisites are met: The combi oven must have been properly cleaned. - Page 102 7 Cooking and Rethermalizing For more information... How to do it right Safely Opening and Closing the Unit Door Placing Food Inside and Taking It Out Removing and installing racks Removing and installing the suction panel Putting Away and Removing the Core Temperature Probe Plugging in the USB stick Operating Manual...
-
Page 103: Day-To-Day Cooking
7 Cooking and Rethermalizing 7.3 Day-to-Day Cooking For your safety when working with/on the combi oven Before starting work, read and understand the rules, risks, and hazards specified in Safely Using the Unit on page 112 and follow all the corresponding instructions without exception. Prerequisites Check whether the following prerequisites are met: The combi oven must have been properly cleaned. -
Page 104: For More Information
7 Cooking and Rethermalizing Cooking when the oven is already hot If the combi oven is already at the required temperature, follow the steps below when cooking food: Step Procedure Button If you already used the same cooking program before, you can skip this step. -
Page 105: Day-To-Day Rethermalization
7 Cooking and Rethermalizing 7.4 Day-to-Day Rethermalization For your safety when working with/on the combi oven Before starting work, read and understand the rules, risks, and hazards specified in Safely Using the Unit on page 112 and follow all the corresponding instructions without exception. Prerequisites Check whether the following prerequisites are met: The combi oven must have been properly cleaned. - Page 106 7 Cooking and Rethermalizing Rethermalization when the oven is already hot If the combi oven is already at the required temperature, follow the steps below when rethermalizing food: Step Procedure Button If you already used the same rethermalization program be‐ fore, you can skip this step.
-
Page 107: Manual Steaming During Cooking
7 Cooking and Rethermalizing 7.5 Manual Steaming During Cooking Prerequisites Check whether the following prerequisites are met: You must have selected the 'Combi-steam' or 'Hot air' cooking program. ■ One of these programs is running. ■ Manual Steaming During Cooking Follow the steps below to manually steam food during cooking: Step Procedure Button... -
Page 108: Using Unoccupied Shelves During Cooking
7 Cooking and Rethermalizing 7.6 Using Unoccupied Shelves During Cooking For your safety when working with/on the combi oven Before starting work, read and understand the rules, risks, and hazards specified in Safely Using the Unit on page 112 and follow all the corresponding instructions without exception. Prerequisites Check whether the following prerequisites are met: Aside from the cooking time, the additional food needs the same cooking parameters as the food in... -
Page 109: Using Unoccupied Shelves During Rethermalization
7 Cooking and Rethermalizing 7.7 Using Unoccupied Shelves During Rethermalization For your safety when working with/on the combi oven Before starting work, read and understand the rules, risks, and hazards specified in Safely Using the Unit on page 112 and follow all the corresponding instructions without exception. Prerequisites Check whether the following prerequisites are met: Aside from the rethermalization time, the additional food needs the same rethermalization parame‐... -
Page 110: Cooling Down The Oven
7 Cooking and Rethermalizing 7.8 Cooling Down the Oven For your safety when working with/on the combi oven Before starting work, read and understand the rules, risks, and hazards specified in Safely Using the Unit on page 112 and follow all the corresponding instructions without exception. Purpose You can use the 'Cool down' extra function to quickly cool down the oven so that you can start a cook‐... -
Page 111: Cleaning The Oven Automatically
7 Cooking and Rethermalizing 7.9 Cleaning the oven automatically Purpose The 'SafeCooldown' function automatically cools down the oven before food is placed inside so that you can start a cooking program with a temperature that is lower than the oven's current one. During this automatic cooling down process, the unit door will always remain closed, ensuring that us‐... -
Page 112: How To Do It Right
8 How to do it right 8 How to do it right Important steps involved in using the combi oven This section goes over certain important steps that you will need to use repeatedly when using the combi oven. 8.1 Safely Using the Unit For your and your employees' safety Every person (user) must read and understand the contents in the 'For Your Safety' on page 18 sec‐... -
Page 113: Safely Opening And Closing The Unit Door
8 How to do it right 8.2 Safely Opening and Closing the Unit Door For your safety when working with/on the combi oven Before starting work, read and understand the rules, risks, and hazards specified in Safely Using the Unit on page 112 and follow all the corresponding instructions without exception. Prerequisites When placed on top of a work table, the unit must be secured in such a way that it will not slide out of place. -
Page 114: Placing Food Inside And Taking It Out
8 How to do it right 8.3 Placing Food Inside and Taking It Out For your safety when working with/on the combi oven Before starting work, read and understand the rules, risks, and hazards specified in Safely Using the Unit on page 112 and follow all the corresponding instructions without exception. Hot liquids Risk of scalding posed by hot liquids Spilling liquid food can result in scalding to the face and hands. - Page 115 8 How to do it right Taking food out Follow the steps below to take food out: Step Procedure Open the unit door. Take out the food, making sure the container is in a horizontal position. For more information... How to do it right Safely Opening and Closing the Unit Door Operating Manual...
-
Page 116: Removing And Installing Racks
8 How to do it right 8.4 Removing and installing racks For your safety when working with/on the combi oven Before starting work, read and understand the rules, risks, and hazards specified in Safely Using the Unit on page 112 and follow all the corresponding instructions without exception. Removing racks Follow the steps below to remove a rack: Step... - Page 117 8 How to do it right Step Procedure Figure Push the air distributor upwards (7). Swing the air distributor backwards (8) and disconnect the rack from the air distributor. Installing racks Follow the steps below to install the racks: Step Procedure Follow the same steps used to remove the racks, but in opposite order.
-
Page 118: Removing And Installing The Suction Panel
8 How to do it right 8.5 Removing and installing the suction panel For your safety when working with/on the combi oven Before starting work, read and understand the rules, risks, and hazards specified in Safely Using the Unit on page 112 and follow all the corresponding instructions without exception. Prerequisites Check whether the following prerequisites are met: The rack must have been removed. - Page 119 8 How to do it right For more information... How to do it right Removing and installing racks Operating Manual...
-
Page 120: Putting Away And Removing The Core Temperature Probe
8 How to do it right 8.6 Putting Away and Removing the Core Temperature Probe For your safety when working with/on the combi oven Before starting work, read and understand the rules, risks, and hazards specified in Safely Using the Unit on page 112 and follow all the corresponding instructions without exception. Purpose If you will not be needing the core temperature probe for the cooking sequence you will be using, make sure to put it away. -
Page 121: Plugging In The Usb Stick
8 How to do it right 8.7 Plugging in the USB stick For your safety when working with/on the combi oven Before starting work, read and understand the rules, risks, and hazards specified in Safely Using the Unit on page 112 and follow all the corresponding instructions without exception. Purpose of USB sliding cover The sliding cover protects the USB port so that no steam will be able to enter the control system elec‐... -
Page 122: Cleaning And Maintenance
9 Cleaning and maintenance 9 Cleaning and maintenance Cleaning and maintaining the combi oven This section provides information on the cleaning and maintenance schedules and explains how to clean your combi oven. 9.1 Cleaning schedule and cleaning agent Cleaning the combi oven This section provides information on the cleaning schedule and cleaning agents used to clean your combi oven. - Page 123 9 Cleaning and maintenance Weekly cleaning The table below provides an overview of the cleaning tasks that need to be carried out on a weekly basis: What needs to be cleaned? Procedure Cleaning agents The double glass door on the in‐ Clean the double-pane door on Common household glass side...
-
Page 124: Cleaning Agents
9 Cleaning and maintenance 9.1.2 Cleaning agents Cleaning agents Only use the cleaning agents specified here when cleaning the oven cavity. Designation Product Label color Cleaning agents ConvoClean forte Rinse aid ConvoCare Green NOTICE: The warranty will be void if there is any damage that can be traced back to improper cleaning or to the use of incorrect cleaning agents. - Page 125 9 Cleaning and maintenance Cleaning agent and rinse aid consumption The following table shows the cleaning agent and rinse aid consumption levels per cleaning sequence in fl oz (USA): Agent Consumption (fl oz) Step 1 Step 2 Step 3 Step 4 Express Care‐...
-
Page 126: Cleaning Programs And Tasks
9 Cleaning and maintenance 9.2 Cleaning programs and tasks Cleaning the combi oven This section explains how to clean your combi oven. 9.2.1 Working Safely When Cleaning For your and your employees' safety Every person (user) must read and understand the contents in the 'For Your Safety' on page 18 sec‐ tion before they work with or on the combi oven for the first time. - Page 127 9 Cleaning and maintenance Rules for safely moving and parking bases with casters In order to avoid hazards, follow the rules below when moving bases with casters with the units: Pay attention to all utility and hose connections when moving the unit. Make sure not to roll over ■...
- Page 128 9 Cleaning and maintenance Contact with cleaning agents Risk of chemical burns and skin, eye, and respiratory tract irritation The ConvoClean new cleaning agent and the ConvoCare rinse aid will cause skin, eye, and respiratory tract irritation upon direct contact. The ConvoClean forte cleaning agent will result in chemical burns to the skin, eyes, and respiratory tract upon direct contact.
-
Page 129: Cooling Down The Oven
9 Cleaning and maintenance 9.2.2 Cooling Down the Oven For your safety when cleaning Before starting any cleaning work, familiarize yourself with the rules, risks, and hazards specified in Working Safely When Cleaning on page 126 and follow all the corresponding instructions without ex‐ ception. -
Page 130: Cleaning The Oven Automatically
9 Cleaning and maintenance 9.2.3 Cleaning the oven automatically Purpose The 'SafeCooldown' function automatically cools down the oven before food is placed inside so that you can start a cooking program with a temperature that is lower than the oven's current one. During this automatic cooling down process, the unit door will always remain closed, ensuring that us‐... -
Page 131: Cleaning A Cold Oven Cavity Semi-Automatically
9 Cleaning and maintenance 9.2.4 Cleaning a Cold Oven Cavity Semi-Automatically For your safety when cleaning Before starting any cleaning work, familiarize yourself with the rules, risks, and hazards specified in Working Safely When Cleaning on page 126 and follow all the corresponding instructions without ex‐ ception. - Page 132 9 Cleaning and maintenance Step Procedure Button Use the spray bottle to spray ConvoClean new or Con‐ voClean forte onto the oven cavity, the suction panel and the area behind it, the rack, and the drain on the bottom. Close the unit door. Result: The program will continue running automatically (ap‐...
- Page 133 9 Cleaning and maintenance Related subjects Cleaning agents Cleaning schedule Operating Manual...
-
Page 134: Cleaning A Hot Oven Cavity Semi-Automatically
9 Cleaning and maintenance 9.2.5 Cleaning a Hot Oven Cavity Semi-Automatically For your safety when cleaning Before starting any cleaning work, familiarize yourself with the rules, risks, and hazards specified in Working Safely When Cleaning on page 126 and follow all the corresponding instructions without ex‐ ception. - Page 135 9 Cleaning and maintenance Step Procedure Button Use the spray bottle to spray ConvoClean new or Con‐ voClean forte onto the oven cavity, the suction panel and the area behind it, the rack, and the drain on the bottom. Close the unit door. Result: The program will continue running automatically (ap‐...
- Page 136 9 Cleaning and maintenance For more information... How to do it right Removing and installing racks Removing and installing the suction panel Related subjects Cleaning agents Cleaning schedule Operating Manual...
-
Page 137: Using The Convoclean System's Fully Automatic Cleaning Sequence To Clean The
9 Cleaning and maintenance 9.2.6 Using the ConvoClean System's Fully Automatic Cleaning Sequence to Clean the Oven When It Is Cold For your safety when cleaning Before starting any cleaning work, familiarize yourself with the rules, risks, and hazards specified in Working Safely When Cleaning on page 126 and follow all the corresponding instructions without ex‐... - Page 138 9 Cleaning and maintenance Step Procedure Button Close the unit door. Result: The combi oven will start the fully automatic cleaning cycle. Warning: Do not, under any circumstance, interrupt the cycle. Do not open the unit door. Wait until an acoustic signal is emitted at the end of the cleaning process.
-
Page 139: Using The Convoclean System's Fully Automatic Cleaning Sequence To Clean The
9 Cleaning and maintenance 9.2.7 Using the ConvoClean System's Fully Automatic Cleaning Sequence to Clean the Oven When It Is Hot For your safety when cleaning Before starting any cleaning work, familiarize yourself with the rules, risks, and hazards specified in Working Safely When Cleaning on page 126 and follow all the corresponding instructions without ex‐... - Page 140 9 Cleaning and maintenance Step Procedure Button Turn the rotary nozzle on the oven cavity's top panel once to make sure it moves freely. Close the unit door. Result: The combi oven will start the fully automatic cleaning cycle. Warning: Do not, under any circumstance, interrupt the cycle.
-
Page 141: Cleaning The Hygienic Removable Gasket
9 Cleaning and maintenance 9.2.8 Cleaning the hygienic removable gasket For your safety when cleaning Before starting any cleaning work, familiarize yourself with the rules, risks, and hazards specified in Working Safely When Cleaning on page 126 and follow all the corresponding instructions without ex‐ ception. -
Page 142: Clean The Double-Pane Door
9 Cleaning and maintenance 9.2.9 Clean the double-pane door For your safety when cleaning Before starting any cleaning work, familiarize yourself with the rules, risks, and hazards specified in Working Safely When Cleaning on page 126 and follow all the corresponding instructions without ex‐ ception. -
Page 143: Cleaning The Oven Cavity Behind The Suction Panel
9 Cleaning and maintenance 9.2.10 Cleaning the oven cavity behind the suction panel For your safety when cleaning Before starting any cleaning work, familiarize yourself with the rules, risks, and hazards specified in Working Safely When Cleaning on page 126 and follow all the corresponding instructions without ex‐ ception. - Page 144 9 Cleaning and maintenance For more information... How to do it right Removing and installing racks Removing and installing the suction panel Related subjects Cleaning agents Cleaning schedule Operating Manual...
-
Page 145: Replacing The Cleaning Agent Canister Containing Convoclean Forte
9 Cleaning and maintenance 9.2.11 Replacing the cleaning agent canister containing ConvoClean forte For your safety when cleaning Before starting any cleaning work, familiarize yourself with the rules, risks, and hazards specified in Working Safely When Cleaning on page 126 and follow all the corresponding instructions without ex‐ ception. -
Page 146: Replacing Cleaning Agent Canisters With Convocare
9 Cleaning and maintenance 9.2.12 Replacing cleaning agent canisters with ConvoCare For your safety when cleaning Before starting any cleaning work, familiarize yourself with the rules, risks, and hazards specified in Working Safely When Cleaning on page 126 and follow all the corresponding instructions without ex‐ ception. -
Page 147: Maintenance
9 Cleaning and maintenance 9.3 Maintenance Combi oven maintenance This section provides information on the maintenance schedule and goes over the maintenance tasks that you will need to perform. Contact Customer Service Please have the following unit information ready when contacting Customer Service: Item number on unit label ■... -
Page 148: Emergency Mode
9 Cleaning and maintenance 9.3.2 Emergency Mode Running the combi oven in emergency mode The combi oven features an emergency mode in order to allow you to keep using it if there is an error or fault that cannot be fixed right away. This mode will let you keep running the unit (with a number of limitations) even when there is a mal‐... - Page 149 9 Cleaning and maintenance Fault Error Display mes‐ Comment code sage Condenser Up to Up to Up to Up to Higher water consumption due E25.0 sensor dis‐ 356°F 356°F 356°F 356°F to the need to cool down the continuity condenser continuously Algo.
-
Page 150: Troubleshooting - Error Codes
9 Cleaning and maintenance 9.3.3 Troubleshooting – Error Codes Error message parts The following figure shows the parts of an error message as an example representing all error mes‐ sages. Error message parts and what they stand for Following is an explanation of what the parts in each error message stand for: Designation Function Error number... - Page 151 9 Cleaning and maintenance E29.3 E29.4 Condenser sensor (B3) has detected an Open the water connection valve E15.0 ■ excessively high temperature Contact Customer Service ■ Oven sensor (B6) has detected an exces‐ Contact Customer Service E11.0 sively high temperature Excessively high temperature in electrical Clean the lint screen at the back of E02.0...
-
Page 152: Troubleshooting - Problems During Operation
9 Cleaning and maintenance 9.3.4 Troubleshooting – Problems During Operation Problems with the food being cooked The following table provides information on potential problems during operation and how to fix them: Problem Possible cause Required response Irregular browning The suction panel is not closed Removing and installing the suction properly panel on page 118... - Page 153 9 Cleaning and maintenance Problems during cleaning The following table provides information on potential problems during operation and how to fix them: Problem Possible cause Required response / For more information... Black spots inside the Wrong cleaning agent Use ConvoClean forte for fully au‐ ■...
-
Page 154: Replacing The Oven Light Halogen Lamp
9 Cleaning and maintenance 9.3.5 Replacing the oven light halogen lamp Live parts Risk of electric shock posed by live parts Touching live parts underneath the covers or underneath the control panel may result in electric shock. Make sure that the covers and the control panel are properly installed. Make sure that all maintenance work under the covers, under the control panel, and on the power cord is performed exclusively by a qualified electrician from an authorized customer service company. - Page 155 9 Cleaning and maintenance The oven light's parts and what they do Following is an explanation of what the oven light's parts do: Designation Function Countersunk screw Fastener used to secure the oven light's cover Bezel Allows access to the halogen lamp Glass pane Protects the halogen lamp from moisture Seal...
- Page 156 9 Cleaning and maintenance Removing the halogen lamp Follow the steps below to remove the halogen lamp: Step Procedure Figure Unscrew the countersunk screws (1). Remove the cover (2), the glass pane (3), and the seal (4) from the oven wall (5). Dispose of the seal (4) you just removed.
- Page 157 9 Cleaning and maintenance For more information... Related subjects Removing and installing racks Turning the Combi Oven On and Off Operating Manual...
-
Page 158: The Cooking Programs In Your Combi Oven
10 The cooking programs in your combi oven 10 The cooking programs in your combi oven Coming up with your own cooking profiles You can combine the various basic and special cooking programs, together with the core temperature measurement function if necessary, into your own single-step or multi-step cooking profiles and save them in the Cookbook and in Press&Go for later use. -
Page 159: Steaming
10 The cooking programs in your combi oven 10.2 Steaming Temperature range When you use the 'Steaming' cooking program, you will be working within a temperature range of 86°F to 248°F. This cooking program is subdivided into the following categories based on the temperature being used: Biosteam (86°F - 210°F) ■... - Page 160 10 The cooking programs in your combi oven What kinds of foods can be prepared with biosteaming at a temperature of 86°F to 210°F? Some examples of foods for which this cooking program can be used include: Fish fillets ■ Terrines ■...
-
Page 161: Combi-Steam
10 The cooking programs in your combi oven 10.3 Combi-steam Temperature range When you use the 'Combi-steam' cooking program, you will be working within a temperature range of 212°F to 482°F. Application The 'Combi-steam' cooking program is suitable for all foods that require for moisture or steam to be manually added when using the corresponding traditional cooking method. -
Page 162: Hot Air
10 The cooking programs in your combi oven 10.4 Hot air Temperature range When you use the 'Hot air' cooking program, you will be working within a temperature range of 86°F to 482°F. Application The 'Hot air' cooking program can always be used when no moisture is needed. For example, when: Roasting ■... -
Page 163: Rethermalization
10 The cooking programs in your combi oven 10.5 Rethermalization Application The rethermalization cooking program can be used to rethermalize food that has already been set up on plates, trays, or standard size bakeware. Temperature range and rethermalization time The rethermalization time and temperature will depend on the product, the thickness of the various layers, and the number of plates or standard size bakeware involved in the rethermalization sequence. -
Page 164: Core Temperature Measurement
10 The cooking programs in your combi oven 10.6 Core temperature measurement How it works When you use the core temperature measurement function, the cooking process' duration will depend on the food's core temperature instead of on a set time. The core temperature measurement function can be used with all basic cooking programs. Application Using the core temperature measurement function is especially recommended when slow-roasting and when cooking food to a specific degree of doneness (medium, rare, etc.). - Page 165 10 The cooking programs in your combi oven Food Degree of doneness Internal temperature Poultry Whole chicken Well done 167 - 179°F Chicken breast Well done 167 - 170°F Chicken drumstick Well done 167 - 179°F Fish Salmon fillets Medium 145 - 149°F Operating Manual...
-
Page 166: Delta-T Cooking
10 The cooking programs in your combi oven 10.7 Delta-T cooking How it works Delta-T cooking is a cooking program in which the oven temperature increases as a function of the food's core temperature When using this method, you will always have to use the core temperature probe. - Page 167 10 The cooking programs in your combi oven Meaning Description Temperature inside the oven Phase 2 The oven temperature will continue to rise as a function of the current core temperature until current the core temperature reaches the specified value. End of phase 2 Program end: The core temperature ( ) has been reached.
-
Page 168: Ecocooking
10 The cooking programs in your combi oven 10.8 ecoCooking How it works ecoCooking is a cooking program consisting of an initial cooking phase and a finishing phase. In single-step cooking profiles, the initial cooking phase will last until a specific cooking time or core temperature is reached. -
Page 169: Overnight Cooking
10 The cooking programs in your combi oven 10.9 Overnight cooking How it works Overnight cooking is a multi-step slow-cooking program consisting of multiple cooking steps and a fi‐ nal holding phase used to let the product mature. When using this method, you will always have to use the core temperature probe. - Page 170 10 The cooking programs in your combi oven The 'BOILING overnight cooking' cooking process The following figure illustrates the cooking process: Meaning Description Temperature in‐ Oven temperature curve side the oven Actual core tem‐ Product core temperature curve perature Holding tempera‐ End core temperature ture Meaning...
- Page 171 10 The cooking programs in your combi oven How to use the function optimally Follow the recommendations below: The holding phase must not exceed 15 hours ■ If you put a mixture of different products or pieces of meat with different sizes inside, make sure to ■...
-
Page 172: Coming Up With Your Own Custom Cooking Profiles
11 Coming Up with Your Own Custom Cooking Profiles 11 Coming Up with Your Own Custom Cooking Profiles Tried-and-true cooking profiles to get you started This section provides a few tried-and-true cooking profiles that will help get you started with your own. 11.1 Side dishes Cooking profile for side dishes Typical recipes for side dishes:... -
Page 173: Fish
11 Coming Up with Your Own Custom Cooking Profiles 11.2 Fish Cooking profile for fish Typical recipes for fish: Dish Please note °F °F Fish in savoy cabbage Breaded fish fillets 10-13 Partial load ■ Use a nonstick sheet pan ■ Use the Crisp&Tasty function ■... -
Page 174: Meat, Poultry, Game
11 Coming Up with Your Own Custom Cooking Profiles 11.3 Meat, poultry, game Cooking profile for meat, poultry, and game Typical recipes for meat, poultry, and game: Dish Please note °F °F Bratwurst 7-12 Cordon bleu 10-13 Use the Crisp&Tasty function (setting 2) Duck Fill with apple and onion if desired... - Page 175 11 Coming Up with Your Own Custom Cooking Profiles Dish Please note Steamed turkey breast Turkey schnitzel 9-13 Use the Crisp&Tasty function (setting 2) Leg of venison, de‐ Lard or pickle / marinate if desired boned Venison pie Set up flue without exception Tenderloin, medium Beef Wellington Lightly coat the puff pastry with...
-
Page 176: Pastries
11 Coming Up with Your Own Custom Cooking Profiles 11.4 Pastries Cooking profile for pastries Typical recipes for pastries: Dish Please note °F °F Apple strudel 12-20 Partial load ■ Amount per sheet pan depends ■ on size Do not place sheet pans too ■... - Page 177 11 Coming Up with Your Own Custom Cooking Profiles Dish Please note °F °F Sponge cake 20-35 Partial load Spritz cookie 8-13 Amount per sheet pan depends ■ on size Do not place sheet pans too ■ close to each other Use the reduced fan speed func‐...
-
Page 178: Pre-Defined Cooking Profiles In Easystart
12 Pre-Defined Cooking Profiles in easyStart 12 Pre-Defined Cooking Profiles in easyStart Tried-and-true cooking profiles in six preconfigured product groups. There are tried-and-true cooking profiles in four pre-configured product groups that can be used for reliable and safe cooking. These cooking profiles can be accessed both through easyStart and through the easyTouch Cookbook. -
Page 179: Baking Product Group
12 Pre-Defined Cooking Profiles in easyStart 12.3 Baking Product Group Cooking Profiles in the Baking Product Group Tried-and-true cooking profiles in the 'Baking' product group: Product Quantity per State Accessories sheet pan Mini Croissants 338°F 12ea 3.2oz Thaw 30 min as di‐ Baking tray;... - Page 181 Item no. Order No. Additional technical documentation can be found in the download center at : www.convotherm.com Welbilt off ers fully-integrated kitchen systems and our products are ® backed by KitchenCare aftermarket parts and service. Welbilt’s portfolio of award-winning brands includes Cleveland™, Convotherm , Delfi...
- Page 182 Combi Oven OES 10.10 mini easyTouch Operating manual UL, USA – Original, ENG...
- Page 184 FOR THE INSTALLER, OPERATOR, RESPONSIBLE OWNER FOR YOUR SAFETY Do not store or use gasoline or other flammable vapors or liquids in the vicinity of this or any other unit. WARNING Improper installation, adjustment, alteration, service or maintenance can cause property damage, injury and death. Read the installation, operating and maintenance instructions thoroughly before installing or servicing this equipment.
- Page 186 Table of Contents Table of Contents General Environmental Protection Identifying Your Combi Oven Customer Documentation Structure Safety Information That Must Be Read without Exception About this operating manual Configuration and Functions Basic overview of how the combi oven works The Combi Oven's Configuration and Functions Control Panel Layout and Functions For Your Safety Basic Safety Instructions...
- Page 187 Table of Contents 5.3.7 The 'Sounds' menu 5.3.8 The 'Password' menu 5.3.9 The 'Backup/Restore' menu 5.3.10 The 'Import/Export' menu How to Work with the Touchscreen Entering Cooking Data 6.1.1 Setting Up a Cooking Program 6.1.2 Setting Up a Rethermalization Program Using Extra Functions and Special Programs 6.2.1 Using Delta-T Cooking...
- Page 188 Table of Contents 9.2.2 Cooling Down the Oven 9.2.3 Cleaning the oven automatically 9.2.4 Cleaning a Cold Oven Cavity Semi-Automatically 9.2.5 Cleaning a Hot Oven Cavity Semi-Automatically 9.2.6 Using the ConvoClean System's Fully Automatic Cleaning Sequence to Clean the Oven When It Is Cold 9.2.7 Using the ConvoClean System's Fully Automatic Cleaning Sequence to Clean the Oven When It Is Hot...
-
Page 189: General
1 General 1 General Purpose of this section This section provides information on how to identify your combi oven and how to use this manual. 1.1 Environmental Protection Policy statement Our customers' expectations, the legal regulations and standards we have to follow, and our compa‐ ny's reputation are what drives the quality and service behind all our products. -
Page 190: Identifying Your Combi Oven
1 General 1.2 Identifying Your Combi Oven Nameplate location The nameplate is found on the left side of the combi oven. Nameplate layout and structure The nameplate makes it easy to identify your unit. The nameplate has the following layout: Designation Unit name Combi Oven Trade name... -
Page 191: Customer Documentation Structure
1 General 1.3 Customer Documentation Structure Customer documentation parts The customer documentation for the combi oven is made up of the following: Installation manual ■ Operating manual (this manual) ■ Operating instructions for easyStart mode ■ Help pages integrated into the software (excerpt from the operating manual) ■... -
Page 192: Safety Information That Must Be Read Without Exception
1 General 1.4 Safety Information That Must Be Read without Exception Safety information found in the documentation for the customer The most important safety information for the combi oven is essentially found in the installation manual and operating manual. The installation manual provides safety information for the transportation, setup, installation, placing- into-operation, and removal-from-service tasks it describes. -
Page 193: About This Operating Manual
1 General 1.5 About this operating manual Purpose The purpose of this operating manual is to provide everyone working with/on the combi oven with the information they will need to carry out operation, cleaning, and limited maintenance work safely and correctly. Target groups This operating manual is intended for the following target groups: Name of target group... - Page 194 1 General Section / sub-section Purpose Target group Cleaning and mainte‐ Includes the cleaning schedule Cook ■ nance Operator Provides the maintenance schedule where relevant to the ■ operator Provides cleaning instructions ■ The cooking programs in Goes over the cooking programs Cook your combi oven Coming Up with Your...
-
Page 195: Configuration And Functions
2 Configuration and Functions 2 Configuration and Functions Purpose of this section This section describes the combi oven's configuration and explains its functions. 2.1 Basic overview of how the combi oven works Basic cooking programs Your combi oven can be used to cook a variety of food. To do this, you can use any of the following basic cooking programs on the combi oven: Steam ■... -
Page 196: The Combi Oven's Configuration And Functions
2 Configuration and Functions 2.2 The Combi Oven's Configuration and Functions Combi oven's configuration The following figure illustrates the combi oven: Shelf options The following table lists the various shelf options: Capacity Qty. 13" x 18" half size sheet pans [pcs] 12"... -
Page 197: Control Panel Layout And Functions
2 Configuration and Functions 2.3 Control Panel Layout and Functions Control panel layout The figure below shows the control panel: Control panel parts Following is an explanation of what the control panel's parts do: Designation Function Main switch Used to turn the combi oven on and off Touchscreen Central combi oven controls Used by touching the icons on the touchscreen... -
Page 198: For Your Safety
3 For Your Safety 3 For Your Safety Purpose of this section The purpose of this section is to provide you with all the information you will need in order to safely work with/on the combi oven without putting yourself and others at risk. Read this section very carefully! 3.1 ... -
Page 199: Your Combi Oven's Intended Use
3 For Your Safety 3.2 Your Combi Oven's Intended Use The combi oven's intended use The combi oven has been designed and built exclusively for cooking a variety of food in standard- ■ size bakeware (steam table pans, sheet pans, etc.). Steam, convection, and combi-steam (steam superheated without pressure) are used for this purpose. - Page 200 3 For Your Safety Prerequisites for cleaning Only use the cleaning agents approved by the manufacturer. ■ Do NOT use a pressure washer to clean the unit. ■ Do NOT use a water jet to clean the outside of the unit. Do not use a water jet for anything other ■...
-
Page 201: Warning Labels On The Combi Oven
3 For Your Safety 3.3 Warning Labels on the Combi Oven Warning label locations The warning labels are found at the following locations on the combi oven: Warning labels on unit door The following warning labels (1) are located on the unit door: Warning Description Hot food, hot bakeware, and hot liquid warning... - Page 202 3 For Your Safety Warning Description CAUTION Surface(s) and Handle(s) may be hot. ATTENTION Surface(s) et poignée(s) chaudes INTERIOR CLEANING INSTRUCTION WARNING To clean the cooking compartment see the operator's manual for complete instructions. ConvoClean cleaning solutions followed by the ConvoRinse solution.
-
Page 203: Overview Of Hazards
3 For Your Safety 3.4 Overview of Hazards General rules on how to deal with hazards and safety measures The combi oven has been designed in such a way as to ensure that users will be protected from all hazards that can be reasonably prevented using design-based measures. However, the combi oven's intended use entails a series of residual risks that will require you to take precautions in order to avoid them. - Page 204 3 For Your Safety Fan (4) The combi oven has a fan in it. This poses the following risks: Risk of hand injuries caused by the fan behind the suction panel in the oven cavity when the suc‐ ■ tion panel is not properly installed in its place. Spray head Using a recoil hand shower can pose various hazards: Risk of scalding if the spray head is used to spray water into the hot oven cavity, e.g., to clean it.
-
Page 205: Hazards And Safety Measures During Operation
3 For Your Safety 3.5 Hazards and Safety Measures During Operation Safety hazard: heat – hot surfaces When operating the unit, keep the following hazards in mind and take the actions required in order to eliminate and/or minimize these hazards: Risk / hazard Where and in which situa‐... - Page 206 3 For Your Safety Safety hazard: heat – other When operating the unit, keep the following hazards in mind and take the actions required in order to eliminate and/or minimize these hazards: Risk / hazard Where and in which situa‐ What to do Safety tions will the risk/hazard ex‐...
- Page 207 3 For Your Safety Safety hazard: microbiological food contamination When operating the unit, keep the following hazards in mind and take the actions required in order to eliminate and/or minimize these hazards: Risk / hazard Where and in which situa‐ What to do Safety device tions will the risk/hazard ex‐...
- Page 208 3 For Your Safety Safety hazard: moving units on bases with casters Risk / hazard Where and in which situa‐ What to do Safety device tions will the risk/hazard ex‐ ist? Pinch point hazard (for When units are being moved Do not pull the base with Retaining ele‐...
- Page 209 3 For Your Safety Safety hazard: water When operating the unit, keep the following hazards in mind and take the actions required in order to eliminate and/or minimize these hazards: Risk / hazard Where and in which situa‐ What to do Safety device tions will the risk/hazard ex‐...
-
Page 210: Hazards And Safety Measures During Cleaning
3 For Your Safety 3.6 Hazards and Safety Measures During Cleaning Safety hazard: cleaning agents When cleaning the unit, keep the following hazards in mind and take the actions required in order to eliminate and/or minimize these hazards: Risk / hazard Where and in which situa‐... - Page 211 3 For Your Safety Safety hazard: microbiological food contamination When cleaning the unit, keep the following hazards in mind and take the actions required in order to eliminate and/or minimize these hazards: Risk / hazard Where and in which situa‐ What to do Safety device tions will the risk/hazard ex‐...
- Page 212 3 For Your Safety Safety hazard: moving units on bases with casters Risk / hazard Where and in which situa‐ What to do Safety device tions will the risk/hazard ex‐ ist? All the risks and haz‐ When units are being moved Before moving the unit Retaining ele‐...
- Page 213 3 For Your Safety Safety hazard: electricity When cleaning the unit, keep the following hazards in mind and take the actions required in order to eliminate and/or minimize these hazards: Risk / hazard Where and in which situa‐ What to do Safety device tions will the risk/hazard ex‐...
- Page 214 3 For Your Safety Safety hazard: mechanical unit components When cleaning the unit, keep the following hazards in mind and take the actions required in order to eliminate and/or minimize these hazards: Risk / hazard Where and in which situa‐ What to do Safety device tions will the risk/hazard ex‐...
-
Page 215: Hazards And Safety Measures During Maintenance
3 For Your Safety 3.7 Hazards and Safety Measures During Maintenance Safety hazard: heat When maintaining the unit, keep the following hazards in mind and take the actions required in order to eliminate and/or minimize these hazards: Risk / hazard Where and in which situa‐... - Page 216 3 For Your Safety Safety hazard: moving units on bases with casters Risk / hazard Where and in which situa‐ What to do Safety device tions will the risk/hazard ex‐ ist? All the risks and haz‐ When units are being moved De-energize the unit be‐...
- Page 217 3 For Your Safety Safety hazard: electricity When maintaining the unit, keep the following hazards in mind and take the actions required in order to eliminate and/or minimize these hazards: Risk / hazard Where and in which situa‐ What to do Safety device tions will the risk/hazard ex‐...
-
Page 218: Safety Devices
3 For Your Safety 3.8 Safety Devices Meaning The combi oven features a series of safety devices and guards that protect the user from a variety of hazards. All safety devices and guards must be present, fully functional, and locked properly without exception when the combi oven is being used. -
Page 219: Staff And Work Area Requirements
3 For Your Safety 3.9 Staff and Work Area Requirements Staff requirements The table below specifies the qualifications needed for each role. Provided that they have the required qualifications, a single person can take over more than one role if necessary. Staff Required qualifications Tasks... -
Page 220: Personal Protective Equipment
3 For Your Safety 3.10 Personal protective equipment Operation and Maintenance Task Tools used Personal Protective Equipment Placing food inside / tak‐ None Wear appropriate work clothes for kitchen work as ing food out required by your country-specific standards and regulations, especially: Protective clothing ■... -
Page 221: Getting Started
4 Getting Started 4 Getting Started 4.1 Turning the Combi Oven On and Off Checks before turning on the unit Before turning on the combi oven, check whether the prerequisites below are being met. Do not place the unit into operation unless all specified prerequisites are met. The unit does not have any obvious damage. -
Page 222: Switching From Easystart To Easytouch
4 Getting Started 4.2 Switching from easyStart to easyTouch Prerequisites Check whether the following prerequisites are met: You are on the easyStart mode home page. ■ Switching from easyStart to easyTouch Follow the steps below to switch from easyStart to easyTouch: Step Procedure Button... -
Page 223: Basic Steps For Cooking With Easytouch
4 Getting Started 4.3 Basic Steps for Cooking with easyTouch How to do it Your combi oven makes cooking extremely easy in five simple steps: Step Procedure How to do it: Turn the combi oven on. Turning the combi oven on and off on page Select or set up the cooking program you Accessing a cooking profile in the cookbook want. -
Page 224: Basic Steps For Rethermalization With Easytouch
4 Getting Started 4.4 Basic Steps for Rethermalization with easyTouch How to do it Your combi oven makes rethermalizing food extremely easy in five simple steps: Step Procedure How to do it: Turn the combi oven on. Turning the combi oven on and off on page Select or set up the rethermalization program Accessing a cooking profile in the cookbook you want. -
Page 225: How The Touchscreen's Pages Are Laid Out
5 How the Touchscreen's Pages Are Laid Out 5 How the Touchscreen's Pages Are Laid Out The touchscreen and its buttons Your combi oven can be controlled using the touchscreen. In other words, all of the combi oven's func‐ tions can be found on the various pages in the form of buttons. To use one of these functions, simply touch the corresponding button with your finger. - Page 226 5 How the Touchscreen's Pages Are Laid Out Button Meaning Function Cancel On input pages: Cancels the input Help Opens the help page The page indicator icons and what they mean The page indicator icons are negatives of the button icons used to open the corresponding pages. The table below only shows examples of these indicator icons and is not exhaustive.
-
Page 227: The On-Screen Help Home Page
5 How the Touchscreen's Pages Are Laid Out 5.1.2 The on-screen help home page What it looks like The buttons and what they do Following is an explanation of the buttons on the home page and what they do: Button Meaning Function Cooking Opens the 'Cooking' page:... -
Page 228: Cooking Page
5 How the Touchscreen's Pages Are Laid Out 5.1.3 Cooking page How to access the 'Cooking' page The 'Basic selection' buttons Following is an explanation of the 'Basic selection' buttons on the 'Cooking' page and what they do: Button Meaning Function Steam Used to select the Steam basic cooking program Combi-steam... - Page 229 5 How the Touchscreen's Pages Are Laid Out The 'Management' buttons Following is an explanation of the 'Management' buttons on the 'Cooking' page and what they do: Button Meaning Function Previous cooking step Jumps back one step in the cooking program ■...
- Page 230 5 How the Touchscreen's Pages Are Laid Out Keyboard used to enter the cooking time Following is an explanation of the buttons on the keyboard and what they do: Button Meaning Function Numbers Used to enter hours, minutes, and seconds Delete Deletes all input Confirm...
-
Page 231: The Easystart Page
5 How the Touchscreen's Pages Are Laid Out 5.1.4 The easyStart page How to access the 'easyStart' page! Reference to easyStart Operating Instructions For information on how the easyStart work pages are laid out, please refer to the easyStart operating instructions. Operating Manual... -
Page 232: Press&Go Page
5 How the Touchscreen's Pages Are Laid Out 5.1.5 Press&Go page How to access the 'Press&Go' page The 'Press&Go' buttons The Press&Go Page will take you directly to the cooking profiles stored under Favorites in the Cook‐ book. Following is an explanation of the buttons on the 'Press&Go' page and what they do: Button Meaning Function... -
Page 233: Rethermalization Page
5 How the Touchscreen's Pages Are Laid Out 5.1.6 Rethermalization page How to access the 'Rethermalization' page The 'Basic selection' buttons Following is an explanation of the 'Basic selection' buttons on the 'Rethermalization' page and what they do: Button Meaning Function Plates Used to select the 'Plates' rethermalization program Gastronorm... - Page 234 5 How the Touchscreen's Pages Are Laid Out The 'Management' buttons Following is an explanation of the 'Management' buttons on the 'Rethermalization' page and what they Button Meaning Function TrayTimer Starts the use of unoccupied shelf levels while a (while a rethermalization pro‐ main rethermalization program is running gram is running) Save rethermalization profile...
- Page 235 5 How the Touchscreen's Pages Are Laid Out The 'Extra Rethermalization Functions' page Following is an explanation of the buttons on the 'Extra Rethermalization Functions' page and what they do: Button Meaning Function Reduced fan speed Reduces the flow speed inside the oven Steam reducer Reduces the amount of steam coming out from the air vent.
-
Page 236: Cleaning Page
5 How the Touchscreen's Pages Are Laid Out 5.1.7 Cleaning page How to access the 'Cleaning' page The 'Cleaning program' buttons Following is an explanation of the standard cleaning program buttons and what they do: Button Meaning Function Semi-automatic cleaning Starts semi-automatic cleaning. The 'Fully automatic cleaning' buttons Following is an explanation of the fully automatic cleaning buttons and what they do: Button... -
Page 237: The Cookbook
5 How the Touchscreen's Pages Are Laid Out 5.2 The Cookbook The Cookbook This section goes over each of the Cookbook pages on the touchscreen. Moreover, it explains the but‐ tons on these pages and what they do. 5.2.1 How the Cookbook Pages Are Laid Out How the main Cookbook pages are laid out The following figure shows the layout for the 'Product groups' page as an example representing the three main Cookbook pages. - Page 238 5 How the Touchscreen's Pages Are Laid Out Functions that can be used on more than one page and what they do Page-specific buttons are covered in the separate sections for each page. Meanwhile, the navigation pane features a number of buttons that have the same function on more than one page: Button Meaning...
-
Page 239: The 'Favorites' Page
5 How the Touchscreen's Pages Are Laid Out 5.2.2 The 'Favorites' page How to access the 'Favorites' page The 'Favorites' buttons Following is an explanation of the buttons on the 'Favorites' page and what they do: Button Meaning Function Basic selection Favorites Shows all cooking profile favorites available for se‐... - Page 240 5 How the Touchscreen's Pages Are Laid Out Button Meaning Function Remove Removes the selected cooking profile from the Fa‐ vorites list Adds the selected cooking profile to the Favorites list Delete Deletes the selected cooking profile from the system Change icon This button does not do anything on the 'Edit Favor‐...
-
Page 241: The 'Product Groups' Page
5 How the Touchscreen's Pages Are Laid Out 5.2.3 The 'Product groups' page How to access the 'Product groups' page! The 'Product groups' buttons Following is an explanation of the buttons on the 'Product groups' page and what they do: Button Meaning Function Basic selection... - Page 242 5 How the Touchscreen's Pages Are Laid Out Button Meaning Function Press to scroll up Scrolls up Press to scroll down Scrolls down Create product group Opens the 'Create product group' page Edit product group Opens the 'Edit product group' page for the selected product group.
- Page 243 5 How the Touchscreen's Pages Are Laid Out The 'Manage Icons' page Following is an explanation of the buttons on the 'Manage Icons' page and what they do: Button Meaning Function Basic selection Press to scroll up Scrolls up Press to scroll down Scrolls down Folder Selects the folder as the source for the images...
-
Page 244: The 'Cooking Profiles' Page
5 How the Touchscreen's Pages Are Laid Out 5.2.4 The 'Cooking profiles' page How to access the 'Cooking profiles' page! The 'Cooking profiles' buttons Following is an explanation of the buttons on the 'Cooking profile' page and what they do: Button Meaning Function Basic selection... - Page 245 5 How the Touchscreen's Pages Are Laid Out The 'Manage Icons' page Following is an explanation of the buttons on the 'Manage Icons' page and what they do: Button Meaning Function Basic selection Press to scroll up Scrolls up Press to scroll down Scrolls down Folder Selects the folder as the source for the images...
-
Page 246: Settings
5 How the Touchscreen's Pages Are Laid Out 5.3 Settings Settings This section goes over the various touchscreen pages that can be used to configure the unit's settings. Moreover, it explains the buttons on these pages and what they do. 5.3.1 Settings Pages How to access the 'Settings' page The 'Settings' buttons Following is an explanation of the buttons on the 'Settings' page and what they do:... -
Page 247: The 'General' Menu
5 How the Touchscreen's Pages Are Laid Out 5.3.2 The 'General' menu How to access the 'General' menu 'General' tab The following functions can be accessed by opening the 'General' tab: Menu type Meaning Function Number of shelves Used to set the number of shelves that can be used Temperature unit Used to select °C or °F as the temperature unit 'Food monitoring' tab... -
Page 248: The 'Language / Cookbook' Menu
5 How the Touchscreen's Pages Are Laid Out 5.3.3 The 'Language / Cookbook' menu How to access the 'Language / Cookbook' menu! The 'Language / Cookbook' menu The following functions can be accessed by opening the 'Language / Cookbook' menu: Button Meaning Function Language... -
Page 249: The 'Transfer' Menu
5 How the Touchscreen's Pages Are Laid Out 5.3.4 The 'Transfer' menu How to access the 'Transfer' menu! The 'Transfer' buttons Following is an explanation of the buttons on the 'Transfer' page and what they do: Button Meaning Function Transfer time Calendar Used to select the transfer date Transfer interval... -
Page 250: The 'Logbook' Menu
5 How the Touchscreen's Pages Are Laid Out 5.3.5 The 'Logbook' menu How to access the 'Logbook' menu How the 'Logbook' menu is laid out The following figure shows the layout for the 'Logbook' menu: The sections in the 'Logbook' menu and what they show/do Following is a description of what the sections in the 'Logbook' menu show/do: Menu type Designation... -
Page 251: The 'Date / Time' Menu
5 How the Touchscreen's Pages Are Laid Out 5.3.6 The 'Date / Time' menu How to access the 'Date / Time' menu The 'Date / Time' menu The following functions can be accessed by opening the 'Date / Time' menu: Menu type Meaning Function Calendar... -
Page 252: The 'Sounds' Menu
5 How the Touchscreen's Pages Are Laid Out 5.3.7 The 'Sounds' menu How to access the 'Sounds' menu 'Volume' tab The following functions can be accessed by opening the 'Volume' tab: Menu type Meaning Function Volume Used to adjust the volume 'Sounds' tab The following functions can be accessed by opening the 'Sounds' tab: Menu type... -
Page 253: The 'Password' Menu
5 How the Touchscreen's Pages Are Laid Out 5.3.8 The 'Password' menu How to access the 'Password' menu The 'Password' menu The following functions can be accessed by opening the 'Password' menu: Menu type Meaning Function Current password Shows the current password in encrypted format New password Used to enter a new password Default password... -
Page 254: The 'Backup/Restore' Menu
5 How the Touchscreen's Pages Are Laid Out 5.3.9 The 'Backup/Restore' menu How to access the 'Backup/Restore' menu The 'Backup/Restore' buttons Following is an explanation of the buttons on the 'Backup/Restore' page and what they do: Button Meaning Function Backup Used to open the 'Backup' tab: Used to transfer data from the unit to the SD card ■... -
Page 255: The 'Import/Export' Menu
5 How the Touchscreen's Pages Are Laid Out 5.3.10 The 'Import/Export' menu How to access the 'Import/Export' menu! The 'Import/Export' buttons Following is an explanation of the buttons on the 'Import/Export' page and what they do: Button Meaning Function Import Used to open the 'Import' tab: Used to transfer data from the USB drive to the ■... - Page 256 5 How the Touchscreen's Pages Are Laid Out Button Meaning Function Controls Used to export the unit's operating parameters Purpose: Checking the corresponding status ■ Format: XML Information for each operating parameter: ■ Name ■ Unit ■ Minimum value ■ Maximum value ■...
-
Page 257: How To Work With The Touchscreen
6 How to Work with the Touchscreen 6 How to Work with the Touchscreen Basic instructions for using the touchscreen This section provides step-by-step instructions for the most important tasks involving the touchscreen. 6.1 Entering Cooking Data How it works This section goes over the basic steps required in order to operate the combi oven. 6.1.1 Setting Up a Cooking Program How to access the 'Cooking' page Setting Up a Cooking Program... - Page 258 6 How to Work with the Touchscreen Add a cooking step. Repeat steps 1 through 7. To access the 'Cooking Step Overview' page, press: For more information... Next steps Day-to-Day Cooking Operating Manual...
-
Page 259: Setting Up A Rethermalization Program
6 How to Work with the Touchscreen 6.1.2 Setting Up a Rethermalization Program How to access the 'Rethermalization' page Setting Up a Rethermalization Program Follow the steps below to set up the rethermalization program you want: Step Procedure Button Select a basic rethermalization program. Enter the rethermalization temperature you want. -
Page 260: Using Extra Functions And Special Programs
6 How to Work with the Touchscreen 6.2 Using Extra Functions and Special Programs How it works This section goes over the basic steps required in order to operate the combi oven. 6.2.1 Using Delta-T Cooking How to access the 'Cooking' page Using Delta-T Cooking Follow the steps below to set up a cooking program with Delta-T cooking: Step... -
Page 261: Using Functions While A Program Is Running
6 How to Work with the Touchscreen 6.3 Using Functions While a Program Is Running How it works This section goes over the basic steps required in order to operate the combi oven. 6.3.1 Changing Cooking Parameters While a Program Is Running Prerequisites Check whether the following prerequisites are met: You have selected a cooking or rethermalization program. -
Page 262: Working With The Cookbook
6 How to Work with the Touchscreen 6.4 Working with the Cookbook The combi oven cookbook This section explains how you can create, edit, and manage cooking profiles in the Cookbook. 6.4.1 Accessing a cooking profile in the cookbook How to access the 'Favorites' page Opening a cooking profile from your Favorites Follow the steps below to open a cooking profile from your Favorites: Step... - Page 263 6 How to Work with the Touchscreen How to access the 'Cooking profiles' page! Opening a Cooking Profile from Stored Cooking Profiles Follow the steps below to open a cooking profile from the cooking profiles stored in the Cookbook: Step Page Procedure Button...
-
Page 264: Opening A Bakepro Cooking Profile From The Cookbook
6 How to Work with the Touchscreen 6.4.2 Opening a BakePro Cooking Profile from the Cookbook How to access the 'Product groups' page! Opening a BakePro Cooking Profile from the Cookbook BakePro is a pre-programmed baking profile with three different settings Each BakePro cooking profile consists of four cooking steps. -
Page 265: Create Cooking Profile
6 How to Work with the Touchscreen 6.4.3 Create cooking profile Create cooking profile Follow the steps below to create a cooking profile: Step Page Procedure Button Set up a cooking program. Use the 'Cooking' page to do so. Save the program as a cooking profile. Give the cooking profile a name. - Page 266 6 How to Work with the Touchscreen Step Page Procedure Button Assign an icon to the rethermalization profile. Confirm the name and icon. For more information... Next steps Adding and removing cooking profile to/from your favorites Storing / Removing Cooking Profiles in / from a Product Group Operating Manual...
-
Page 267: Changing The Name And Icon For A Cooking Profile
6 How to Work with the Touchscreen 6.4.4 Changing the name and icon for a cooking profile How to access the 'Cooking profiles' page! Changing the name and icon for a cooking profile Follow the steps below to change the name and icon for a cooking profile: Step Page Procedure... -
Page 268: Delete The Cooking Profile From The Cookbook
6 How to Work with the Touchscreen 6.4.5 Delete the cooking profile from the cookbook How to access the 'Cooking profiles' page! Delete the cooking profile from the cookbook Follow the steps below to delete a cooking profile from the cookbook: Step Page Procedure... -
Page 269: Adding And Removing Cooking Profile To/From Your Favorites
6 How to Work with the Touchscreen 6.4.6 Adding and removing cooking profile to/from your favorites How to access the 'Favorites' page Adding a cooking profile to your favorites Follow the steps below to add a cooking profile to your favorites: Step Page Op‐... - Page 270 6 How to Work with the Touchscreen Delete the cooking profile from the cookbook If you need to, you can also delete a cooking profile from the cookbook using the favorites page. Fol‐ low the steps below: Step Page Op‐ Procedure Button tion...
-
Page 271: Creating New Product Groups
6 How to Work with the Touchscreen 6.4.7 Creating New Product Groups How to access the 'Product groups' page! Creating New Product Groups Follow the steps below to create a new cooking profile group: Step Page Procedure Button Open the 'Manage product group' page. Open the 'Create product group' page. -
Page 272: Changing The Name And Icon For A Product Group
6 How to Work with the Touchscreen 6.4.8 Changing the name and icon for a product group How to access the 'Product groups' page! Changing the name and icon for a product group Follow the steps below to change the name and icon for a product group: Step Page Op‐... -
Page 273: Storing / Removing Cooking Profiles In / From A Product Group
6 How to Work with the Touchscreen 6.4.9 Storing / Removing Cooking Profiles in / from a Product Group How to access the 'Product groups' page! Storing a Cooking Profile in a Product Group Follow the steps below to store a cooking profile in a product group: Step Page Op‐... - Page 274 6 How to Work with the Touchscreen Delete the cooking profile from the cookbook If you need to, you can also delete a cooking profile from the cookbook using the product group page. Follow the steps below: Step Page Op‐ Procedure Button tion...
-
Page 275: Press To Delete The Product Group
6 How to Work with the Touchscreen 6.4.10 Press to delete the product group How to access the 'Product groups' page! Press to delete the product group Follow the steps below to delete a product group: Step Page Op‐ Procedure Button tion Open the 'Manage product group' page. -
Page 276: Making Changes With The Settings
6 How to Work with the Touchscreen 6.5 Making changes with the settings Making changes with the settings This section goes over the considerations that must be observed when making changes with the set‐ tings. 6.5.1 Options that can be configured with the service interface Configurable options There are additional functions that must be enabled with the service interface in order to make the use of your combi oven even safer. -
Page 277: Cooking And Rethermalizing
7 Cooking and Rethermalizing 7 Cooking and Rethermalizing Cooking in detail This section goes over the steps you need to follow when cooking or rethermalizing food and how you can take full advantage of all the functions featured by your combi oven. 7.1 ... - Page 278 7 Cooking and Rethermalizing Hot surfaces Risk of burns posed by high temperatures inside the oven cavity and on the inside of the unit door Touching any interior oven cavity parts, the inside of the unit door, or any parts that are found inside the cooking compartment during cooking may result in burns.
-
Page 279: Cooking With Press&Go
7 Cooking and Rethermalizing 7.2 Cooking with Press&Go For your safety when working with/on the combi oven Before starting work, read and understand the rules, risks, and hazards specified in Safely Using the Unit on page 109 and follow all the corresponding instructions without exception. Prerequisites Check whether the following prerequisites are met: The combi oven must have been properly cleaned. - Page 280 7 Cooking and Rethermalizing For more information... How to do it right Safely Opening and Closing the Unit Door Placing Food Inside and Taking It Out Removing and installing racks Removing and installing the suction panel Putting Away and Removing the Core Temperature Probe Plugging in the USB stick Operating Manual...
-
Page 281: Day-To-Day Cooking
7 Cooking and Rethermalizing 7.3 Day-to-Day Cooking For your safety when working with/on the combi oven Before starting work, read and understand the rules, risks, and hazards specified in Safely Using the Unit on page 109 and follow all the corresponding instructions without exception. Prerequisites Check whether the following prerequisites are met: The combi oven must have been properly cleaned. - Page 282 7 Cooking and Rethermalizing Cooking when the oven is already hot If the combi oven is already at the required temperature, follow the steps below when cooking food: Step Procedure Button If you already used the same cooking program before, you can skip this step.
-
Page 283: Day-To-Day Rethermalization
7 Cooking and Rethermalizing 7.4 Day-to-Day Rethermalization For your safety when working with/on the combi oven Before starting work, read and understand the rules, risks, and hazards specified in Safely Using the Unit on page 109 and follow all the corresponding instructions without exception. Prerequisites Check whether the following prerequisites are met: The combi oven must have been properly cleaned. - Page 284 7 Cooking and Rethermalizing Rethermalization when the oven is already hot If the combi oven is already at the required temperature, follow the steps below when rethermalizing food: Step Procedure Button If you already used the same rethermalization program be‐ fore, you can skip this step.
-
Page 285: Manual Steaming During Cooking
7 Cooking and Rethermalizing 7.5 Manual Steaming During Cooking Prerequisites Check whether the following prerequisites are met: You must have selected the 'Combi-steam' or 'Hot air' cooking program. ■ One of these programs is running. ■ Manual Steaming During Cooking Follow the steps below to manually steam food during cooking: Step Procedure Button... -
Page 286: Using Unoccupied Shelves During Cooking
7 Cooking and Rethermalizing 7.6 Using Unoccupied Shelves During Cooking For your safety when working with/on the combi oven Before starting work, read and understand the rules, risks, and hazards specified in Safely Using the Unit on page 109 and follow all the corresponding instructions without exception. Prerequisites Check whether the following prerequisites are met: Aside from the cooking time, the additional food needs the same cooking parameters as the food in... -
Page 287: Using Unoccupied Shelves During Rethermalization
7 Cooking and Rethermalizing 7.7 Using Unoccupied Shelves During Rethermalization For your safety when working with/on the combi oven Before starting work, read and understand the rules, risks, and hazards specified in Safely Using the Unit on page 109 and follow all the corresponding instructions without exception. Prerequisites Check whether the following prerequisites are met: Aside from the rethermalization time, the additional food needs the same rethermalization parame‐... -
Page 288: Cooling Down The Oven
7 Cooking and Rethermalizing 7.8 Cooling Down the Oven For your safety when working with/on the combi oven Before starting work, read and understand the rules, risks, and hazards specified in Safely Using the Unit on page 109 and follow all the corresponding instructions without exception. Purpose You can use the 'Cool down' extra function to quickly cool down the oven so that you can start a cook‐... -
Page 289: Cleaning The Oven Automatically
7 Cooking and Rethermalizing 7.9 Cleaning the oven automatically Purpose The 'SafeCooldown' function automatically cools down the oven before food is placed inside so that you can start a cooking program with a temperature that is lower than the oven's current one. During this automatic cooling down process, the unit door will always remain closed, ensuring that us‐... -
Page 290: How To Do It Right
8 How to do it right 8 How to do it right Important steps involved in using the combi oven This section goes over certain important steps that you will need to use repeatedly when using the combi oven. 8.1 Safely Using the Unit For your and your employees' safety Every person (user) must read and understand the contents in the 'For Your Safety' on page 17 sec‐... -
Page 291: Safely Opening And Closing The Unit Door
8 How to do it right 8.2 Safely Opening and Closing the Unit Door For your safety when working with/on the combi oven Before starting work, read and understand the rules, risks, and hazards specified in Safely Using the Unit on page 109 and follow all the corresponding instructions without exception. Prerequisites When placed on top of a work table, the unit must be secured in such a way that it will not slide out of place. -
Page 292: Placing Food Inside And Taking It Out
8 How to do it right 8.3 Placing Food Inside and Taking It Out For your safety when working with/on the combi oven Before starting work, read and understand the rules, risks, and hazards specified in Safely Using the Unit on page 109 and follow all the corresponding instructions without exception. Hot liquids Risk of scalding posed by hot liquids Spilling liquid food can result in scalding to the face and hands. - Page 293 8 How to do it right Taking food out Follow the steps below to take food out: Step Procedure Open the unit door. Take out the food, making sure the container is in a horizontal position. For more information... How to do it right Safely Opening and Closing the Unit Door Operating Manual...
-
Page 294: Removing And Installing Racks
8 How to do it right 8.4 Removing and installing racks For your safety when working with/on the combi oven Before starting work, read and understand the rules, risks, and hazards specified in Safely Using the Unit on page 109 and follow all the corresponding instructions without exception. Removing racks Follow the steps below to remove a rack: Step... - Page 295 8 How to do it right Installing racks Follow the steps below to install the racks: Step Procedure Follow the same steps used to remove the racks, but in opposite order. Check to make sure that the racks have been installed properly. Check to make sure that the sheet pans can be easily slid in.
-
Page 296: Removing And Installing The Suction Panel
8 How to do it right 8.5 Removing and installing the suction panel For your safety when working with/on the combi oven Before starting work, read and understand the rules, risks, and hazards specified in Safely Using the Unit on page 109 and follow all the corresponding instructions without exception. Prerequisites Check whether the following prerequisites are met: The rack must have been removed. - Page 297 8 How to do it right For more information... How to do it right Removing and installing racks Operating Manual...
-
Page 298: Putting Away And Removing The Core Temperature Probe
8 How to do it right 8.6 Putting Away and Removing the Core Temperature Probe For your safety when working with/on the combi oven Before starting work, read and understand the rules, risks, and hazards specified in Safely Using the Unit on page 109 and follow all the corresponding instructions without exception. Purpose If you will not be needing the core temperature probe for the cooking sequence you will be using, make sure to put it away. -
Page 299: Plugging In The Usb Stick
8 How to do it right 8.7 Plugging in the USB stick For your safety when working with/on the combi oven Before starting work, read and understand the rules, risks, and hazards specified in Safely Using the Unit on page 109 and follow all the corresponding instructions without exception. Purpose of USB sliding cover The sliding cover protects the USB port so that no steam will be able to enter the control system elec‐... -
Page 300: Cleaning And Maintenance
9 Cleaning and maintenance 9 Cleaning and maintenance Cleaning and maintaining the combi oven This section provides information on the cleaning and maintenance schedules and explains how to clean your combi oven. 9.1 Cleaning schedule and cleaning agent Cleaning the combi oven This section provides information on the cleaning schedule and cleaning agents used to clean your combi oven. - Page 301 9 Cleaning and maintenance Weekly cleaning The table below provides an overview of the cleaning tasks that need to be carried out on a weekly basis: What needs to be cleaned? Procedure Cleaning agents The double glass door on the in‐ Clean the double-pane door on Common household glass side...
-
Page 302: Cleaning Agents
9 Cleaning and maintenance 9.1.2 Cleaning agents Cleaning agents Only use the cleaning agents specified here when cleaning the oven cavity. Designation Product Label color Cleaning agents ConvoClean forte Rinse aid ConvoCare Green NOTICE: The warranty will be void if there is any damage that can be traced back to improper cleaning or to the use of incorrect cleaning agents. - Page 303 9 Cleaning and maintenance Cleaning agent and rinse aid consumption The following table shows the cleaning agent and rinse aid consumption levels per cleaning sequence in fl oz (USA): Agent Consumption (fl oz) Step 1 Step 2 Step 3 Step 4 Express Care‐...
-
Page 304: Cleaning Programs And Tasks
9 Cleaning and maintenance 9.2 Cleaning programs and tasks Cleaning the combi oven This section explains how to clean your combi oven. 9.2.1 Working Safely When Cleaning For your and your employees' safety Every person (user) must read and understand the contents in the 'For Your Safety' on page 17 sec‐ tion before they work with or on the combi oven for the first time. - Page 305 9 Cleaning and maintenance Rules for safely moving and parking bases with casters In order to avoid hazards, follow the rules below when moving bases with casters with the units: Pay attention to all utility and hose connections when moving the unit. Make sure not to roll over ■...
- Page 306 9 Cleaning and maintenance Contact with cleaning agents Risk of chemical burns and skin, eye, and respiratory tract irritation The ConvoClean new cleaning agent and the ConvoCare rinse aid will cause skin, eye, and respiratory tract irritation upon direct contact. The ConvoClean forte cleaning agent will result in chemical burns to the skin, eyes, and respiratory tract upon direct contact.
-
Page 307: Cooling Down The Oven
9 Cleaning and maintenance 9.2.2 Cooling Down the Oven For your safety when cleaning Before starting any cleaning work, familiarize yourself with the rules, risks, and hazards specified in Working Safely When Cleaning on page 123 and follow all the corresponding instructions without ex‐ ception. -
Page 308: Cleaning The Oven Automatically
9 Cleaning and maintenance 9.2.3 Cleaning the oven automatically Purpose The 'SafeCooldown' function automatically cools down the oven before food is placed inside so that you can start a cooking program with a temperature that is lower than the oven's current one. During this automatic cooling down process, the unit door will always remain closed, ensuring that us‐... -
Page 309: Cleaning A Cold Oven Cavity Semi-Automatically
9 Cleaning and maintenance 9.2.4 Cleaning a Cold Oven Cavity Semi-Automatically For your safety when cleaning Before starting any cleaning work, familiarize yourself with the rules, risks, and hazards specified in Working Safely When Cleaning on page 123 and follow all the corresponding instructions without ex‐ ception. - Page 310 9 Cleaning and maintenance Step Procedure Button Use the spray bottle to spray ConvoClean new or Con‐ voClean forte onto the oven cavity, the suction panel and the area behind it, the rack, and the drain on the bottom. Close the unit door. Result: The program will continue running automatically (ap‐...
- Page 311 9 Cleaning and maintenance Related subjects Cleaning agents Cleaning schedule Operating Manual...
-
Page 312: Cleaning A Hot Oven Cavity Semi-Automatically
9 Cleaning and maintenance 9.2.5 Cleaning a Hot Oven Cavity Semi-Automatically For your safety when cleaning Before starting any cleaning work, familiarize yourself with the rules, risks, and hazards specified in Working Safely When Cleaning on page 123 and follow all the corresponding instructions without ex‐ ception. - Page 313 9 Cleaning and maintenance Step Procedure Button Use the spray bottle to spray ConvoClean new or Con‐ voClean forte onto the oven cavity, the suction panel and the area behind it, the rack, and the drain on the bottom. Close the unit door. Result: The program will continue running automatically (ap‐...
- Page 314 9 Cleaning and maintenance For more information... How to do it right Removing and installing racks Removing and installing the suction panel Related subjects Cleaning agents Cleaning schedule Operating Manual...
-
Page 315: Using The Convoclean System's Fully Automatic Cleaning Sequence To Clean The
9 Cleaning and maintenance 9.2.6 Using the ConvoClean System's Fully Automatic Cleaning Sequence to Clean the Oven When It Is Cold For your safety when cleaning Before starting any cleaning work, familiarize yourself with the rules, risks, and hazards specified in Working Safely When Cleaning on page 123 and follow all the corresponding instructions without ex‐... - Page 316 9 Cleaning and maintenance Step Procedure Button Close the unit door. Result: The combi oven will start the fully automatic cleaning cycle. Warning: Do not, under any circumstance, interrupt the cycle. Do not open the unit door. Wait until an acoustic signal is emitted at the end of the cleaning process.
-
Page 317: Using The Convoclean System's Fully Automatic Cleaning Sequence To Clean The
9 Cleaning and maintenance 9.2.7 Using the ConvoClean System's Fully Automatic Cleaning Sequence to Clean the Oven When It Is Hot For your safety when cleaning Before starting any cleaning work, familiarize yourself with the rules, risks, and hazards specified in Working Safely When Cleaning on page 123 and follow all the corresponding instructions without ex‐... - Page 318 9 Cleaning and maintenance Step Procedure Button Turn the rotary nozzle on the oven cavity's top panel once to make sure it moves freely. Close the unit door. Result: The combi oven will start the fully automatic cleaning cycle. Warning: Do not, under any circumstance, interrupt the cycle.
-
Page 319: Cleaning The Hygienic Removable Gasket
9 Cleaning and maintenance 9.2.8 Cleaning the hygienic removable gasket For your safety when cleaning Before starting any cleaning work, familiarize yourself with the rules, risks, and hazards specified in Working Safely When Cleaning on page 123 and follow all the corresponding instructions without ex‐ ception. -
Page 320: Clean The Double-Pane Door
9 Cleaning and maintenance 9.2.9 Clean the double-pane door For your safety when cleaning Before starting any cleaning work, familiarize yourself with the rules, risks, and hazards specified in Working Safely When Cleaning on page 123 and follow all the corresponding instructions without ex‐ ception. -
Page 321: Cleaning The Oven Cavity Behind The Suction Panel
9 Cleaning and maintenance 9.2.10 Cleaning the oven cavity behind the suction panel For your safety when cleaning Before starting any cleaning work, familiarize yourself with the rules, risks, and hazards specified in Working Safely When Cleaning on page 123 and follow all the corresponding instructions without ex‐ ception. - Page 322 9 Cleaning and maintenance For more information... How to do it right Removing and installing racks Removing and installing the suction panel Related subjects Cleaning agents Cleaning schedule Operating Manual...
-
Page 323: Replacing The Cleaning Agent Canister Containing Convoclean Forte
9 Cleaning and maintenance 9.2.11 Replacing the cleaning agent canister containing ConvoClean forte For your safety when cleaning Before starting any cleaning work, familiarize yourself with the rules, risks, and hazards specified in Working Safely When Cleaning on page 123 and follow all the corresponding instructions without ex‐ ception. -
Page 324: Replacing Cleaning Agent Canisters With Convocare
9 Cleaning and maintenance 9.2.12 Replacing cleaning agent canisters with ConvoCare For your safety when cleaning Before starting any cleaning work, familiarize yourself with the rules, risks, and hazards specified in Working Safely When Cleaning on page 123 and follow all the corresponding instructions without ex‐ ception. -
Page 325: Maintenance
9 Cleaning and maintenance 9.3 Maintenance Combi oven maintenance This section provides information on the maintenance schedule and goes over the maintenance tasks that you will need to perform. Contact Customer Service Please have the following unit information ready when contacting Customer Service: Item number on unit label ■... -
Page 326: Emergency Mode
9 Cleaning and maintenance 9.3.2 Emergency Mode Running the combi oven in emergency mode The combi oven features an emergency mode in order to allow you to keep using it if there is an error or fault that cannot be fixed right away. This mode will let you keep running the unit (with a number of limitations) even when there is a mal‐... - Page 327 9 Cleaning and maintenance Fault Error Display mes‐ Comment code sage Condenser Up to Up to Up to Up to Higher water consumption due E25.0 sensor dis‐ 356°F 356°F 356°F 356°F to the need to cool down the continuity condenser continuously Algo.
-
Page 328: Troubleshooting - Error Codes
9 Cleaning and maintenance 9.3.3 Troubleshooting – Error Codes Error message parts The following figure shows the parts of an error message as an example representing all error mes‐ sages. Error message parts and what they stand for Following is an explanation of what the parts in each error message stand for: Designation Function Error number... - Page 329 9 Cleaning and maintenance E29.3 E29.4 Condenser sensor (B3) has detected an Open the water connection valve E15.0 ■ excessively high temperature Contact Customer Service ■ Oven sensor (B6) has detected an exces‐ Contact Customer Service E11.0 sively high temperature Excessively high temperature in electrical Clean the lint screen at the back of E02.0...
-
Page 330: Troubleshooting - Problems During Operation
9 Cleaning and maintenance 9.3.4 Troubleshooting – Problems During Operation Problems with the food being cooked The following table provides information on potential problems during operation and how to fix them: Problem Possible cause Required response Irregular browning The suction panel is not closed Removing and installing the suction properly panel on page 115... - Page 331 9 Cleaning and maintenance Problems during cleaning The following table provides information on potential problems during operation and how to fix them: Problem Possible cause Required response / For more information... Black spots inside the Wrong cleaning agent Use ConvoClean forte for fully au‐ ■...
-
Page 332: Replacing The Oven Light Halogen Lamp
9 Cleaning and maintenance 9.3.5 Replacing the oven light halogen lamp Live parts Risk of electric shock posed by live parts Touching live parts underneath the covers or underneath the control panel may result in electric shock. Make sure that the covers and the control panel are properly installed. Make sure that all maintenance work under the covers, under the control panel, and on the power cord is performed exclusively by a qualified electrician from an authorized customer service company. - Page 333 9 Cleaning and maintenance The oven light's parts and what they do Following is an explanation of what the oven light's parts do: Designation Function Countersunk screw Fastener used to secure the oven light's cover Bezel Allows access to the halogen lamp Glass pane Protects the halogen lamp from moisture Seal...
- Page 334 9 Cleaning and maintenance Removing the halogen lamp Follow the steps below to remove the halogen lamp: Step Procedure Figure Unscrew the countersunk screws (1). Remove the cover (2), the glass pane (3), and the seal (4) from the oven wall (5). Dispose of the seal (4) you just removed.
- Page 335 9 Cleaning and maintenance For more information... Related subjects Removing and installing racks Turning the Combi Oven On and Off Operating Manual...
-
Page 336: The Cooking Programs In Your Combi Oven
10 The cooking programs in your combi oven 10 The cooking programs in your combi oven Coming up with your own cooking profiles You can combine the various basic and special cooking programs, together with the core temperature measurement function if necessary, into your own single-step or multi-step cooking profiles and save them in the Cookbook and in Press&Go for later use. -
Page 337: Steaming
10 The cooking programs in your combi oven 10.2 Steaming Temperature range When you use the 'Steaming' cooking program, you will be working within a temperature range of 86°F to 248°F. This cooking program is subdivided into the following categories based on the temperature being used: Biosteam (86°F - 210°F) ■... - Page 338 10 The cooking programs in your combi oven What kinds of foods can be prepared with biosteaming at a temperature of 86°F to 210°F? Some examples of foods for which this cooking program can be used include: Fish fillets ■ Terrines ■...
-
Page 339: Combi-Steam
10 The cooking programs in your combi oven 10.3 Combi-steam Temperature range When you use the 'Combi-steam' cooking program, you will be working within a temperature range of 212°F to 482°F. Application The 'Combi-steam' cooking program is suitable for all foods that require for moisture or steam to be manually added when using the corresponding traditional cooking method. -
Page 340: Hot Air
10 The cooking programs in your combi oven 10.4 Hot air Temperature range When you use the 'Hot air' cooking program, you will be working within a temperature range of 86°F to 482°F. Application The 'Hot air' cooking program can always be used when no moisture is needed. For example, when: Roasting ■... -
Page 341: Rethermalization
10 The cooking programs in your combi oven 10.5 Rethermalization Application The rethermalization cooking program can be used to rethermalize food that has already been set up on plates, trays, or standard size bakeware. Temperature range and rethermalization time The rethermalization time and temperature will depend on the product, the thickness of the various layers, and the number of plates or standard size bakeware involved in the rethermalization sequence. -
Page 342: Core Temperature Measurement
10 The cooking programs in your combi oven 10.6 Core temperature measurement How it works When you use the core temperature measurement function, the cooking process' duration will depend on the food's core temperature instead of on a set time. The core temperature measurement function can be used with all basic cooking programs. Application Using the core temperature measurement function is especially recommended when slow-roasting and when cooking food to a specific degree of doneness (medium, rare, etc.). - Page 343 10 The cooking programs in your combi oven Food Degree of doneness Internal temperature Poultry Whole chicken Well done 167 - 179°F Chicken breast Well done 167 - 170°F Chicken drumstick Well done 167 - 179°F Fish Salmon fillets Medium 145 - 149°F Operating Manual...
-
Page 344: Delta-T Cooking
10 The cooking programs in your combi oven 10.7 Delta-T cooking How it works Delta-T cooking is a cooking program in which the oven temperature increases as a function of the food's core temperature When using this method, you will always have to use the core temperature probe. - Page 345 10 The cooking programs in your combi oven Meaning Description Temperature inside the oven Phase 2 The oven temperature will continue to rise as a function of the current core temperature until current the core temperature reaches the specified value. End of phase 2 Program end: The core temperature ( ) has been reached.
-
Page 346: Ecocooking
10 The cooking programs in your combi oven 10.8 ecoCooking How it works ecoCooking is a cooking program consisting of an initial cooking phase and a finishing phase. In single-step cooking profiles, the initial cooking phase will last until a specific cooking time or core temperature is reached. -
Page 347: Overnight Cooking
10 The cooking programs in your combi oven 10.9 Overnight cooking How it works Overnight cooking is a multi-step slow-cooking program consisting of multiple cooking steps and a fi‐ nal holding phase used to let the product mature. When using this method, you will always have to use the core temperature probe. - Page 348 10 The cooking programs in your combi oven The 'BOILING overnight cooking' cooking process The following figure illustrates the cooking process: Meaning Description Temperature in‐ Oven temperature curve side the oven Actual core tem‐ Product core temperature curve perature Holding tempera‐ End core temperature ture Meaning...
- Page 349 10 The cooking programs in your combi oven How to use the function optimally Follow the recommendations below: The holding phase must not exceed 15 hours ■ If you put a mixture of different products or pieces of meat with different sizes inside, make sure to ■...
-
Page 350: Coming Up With Your Own Custom Cooking Profiles
11 Coming Up with Your Own Custom Cooking Profiles 11 Coming Up with Your Own Custom Cooking Profiles Tried-and-true cooking profiles to get you started This section provides a few tried-and-true cooking profiles that will help get you started with your own. 11.1 Side dishes Cooking profile for side dishes Typical recipes for side dishes:... -
Page 351: Fish
11 Coming Up with Your Own Custom Cooking Profiles 11.2 Fish Cooking profile for fish Typical recipes for fish: Dish Please note °F °F Fish in savoy cabbage Breaded fish fillets 10-13 Partial load ■ Use a nonstick sheet pan ■ Use the Crisp&Tasty function ■... -
Page 352: Meat, Poultry, Game
11 Coming Up with Your Own Custom Cooking Profiles 11.3 Meat, poultry, game Cooking profile for meat, poultry, and game Typical recipes for meat, poultry, and game: Dish Please note °F °F Bratwurst 7-12 Cordon bleu 10-13 Use the Crisp&Tasty function (setting 2) Duck Fill with apple and onion if desired... - Page 353 11 Coming Up with Your Own Custom Cooking Profiles Dish Please note Steamed turkey breast Turkey schnitzel 9-13 Use the Crisp&Tasty function (setting 2) Leg of venison, de‐ Lard or pickle / marinate if desired boned Venison pie Set up flue without exception Tenderloin, medium Beef Wellington Lightly coat the puff pastry with...
-
Page 354: Pastries
11 Coming Up with Your Own Custom Cooking Profiles 11.4 Pastries Cooking profile for pastries Typical recipes for pastries: Dish Please note °F °F Apple strudel 12-20 Partial load ■ Amount per sheet pan depends ■ on size Do not place sheet pans too ■... - Page 355 11 Coming Up with Your Own Custom Cooking Profiles Dish Please note °F °F Sponge cake 20-35 Partial load Spritz cookie 8-13 Amount per sheet pan depends ■ on size Do not place sheet pans too ■ close to each other Use the reduced fan speed func‐...
-
Page 356: Pre-Defined Cooking Profiles In Easystart
12 Pre-Defined Cooking Profiles in easyStart 12 Pre-Defined Cooking Profiles in easyStart Tried-and-true cooking profiles in six preconfigured product groups. There are tried-and-true cooking profiles in four pre-configured product groups that can be used for reliable and safe cooking. These cooking profiles can be accessed both through easyStart and through the easyTouch Cookbook. -
Page 357: Baking Product Group
12 Pre-Defined Cooking Profiles in easyStart 12.3 Baking Product Group Cooking Profiles in the Baking Product Group Tried-and-true cooking profiles in the 'Baking' product group: Product Quantity per State Accessories sheet pan Mini Croissants 338°F 12ea 3.2oz Thaw 30 min as di‐ Baking tray;... - Page 359 Item no. Order No. Additional technical documentation can be found in the download center at : www.convotherm.com Welbilt off ers fully-integrated kitchen systems and our products are ® backed by KitchenCare aftermarket parts and service. Welbilt’s portfolio of award-winning brands includes Cleveland™, Convotherm , Delfi...
Need help?
Do you have a question about the Convotherm easyTouch OES 6.10 mini and is the answer not in the manual?
Questions and answers