Advertisement
Quick Links
Build Instructions
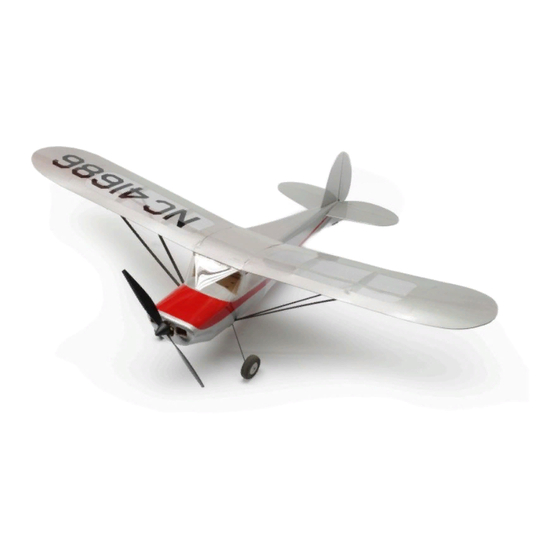
C-140 "Say's Nuh!"
Post War Two Seat Light Aircraft Trainer
Wing Span: 21 inches | Wing Area: 63 square inches | Average Flying Weight: 1.5 ounces
Build Instructions - Version 1.0 (revised 04.15.2014)
1946 "Say's Nuh!" C-140 UM Build Instructions. © 2013 Stevens AeroModel all rights reserved.!
Page 1
Advertisement

Related Manuals for Stevens AeroModel Say’s Nuh! C-140


Summary of Contents for Stevens AeroModel Say’s Nuh! C-140
- Page 1 Post War Two Seat Light Aircraft Trainer Wing Span: 21 inches | Wing Area: 63 square inches | Average Flying Weight: 1.5 ounces Build Instructions - Version 1.0 (revised 04.15.2014) 1946 “Say’s Nuh!” C-140 UM Build Instructions. © 2013 Stevens AeroModel all rights reserved.! Page 1...
-
Page 2: Warranty
Build Instructions WARRANTY Stevens AeroModel guarantees this kit to be free from defects in both material and workmanship at the date of purchase. This warranty does not cover any component parts damaged by use or modification. In no case shall Stevens AeroModel’s liability exceed the original cost of the purchased kit. Further, Stevens AeroModel reserves the right to change or modify this warranty without notice. - Page 3 ☐ 2 - 0.015 in. x 12 in. wire (pushrods) ☐ Hardware Bag 1 - 1-1/2 in. Length Heat Shrink Tube 1 - Nylon Receiver Clip 1 - Pair Plastic Wheels [SH540] 1946 “Say’s Nuh!” C-140 UM Build Instructions. © 2013 Stevens AeroModel all rights reserved.! Page 3...
- Page 4 ☐ DEFT clear lacquer based sealant (available at most hardware stores). ☐ Design Master Color Tool lacquer based spray paint (available at most art supply stores). 1946 “Say’s Nuh!” C-140 UM Build Instructions. © 2013 Stevens AeroModel all rights reserved.! Page 4...
- Page 5 Build Instructions Sheet Wood Inventory (1 of 1) 1946 “Say’s Nuh!” C-140 UM Build Instructions. © 2013 Stevens AeroModel all rights reserved.! Page 5...
- Page 6 Build Instructions Builders Notes 1946 “Say’s Nuh!” C-140 UM Build Instructions. © 2013 Stevens AeroModel all rights reserved.! Page 6...
- Page 7 Please check our web-site for updates to these instructions prior to commencing the build. To obtain downloads and updates relative to this model aircraft kit, please visit the corresponding product page at StevensAero.com 1946 “Say’s Nuh!” C-140 UM Build Instructions. © 2013 Stevens AeroModel all rights reserved.! Page 7...
- Page 8 F5, forward fuselage side, has been tack glued into position on the crutch). Fit window upright F5b to dove-tailed slots within forward fuselage side F5a and bond with CA glue. 1946 “Say’s Nuh!” C-140 UM Build Instructions. © 2013 Stevens AeroModel all rights reserved.! Page 8...
- Page 9 Step 5 “top” Step 2 “bottom” Step 6 Nylon Clip “top” Receiver Tray Step 6 Cont. “bottom” “bottom” Step 3 Step 7 “bottom” Step 4 1946 “Say’s Nuh!” C-140 UM Build Instructions. © 2013 Stevens AeroModel all rights reserved.! Page 9...
- Page 10 CA. DO NOT bond the lower portion of the fuselage sides to the lower portion of the formers (where the formers curve inwards). This will be done at a later step. 1946 “Say’s Nuh!” C-140 UM Build Instructions. © 2013 Stevens AeroModel all rights reserved.! Page 10...
- Page 11 Step 8 F5a/b Step 12 Step 9 F5a/b See Note! Step 13 Taper Step 10 F6a/b Step 14 Step 11 Step 15 Tape F6a/b 1946 “Say’s Nuh!” C-140 UM Build Instructions. © 2013 Stevens AeroModel all rights reserved.! Page 11...
- Page 12 F10. Ensure that F14 does not cover the slot in the landing gear pocket. Bond with CA. 1946 “Say’s Nuh!” C-140 UM Build Instructions. © 2013 Stevens AeroModel all rights reserved.! Page 12...
- Page 13 Bottom View Tape Step 17 Step 21 Bottom View Step 22 Step 18 Bottom View Bond Bottom View Bottom View Step 19 Step 23 1946 “Say’s Nuh!” C-140 UM Build Instructions. © 2013 Stevens AeroModel all rights reserved.! Page 13...
- Page 14 More detailed sanding guidance is given in the assembly steps that follow. Turn the page! 1946 “Say’s Nuh!” C-140 UM Build Instructions. © 2013 Stevens AeroModel all rights reserved.! Page 14...
- Page 15 Step 28 Step 25 Bottom View Step 29 Bottom View Step 30 Step 26 Bottom View “top” Bottom View Step 31 “top” Step 27 1946 “Say’s Nuh!” C-140 UM Build Instructions. © 2013 Stevens AeroModel all rights reserved.! Page 15...
-
Page 16: Tail Surfaces
Hey, why not take the time right now to paint the tail wheel detail on part Rb black. It will be much easier to paint now prior to covering and installing on the model. 1946 “Say’s Nuh!” C-140 UM Build Instructions. © 2013 Stevens AeroModel all rights reserved.! Page 16... - Page 17 Step 36 Step 32 Step 33 Step 37 45 Deg. “top” Step 38 Radius Paint Step 34 Step 38 Cont. 45 Deg. “Right” Step 35 1946 “Say’s Nuh!” C-140 UM Build Instructions. © 2013 Stevens AeroModel all rights reserved.! Page 17...
-
Page 18: Final Assembly
Install the Rudder horn on the right side of the Rudder, and the Elevator horn on the lower □ left side of the Elevator. 1946 “Say’s Nuh!” C-140 UM Build Instructions. © 2013 Stevens AeroModel all rights reserved.! Page 18... - Page 19 Step 43 Step 44 Bottom View Step 40 Bottom View Top View Tape Step 41 Step 45 Step 46 Rudder RIGHT Elevator BOTTOM Step 42 1946 “Say’s Nuh!” C-140 UM Build Instructions. © 2013 Stevens AeroModel all rights reserved.! Page 19...
- Page 20 Remove the pointed mounting studs from the gearbox mounting tabs on the motor gearbox □ combo [PKZ3624] and sand the remaining stud protrusions smooth. 1946 “Say’s Nuh!” C-140 UM Build Instructions. © 2013 Stevens AeroModel all rights reserved.! Page 20...
- Page 21 Bottom View Bend to Retain Step 53 Shrink Tube Part A Part B Step 49 PKZ3624 Bottom View Step 54 * Remove Step 50 1946 “Say’s Nuh!” C-140 UM Build Instructions. © 2013 Stevens AeroModel all rights reserved.! Page 21...
- Page 22 Leave the tape mask in place for 10-15 minutes or until the glue has cured. 1946 “Say’s Nuh!” C-140 UM Build Instructions. © 2013 Stevens AeroModel all rights reserved.! Page 22...
- Page 23 Build Instructions Step 55 Step 59 Step 56 Step 60 Step 61 Step 57 Bottom View * Bond Step 58 Flush Here Step 62 1946 “Say’s Nuh!” C-140 UM Build Instructions. © 2013 Stevens AeroModel all rights reserved.! Page 23...
- Page 24 CA glue between the prop hub and the foam spinner base. Congratulations! Your Stevens AeroModel 1946 “Say’s Nuh!” C-140 is now complete! Dance naked around your kitchen with your newly minted model airplane happily making motor noises until the neighbors call the cops...
- Page 25 Build Instructions Bottom View Finished! Flying Strut Pocket Step 63 Slots Step 64 Step 65 Step 66 1946 “Say’s Nuh!” C-140 UM Build Instructions. © 2013 Stevens AeroModel all rights reserved.! Page 25...
- Page 26 Sure it’s a little bitty flexible plastic prop but it’s still fun to yell “Clear Prop” Before applying power to the model... and an excellent habit to form. 1946 “Say’s Nuh!” C-140 UM Build Instructions. © 2013 Stevens AeroModel all rights reserved.! Page 26...
- Page 27 Make certain that your wing is straight before you fly. We are committed to improving your build and flying experience and are constantly refining our 1946 “Say’s Nuh!” C-140 UM Build Instructions. © 2013 Stevens AeroModel all rights reserved.! Page 27...
Need help?
Do you have a question about the Say’s Nuh! C-140 and is the answer not in the manual?
Questions and answers