Table of Contents
Advertisement
Quick Links
CONTACT INFORMATION
Toll Free: 1-833-CONTIXO (266-8496)
E-Mail: support@con�xo.com
Website: www.con�xo.com
CONTIXO is a trademark of Con�xo Inc.
2018 Con�xo Inc. All Rights Reserved.
Instruc�on Manual
Please read this instruc�on manual first before opera�ng the drone.
Please keep this manual for future use.
F20 GPS DRONE
www.con�xo.com
Advertisement
Table of Contents

Related Manuals for Contixo F20 GPS


Summary of Contents for Contixo F20 GPS
- Page 1 Please read this instruc�on manual first before opera�ng the drone. CONTACT INFORMATION Please keep this manual for future use. Toll Free: 1-833-CONTIXO (266-8496) E-Mail: support@con�xo.com Website: www.con�xo.com F20 GPS DRONE CONTIXO is a trademark of Con�xo Inc. 2018 Con�xo Inc. All Rights Reserved. www.con�xo.com...
- Page 2 Safety First Always follow proper opera�ng procedures and safe-flight guidelines Please take a careful look at the manual before flights for important informa- �on regarding product func�ons and opera�on �ps. It is important to learn how to use the product to achieve a safe flight. Stay informed of local laws and regula�ons regarding flying this product and always abide by the law.
-
Page 3: Table Of Contents
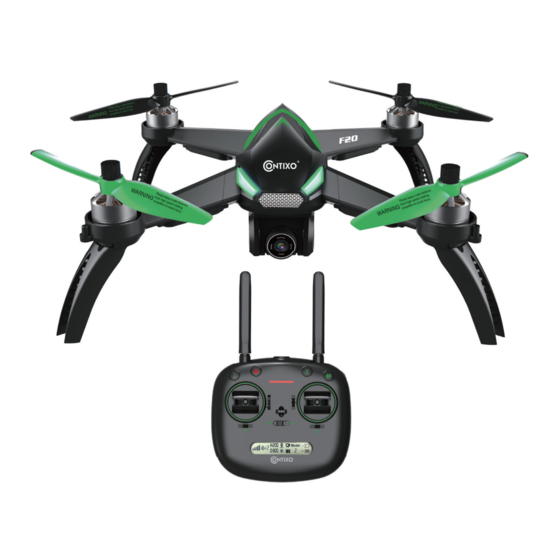
What’s in the Box Introduc�on Products/ Spare Parts Included In The Box Thank you for choosing Con�xo--a trusted manufacturer of high-quality • 1 Drone • 1 Remote Controller drones. To make opera�on of this drone easy and enjoyable, please read •... -
Page 4: Drone Ba�Ery Charging
● If ba�ery or charger is damaged, please discon�nue use immediately The smartphone clip holder is compa�ble with devices up to 6 inches in width. and call us at 1-833-CONTIXO (1-833-266-8496) for replacement parts. -
Page 5: Power On The Drone
● Please use Con�xo propellers only for this drone. Extra propellers can center bore of the propeller. Then, using the propeller screw with the dot, be ordered through Con�xo by calling 1-833-CONTIXO (266-8496) to put it onto the motor sha�; �ghten the screw by turning counter-clock- order addi�onal spare parts. -
Page 6: Remote Controller
Remote Controller Powering Off the Drone Below is the diagram of the Remote Controller. You should get ATTENTION: Failure to properly secure the ba�ery before flight comfortable and familiar with the Remote Controller before every flight engagement may result in ba�ery dislodgment and drone malfunc�on. to prevent any accidents or incidents while flying. -
Page 7: Remote Controller Signal Connec�On
Remote Controller (con�nued) Remote Controller Signal Connec�on NOTE - First, please make sure that the drone is turned off (no ba�ery Al�tude from Return-To-Home is inserted into the drone). Home Point (in meters) (RTH) Icon All you need to do is simultaneously press and hold the “Red Lock/Unlock” Satellite Number bu�on near the top of the remote controller AND turn “ON”... -
Page 8: Control Mode Selec�On
Control Mode Selec�on (Op�onal) Control Mode Selec�on (con�nued) The thro�le control mode is set to “mode 2” by default. Le�- and right-hand thro�le are available control modes for users who prefer ATTENTION: To change between control modes, please make sure that non-standard controls. -
Page 9: Camera
Camera Camera (con�nued) How to A�ach and Detach the Camera Short-press the camera bu�on to take a picture. Long-press the camera A�ach bu�on to capture a video (the corresponding icon will be displayed on the Step 1. Insert the white plug of the camera into the socket at the bo�om screen of the remote controller). -
Page 10: How To Pair The Remote To The Drone
Drone Ini�aliza�on Detec�on How to Pair the Remote to the Drone Press and hold the “Red Lock/Unlock” bu�on on top of the remote AND A�er Signal Connec�on has been successful, the drone enters the simultaneously turn “ON” the remote controller (by moving the power ini�aliza�on detec�on procedure. -
Page 11: Gyroscope Calibra�On
Drone Compass Calibra�on (con�nued) Gyroscope Calibra�on Step 2) Ver�cal Calibra�on Once the drone has been calibrated, set drone on a flat surface. Now, push Hold the drone ver�cally with its front (camera) facing down and rotate it 360 down both of the control s�cks to the lower-le� corner and release (as degrees counterclockwise along its horizontal axis for about 3 full circles un�l the indicated in photo below). -
Page 12: One-Key Takeoff And Landing
How To Lock and Unlock the Drone (con�nued) One-Key Takeoff/ Landing Locking the Drone: 1. A�er the drone is unlocked, short-press the “Takeoff” bu�on (as There are 3 ways to lock the drone that you can find below: indicated below). The drone will automa�cally start hovering up to an Method 1) When the drone is on the ground and the motor is s�ll rota�ng, al�tude of between 6-9 feet. - Page 13 Flight Modes (con�nued) Flight Modes (con�nued) Return-to-Home (RTH) procedure brings the drone back to the last GPS Mode recorded Home Point. There are 3 types of RTH procedures: Smart RTH, GPS mode enables precise posi�oning and prevents drone loss. Simply move Fail-Safe RTH and Low Ba�ery RTH.
-
Page 14: Capturing Photos And Videos
Flight Modes (con�nued) Capturing Photos and Videos Photo: Fail-Safe Return simply short-press the Photo/ Video To capture breathtaking photos, bu�on. Fail-Safe RTH will be triggered if the remote controller signal is lost for more The LCD screen camera icon will flash once and the remote will beep once than 6 seconds. -
Page 15: Signal Strength Indicator
Signal Strength Indicator Smartphone Device Applica�on (Con�xo F20 App Signal Strength icon shows the strength of the received signal. The more, Con�xo F20 Smartphone App is essen�al to access all the features of the be�er. If the signal is weak or irregular, then please do not fly the the Con�xo F20 drone. - Page 16 “Con�xo F20” Smartphone Applica�on (con�nued) “Con�xo F20” Smartphone Applica�on (con�nued) Please understand the func�ons of the Con�xo F20 App first, then tap on the “Click” bu�on. You will see a live feed from the drone camera and you ATTENTION: Please make sure that your smartphone supports 5G Wi-Fi will be ready to use your app to record videos, take photos, view your before linking to the Con�xo F20 App.
- Page 17 “Con�xo F20” Smartphone Applica�on (con�nued) “Con�xo F20” Smartphone Applica�on (con�nued) Gallery Viewer You can view all of your captured files via the Con�xo F20 App interface. “Hide” Bu�on: Press this icon to hide the icons on the Simply press the “Gallery” icon to enter the gallery interface. App.
- Page 18 “Con�xo F20” Smartphone Applica�on (con�nued) “Con�xo F20” Smartphone Applica�on (con�nued) Aircra� Ba�ery Level: RTH Switch (Return-To-Home) Icon: If a strong GPS signal is Display the power of the drone. available (more than 7 satellites displayed on the LCD screen) and the Home Point is recorded at takeoff, press the RTH icon and select Remote Controller Ba�ery Level: "YES."...
- Page 19 “Con�xo F20” Smartphone Applica�on (con�nued) Troubleshoo�ng “Con�xo F20” Smartphone Applica�on (con�nued) TapFly: With this feature enabled, you can switch between flying the drone with “by touch” (with your finger within the or set a trajectory flight path. TapFly (Track): Start by tracing a flight path (route) on the map within the app, then click “Submit”...
-
Page 20: Troubleshoo�Ng
Troubleshoo�ng Troubleshoo�ng (con�nued) Status Meaning Meaning Status Front and rear lights flash Signal between drone and transmi�er Remote controller and drone not The front and rear lights of yellow rapidly has been interrupted the drone flash successfully paired. green Front and rear lights flash Drone ini�alizing and pairing rapidly red, yellow, and green... -
Page 21: Technical Support
Have ques�ons ? Control s�cks calibra�on has been done in the factory by default. It is not necessary to calibrate the remote controller unless you are Call Our Toll-Free Hotline: 1-833-CONTIXO (266-8496) experiencing unusual or unstable flights. Interna�onal: +1-909-465-5662 E-mail: support@con�xo.com...
Need help?
Do you have a question about the F20 GPS and is the answer not in the manual?
Questions and answers