
Related Manuals for Walgreens WGNBPA-220


Summary of Contents for Walgreens WGNBPA-220
- Page 1 AUTOMATIC ARM Blood Pressure Monitor • 5-Year Limited Warranty El manual en español empieza en la página 34 WGNBPA-220 WIC 899709...
-
Page 2: Table Of Contents
TABLE OF CONTENTS INTRODUCTORY INFORMATION: Important Product Notices and Safety Instructions ........... 4 About Blood Pressure ........6 Blood Pressure Standard ....... 7 How This Blood Pressure Monitor Works ..8 USAGE INFORMATION: Name/Function of Each Part ......9 Display Explanations ........10 Installing Batteries ........ - Page 3 Clearing Values from Memory ...... 24 Important Notes Regarding Your Blood Pressure Measurement ...... 24 Care, Maintenance, & Cleaning ....25 Potential for Electromagnetic Interference ... 27 Electromagnetic Compatibility (EMC) ... 28 Troubleshooting ........... 30 Specifications ..........31 5-Year Limited Warranty ....... 33...
-
Page 4: Important Product Notices And Safety Instructions
IMPORTANT PRODUCT NOTICES AND SAFETY INSTRUCTIONS When using your blood pressure monitor, basic precautions should always be followed. Please read and follow all instructions and warnings before using this product. Save these instructions for future reference. • This is a home health care product only and it is not intended to serve as a substitute for the advice of a physician or medical professional. - Page 5 recommended rest period, please consult your physician. • Excessive use may result in blood flow interference, which is likely to cause uncomfortable sensations, such as partial subcutaneous hemorrhage, or temporary numbness to your arm. In general, these symptoms should not last long. However, if you do not recover in time, please seek advice from a medical professional.
-
Page 6: About Blood Pressure
ABOUT BLOOD PRESSURE Blood pressure is the pressure exerted on the artery walls while blood flows through the arteries. The pressure measured when the heart contracts and sends blood out of the heart is systolic (highest) blood pressure. The pressure measured when the heart dilates with blood flowing back into the heart is called diastolic (lowest) blood pressure. -
Page 7: Blood Pressure Standard
BLOOD PRESSURE STANDARD The table below contains defined levels for hypertension that are ® publicly available from the American Heart Association (AHA 2017). Users can compare their own blood pressure readings against these defined levels to determine if they may be potentially at increased risk. This table is applicable to most adults aged 18 and older. -
Page 8: How This Blood Pressure Monitor Works
Please note that cues provided by this monitor are only intended to assist you in using this table. The table and cues are only provided for convenience to help you understand your noninvasive blood pressure ® reading as it relates to the American Heart Association information. -
Page 9: Name/Function Of Each Part
NAME/FUNCTION OF EACH PART Air Tube and Connector LCD Display Battery Cover (Located on bottom of unit) Arm Cuff Memory Recall/ Date & Time Set Date & Time Select START/STOP NOTE: The “MEM” button is also used to set the date and time. -
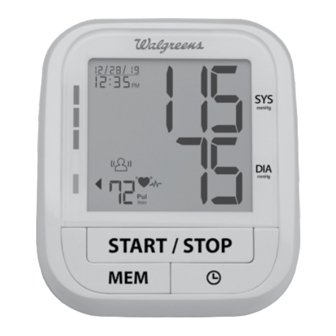
Page 10: Display Explanations
DISPLAY EXPLANATIONS Date/Time Indicator Systolic Pressure Diastolic Pressure Heart Rate Irregular Heartbeat Detector... - Page 11 Display Symbols: Low Battery Symbol: Appears when batteries should be replaced, or +/- polarities have been positioned incorrectly. Pulse Symbol: Shows the heart rate per minute. Irregular Heartbeat Detector: See page 22 for more information. Risk Category Index: See page 21 for more information. START STOP Memory Average: Displays average of last 3 readings.
-
Page 12: Installing Batteries
INSTALLING BATTERIES 1. Press down on latch and lift the battery cover to open the battery compartment. Battery 2. Install or replace 4 “AAA ” sized batteries in the Cover battery compartment according to the indications inside the compartment. 3. Close the battery cover by pushing in the top end of the battery door. -
Page 13: Date & Time Set Procedure
DATE & TIME SET PROCEDURE 1. To adjust the date and time, press the “DATE & TIME SET” button. 2. The display will show a blinking number showing the MONTH. Change the MONTH by pressing the “MEM” button. Each press will increase the number by one in a cycling manner. -
Page 14: Using The Ultrasoft ® Arm Cuff
USING THE ULTRASOFT ARM CUFF ® Very Important: Proper cuff size is critical to accurate measurement. This monitor comes with one UltraSoft Upper Arm Cuff that fits arm circumferences from 9"-17" (23cm-43cm). If the arrow falls outside of the solid-colored line, you will need a larger cuff. - Page 15 1. If the cuff is not assembled, pass the end of the cuff furthest away from the tubing through the metal D-ring in order to form a loop. The smooth side without the felt material should be on the inside of the cuff loop.
- Page 16 5. Position cuff edge 0.8–1.2 inches (2–3 cm) above elbow. NOTE: If using the larger cuff designed for arms 17"-22" (43cm-56cm), position cuff above inner elbow crease. 6. Center tube over middle of arm. 7. Pull the end of the cuff so that it tightens evenly around your arm.
- Page 17 NOTE: • This device should not be used when your arm is wounded or injured. • Thick clothing or a rolled up sleeve will cause inaccurate blood pressure measurements. It is recommended that the cuff be wrapped on a bare arm, or over thin clothing. •...
-
Page 18: Check-With-Confidence
CHECK-WITH-CONFIDENCE This monitor includes a built-in Check-with-Confidence feature provides accuracy assurance function, which enables the device to automatically perform a self-check. It provides a convenient way to ensure the monitor is working properly. The Check-with-Confidence default setting is “ON.” To turn this feature “OFF,”... -
Page 19: Measurement Procedure
MEASUREMENT PROCEDURE IMPORTANT NOTES: • Blood pressure changes with every heartbeat and is in constant fluctuation throughout the day. • Blood pressure measurement can be affected by the position of the user, his or her physiologic condition, and other factors. Before Measurement: To help ensure an accurate reading, follow these instructions before taking a measurement:... - Page 20 1. With the cuff wrapped around your arm, press the “START/STOP” button. Do not inflate the cuff unless it is wrapped around your arm. All digits will light up to check the display functions. The checking procedure will be completed after about 3 seconds. NOTE: •...
-
Page 21: Risk Category Index
RISK CATEGORY INDEX This monitor comes equipped with a Risk Category Indicator that automatically compares each reading to defined levels established by ® the American Heart Association (AHA 2017) as described earlier in this manual, and provides a helpful cue if your reading falls into one of the stages that could potentially indicate increased risk. -
Page 22: Irregular Heartbeat Detector
IRREGULAR HEARTBEAT DETECTOR The appearance of the icon indicates that a pulse irregularity consistent with an irregular heartbeat was detected during measurement. Usually this is not a cause for concern. However, if the symbol appears often, we recommend you seek medical advice. -
Page 23: Excessive Body Motion Detector
EXCESSIVE BODY MOTION DETECTOR icon is displayed if body movement is detected during measurement, especially the movement of the arm the blood pressure monitor is worn on. Excessive Body Motion Detector NOTE: • The measured blood pressure reading may not be accurate if the icon is displayed. -
Page 24: Clearing Values From Memory
CLEARING VALUES FROM MEMORY Press and hold the “MEM” and “START/STOP” buttons at the same time while in memory recall mode, and the data will be erased automatically. NOTE: • Once deleted, your readings cannot be restored. • Once deleted, the device will automatically perform a self-check on the next measurement. -
Page 25: Care, Maintenance, & Cleaning
CARE, MAINTENANCE, & CLEANING • Clean the blood pressure monitor body and cuff carefully with a slightly damp, soft cloth. Do not press. Do not wash cuff or use chemical cleaner on it. Never use thinner, alcohol or petrol (gasoline) as cleaner. - Page 26 • DO NOT inflate the cuff unless wrapped around arm. • DO NOT wrap the cuff around body parts other than your arm. • DO NOT drop or insert any object into any opening or hose. • To avoid accidental strangulation, keep this product away from children.
-
Page 27: Potential For Electromagnetic Interference
POTENTIAL FOR ELECTROMAGNETIC INTERFERENCE To avoid inaccurate results caused by electromagnetic interference between electrical and electronic equipment, do not use the device near a cell phone or microwave oven. For most wireless communication devices, it is recommended to maintain a distance of 10.8 feet (3.3m) in order to avoid electromagnetic interference. -
Page 28: Electromagnetic Compatibility (Emc)
ELECTROMAGNETIC COMPATIBILITY (EMC) • Guidance and manufacturer’s declaration—electromagnetic emissions The device is intended for use in the electromagnetic environments listed below, and should only be used in such environments: Emissions test Compliance Electromagnetic environment—guidance RF emissions CISPR 11 Group 1 RF energy is used only to maintain device’s operation. - Page 29 For transmitters rated at a maximum output power not listed above, the recommended separation distance d in metres (m) can be estimated using the equation applicable to the frequency of the transmitter, where P is the maximum output power rating of the transmitter in watts (W) according to the transmitter manufacturer.
-
Page 30: Troubleshooting
TROUBLESHOOTING If any abnormality arises during use, please check the following points: SYMPTOMS POSSIBLE CAUSES CORRECTION Unit does not turn on when Batteries have run down. Replace them with 4 new the START/STOP button is “AAA” alkaline batteries. pushed. Battery polarities have been positioned Re-insert the batteries in the incorrectly. -
Page 31: Specifications
SPECIFICATIONS Power Source: Four 1.5V DC “AAA” alkaline batteries Measurement Method: Oscillometric Rated Range of Cuff Pressure: 0~300 mmHg Rated Range of Cuff 40~280 mmHg Determination: Measurement Range of 40~199 beats/minute Heart Rate: Pressure: ±3 mmHg Accuracy: Pulse: ±5% of reading Pressure Sensor: Semi-conductor Inflation:... - Page 32 Internally powered equipment Type BF equipment Not suitable for use in presence of flammable anesthetic mixture with air, oxygen, or nitrous oxide. Continuous operation with short-time loading. Follow instructions for use. To avoid inaccurate results caused by electromagnetic interference. NOTE: Portable RF communications equipment (including peripherals such as antenna cables and external antennas) should be used no closer than 30 cm (12 inches) to any part of the device.
-
Page 33: 5-Year Limited Warranty
Made exclusively for LIMITED 5-YEAR WARRANTY HoMedics sells its products with the intent that they are free of defects in manufacture and workmanship for a period of 5 years from the date of original purchase, except as noted below. HoMedics warrants that its products will be free of defects in material and workmanship under normal use and service. - Page 34 BRAZO AUTOMÁTICO Monitor de Presión Arterial • Garantía limitada de 5 años WGNBPA-220 WIC 899709...
- Page 35 ÍNDICE INFORMACIÓN INTRODUCTORIA: Información importante del producto e instrucciones de seguridad ....... 37 Sobre la presión arterial ......39 Estándar de presión arterial ......40 Funcionamiento de este monitor de presión arterial ..........41 INFORMACIÓN DE USO: Nombre/Función de cada parte ....42 Explicaciones de la pantalla ......
- Page 36 Recuperar valores de la memoria ....56 Limpiando valores de la memoria ....57 Notas importantes respecto a su medición de la presión arterial ....57 Cuidados, mantenimiento y limpieza .... 58 Potencial de interferencia electromagnética 60 Compatibilidad electromagnética (EMC)..61 Solución de problemas ........
-
Page 37: Información Introductoria: Información Importante Del Producto E Instrucciones De Seguridad
NOTIFICACIONES IMPORTANTES SOBRE EL PRODUCTO E INSTRUCCIONES DE SEGURIDAD Al usar su monitor de presión arterial, siempre debe tener precauciones básicas. Lea y siga todas las instrucciones y advertencias antes de usar este producto. Guarde estas instrucciones para referencia futura. •... - Page 38 incluso después del periodo de descanso recomendado, consulte a su médico. • El uso excesivo de este dispositivo puede ocasionar interferencias en el flujo sanguíneo que podrían causar sensaciones incómodas como, por ejemplo, hemorragia parcial subcutánea o adormecimiento temporal del brazo. En general, estos síntomas no deben permanecer mucho tiempo.
-
Page 39: Sobre La Presión Arterial
SOBRE LA PRESIÓN ARTERIAL La presión arterial es la presión ejercida en las paredes arteriales mientras la sangre fluye a través de las arterias. La presión medida cuando el corazón se contrae y expulsa la sangre del corazón es la presión arterial sistólica (la más alta). -
Page 40: Estándar De Presión Arterial
ESTÁNDAR DE PRESIÓN ARTERIAL La siguiente tabla contiene los niveles definidos de hipertensión publicados por la American Heart Association® (AHA 2017). Los usuarios pueden comparar sus propias lecturas de presión arterial contra aquellos niveles definidos para determinar si es que están potencialmente en un riesgo mayor. -
Page 41: Funcionamiento De Este Monitor De Presión Arterial
Tome en cuenta que las indicaciones proporcionadas por este monitor tienen únicamente la intención de ayudarle a usar esta tabla. La tabla y las indicaciones se proporcionan solo por comodidad para ayudarle a entender la medición no invasiva de su presión arterial y cómo se interpreta de acuerdo con la información de la American Heart Association®. -
Page 42: Nombre/Función De Cada Parte
NOMBRE/FUNCIÓN DE CADA PARTE Tubo de aire y conector Pantalla LCD Cubierta de baterías (ubicada en la base de la Brazalete para brazo unidad) Recuperar de la Ajuste de fecha memoria/Selección y hora de fecha y hora INICIO/PARO (START/STOP) NOTA: El botón “MEM”... -
Page 43: Explicaciones De La Pantalla
EXPLICACIONES DE LA PANTALLA Indicador de Fecha/Hora Presión Sistólica Presión Diastólica Frecuencia Cardíaca Detector de Latidos Irregulares... - Page 44 Símbolos de pantalla: Símbolo de batería baja: Aparece cuando las baterías deben reemplazarse o cuando las polaridades +/- se han posicionado incorrectamente. Símbolo de pulso: Muestra la frecuencia cardíaca por minuto. Detector de latidos irregulares: Consulte la página 55 para obtener información adicional.
-
Page 45: Colocación De Baterías
COLOCACIÓN DE BATERÍAS 1. Presione la cubierta de las baterías y levántela para abrir el Cubierta de compartimiento de las baterías. baterías 2. Coloque o reemplace 4 baterías alcalinas tamaño AAA en el compartimiento de baterías de acuerdo con las indicaciones que hay dentro del compartimiento. -
Page 46: Procedimiento Para Ajuste De Fechay Hora
PROCEDIMIENTO PARA AJUSTE DE FECHA Y HORA 1. Para ajustar la fecha y hora, presione el botón de “DATE/TIME SET” 2. La pantalla mostrará un número parpadeante que muestra el MES. Cambie el MES al presionar el botón “MEM”. Cada vez que lo presione, el número incrementará... -
Page 47: Cómo Usar El Brazalete Para Brazo Ultrasoft
CÓMO USAR EL BRAZALETE PARA BRAZO ULTRASOFT ® Muy importante: El tamaño adecuado del brazalete es crítico para una medición precisa. Este monitor viene con un brazalete UltraSoft para la parte superior del brazo que ajusta a brazos de tamaños entre 23 cm - 43 cm (9” - 17”). Si la flecha cae fuera de la línea de color sólido, necesitará... - Page 48 1. Si el brazalete no está ensamblado, pase el extremo del brazalete lo más lejos del tubo a través del anillo-D de metal para formar un lazo. El lado suave sin el fieltro debería estar en el interior del lazo del brazalete.
- Page 49 1. Coloque el borde del brazalete a 2 - 3 cm (0.8 - 1.2 pulgadas) arriba del codo. NOTA: Si usa el brazalete más grande diseñado para brazos de entre 43 cm - 56 cm (17” - 22”), coloque el brazalete arriba de la parte interna del codo.
- Page 50 NOTA: • Este dispositivo no deberá usarse cuando su brazo esté lastimado o herido. • La ropa gruesa o una manga enrollada ocasionará mediciones de la presión arterial inexactas. Se recomienda que el brazalete se coloque sobre el brazo desnudo o sobre ropa delgada. •...
-
Page 51: Check-With-Confidence
CHECK-WITH-CONFIDENCE Este monitor incluye una característica Check-with-Confidence integrada que proporciona una función de aseguramiento de la precisión, la cual permite que el dispositivo realice automáticamente un autocontrol. Brinda una manera cómoda para asegurar que el monitor está funcionando correctamente. La configuración predeterminada de Medición Confiable está “ON” (ACTIVADA). -
Page 52: Procedimiento De Medición
PROCEDIMIENTO DE MEDICIÓN NOTAS IMPORTANTES: • La presión arterial cambia con cada latido y está en una fluctuación constante a lo largo del día. • La medición de la presión arterial puede ser afectada por la posición del usuario, su condición fisiológica y otros factores. Antes de la medición: Para ayudar a asegurar una medición precisa, siga estas instrucciones antes de realizar la medición:... - Page 53 1. Ya con el brazalete colocado alrededor de su brazo, presione el botón INICIO/PARO “START/STOP”. No infle el brazalete a menos que esté alrededor de su brazo. Todos los dígitos se iluminarán para revisar las funciones de la pantalla. El procedimiento de revisión se completará...
-
Page 54: Indicador De Categoría De Riesgo
INDICADOR DE CATEGORÍA DE RIESGO Este monitor viene equipado con un indicador de categoría de riesgo que compara automáticamente cada medición contra los niveles definidos por la American Heart Association® (AHA 2017) como se describió anteriormente en este manual, y proporciona una indicación útil si su lectura cae en una de las etapas que podría potencialmente indicar un riesgo elevado. -
Page 55: Detector De Latidos Irregulares
DETECTOR DE LATIDOS IRREGULARES La aparición del icono indica que se detectó una irregularidad de pulso consistente con una frecuencia cardíaca irregular durante la medición. Usualmente, esta no es una causa de preocupación. Sin embargo, si el símbolo aparece con frecuencia, recomendamos que busque asesoría médica. -
Page 56: Detector De Movimiento Corporal Excesivo
DETECTOR DE MOVIMIENTO CORPORAL EXCESIVO El icono aparecerá si se detecta el movimiento del cuerpo durante la medición, especialmente el movimiento del brazo que está usando el monitor de presión arterial. Detector de movimiento corporal excesivo NOTA: • La lectura de la presión arterial medida podría no ser precisa si se muestra el icono. -
Page 57: Limpiando Valores De La Memoria
LIMPIANDO VALORES DE LA MEMORIA Presione y mantenga presionados los botones “MEM” y INICIO/ PARO “START/STOP” al mismo tiempo mientras esté en el modo de recuperación de valores de la memoria y los datos del usuario seleccionado se borrarán de forma automática. -
Page 58: Cuidados, Mantenimiento Y Limpieza
CUIDADOS, MANTENIMIENTO Y LIMPIEZA • Limpie el monitor de presión arterial y el brazalete con cuidado con una tela ligeramente húmeda y suave. No presione. No lave el brazalete o use algún limpiador químico en él. Jamás utilice solvente, alcohol o gasolina para limpiar. •... - Page 59 • NO infle el brazalete a menos que esté alrededor del brazo. • NO enrolle el brazalete alrededor de otras partes del cuerpo que no sean el brazo. • NO deje caer ni inserte ningún objeto en ninguna abertura o manguera.
-
Page 60: Potencial De Interferencia Electromagnética
POTENCIAL DE INTERFERENCIA ELECTROMAGNÉTICA (EMI) Para evitar resultados poco precisos provocados por interferencia electromagnética entre equipo eléctrico y electrónico, no utilice el dispositivo cerca de un teléfono celular o un horno de microondas. Para la mayoría de los dispositivos de comunicación inalámbrica, se recomienda mantener una distancia de 3.3 m (10.8 ft) para evitar interferencia electromagnética. -
Page 61: Compatibilidad Electromagnética (Emc)
COMPATIBILIDAD ELECTROMAGNÉTICA (EMC) • Orientación y declaración del fabricante - emisiones electromagnéticas El dispositivo está diseñado para su uso en los ambientes electromagnéticos que se enumeran a continuación, y deberá usarse únicamente en dichos ambientes: Prueba de emisión Cumplimiento Ambiente electromagnético - orientación Emisiones de RF CISPR 11 Grupo 1 La energía de RF se usa únicamente para mantener la... - Page 62 Para transmisores clasificados a una potencia máxima de salida no enumerada en la tabla anterior, la distancia de separación d en metros (m) puede estimarse usando la ecuación aplicable a la frecuencia del transmisor, en donde P es la potencia máxima de salida del transmisor en watts (W) de acuerdo con el fabricante del transmisor.
-
Page 63: Solución De Problemas
SOLUCIÓN DE PROBLEMAS Si surge cualquier anormalidad durante el uso, revise los siguientes puntos: SÍNTOMAS POSIBLES CAUSAS CORRECCIÓN Las baterías se acabaron. Reemplácelas con 4 baterías La unidas no se enciende cuando se presiona el botón de INICIO/ alcalinas AAA nuevas. PARO. -
Page 64: Especificaciones
ESPECIFICACIONES Fuente de alimentación: Cuatro baterías alcalinas AAA de 1.5 V CD Método de medición: Oscilométrica Rango clasificado de presión del 0 a 300 mmHg manguito: Rango clasificado de 40 a 280 mmHg determinación del brazalete: Rango de medición de 40 ~ 199 latidos/minuto frecuencia cardíaca: Presión: ±3 mmHg... - Page 65 Equipo alimentado de manera interna Equipo de tipo BF No es apropiado su uso en la presencia de mezcla de anestesia inflamable con aire, oxígeno o óxido nitroso. Operación continua con un periodo corto de carga. Siga las instrucciones para su uso. Para evitar resultados inexactos causados por interferencia electromagnética.
-
Page 66: Garantía Limitada De 5 Años
Fabricado en exclusiva para GARANTÍA LIMITADA DE 5 AÑOS HoMedics vende sus productos con la intención de que estén libres de defectos de fabricación y mano de obra por un período de 5 años a partir de la fecha de compra original, con excepción de lo que se indica a continuación.
Need help?
Do you have a question about the WGNBPA-220 and is the answer not in the manual?
Questions and answers
clear memery
To clear memory on the Walgreens WGNBPA-220:
1. Enter the memory recall mode.
2. Press and hold the “MEM” and “START/STOP” buttons at the same time.
3. The selected user's data will be automatically deleted.
Note: Once deleted, data cannot be recovered. The device will perform an automatic self-check during the next measurement.
This answer is automatically generated