
Related Manuals for Walgreens WGNBPA-540


Summary of Contents for Walgreens WGNBPA-540
- Page 1 Deluxe Arm Blood Pressure Monitor WGNBPA-540 El manual en español empieza en la página 32 IB-WGNBPA540-manual.indd 1 2009/11/3 下午 1:42...
-
Page 2: Table Of Contents
TABLE OF CONTENTS INTRODUCTORY INFORMATION: Important Product Notices and Safety Instructions ............3 About Blood Pressure ......... 5 What is Blood Pressure? Why Measure Your Blood Pressure? Blood Pressure Standard ........5 How This Blood Pressure Monitor Works ..7 USAGE INFORMATION: Name/Function of Each Part ....... - Page 3 Clearing Values from Memory ......24 Important Notes Regarding Your Blood Pressure Measurement ......25 Care, Maintenance & Cleaning ......26 Potential for Electromagnetic Interference ..28 Troubleshooting ..........29 Specifications ............ 30 5 Year Limited Warranty ........31 IB-WGNBPA540-manual.indd 2 2009/11/3 下午...
-
Page 4: Important Product Notices And Safety Instructions
IMPORTANT PRODUCT NOTICES AND SAFETY INSTRUCTIONS When using your blood pressure monitor, basic precautions should always be followed. Please read and follow all instructions and warnings before using this product. Save these instructions for future reference. • P lease note that this is a home healthcare product only and it is not intended to serve as a substitute for the advice of a physician or medical professional. - Page 5 • T he pulse display is not suitable for checking the frequency of heart pacemakers. • E lectromagnetic interference: The device contains sensitive electronic components. Avoid strong electrical or electromagnetic fields in the direct vicinity of the device (e.g. mobile telephones, microwave ovens). These may lead to temporary impairment of measurement accuracy. • Use blood pressure monitor only for its intended use.
-
Page 6: About Blood Pressure
ABOUT BLOOD PRESSURE What is Blood Pressure? Blood pressure is the pressure exerted on the artery walls while blood flows through the arteries. The pressure measured when the heart contracts and sends blood out of the heart is systolic (highest) blood pressure. The pressure measured when the heart dilates with blood flowing back into the heart is called diastolic (lowest) blood pressure. - Page 7 Blood pressure tends to go up and down, even in people who normally don’t have high readings. If your numbers stay above the “normal” range most of the time, you may be at increased risk and should consult your physician. Category Systolic (mmHg) Diastolic (mmHg)
-
Page 8: How This Blood Pressure Monitor Works
HOW THIS BLOOD PRESSURE MONITOR WORKS This monitor uses innovative technology to detect your blood pressure. This technology enables the monitor to automatically inflate and deflate at the appropriate level for each individual. With one touch of a button, the cuff will automatically inflate to block the blood flow through your artery. -
Page 9: Name/Function Of Each Part
NAME/FUNCTION OF EACH PART Date/Time Set Buttons Air Tube and Connector LCD Display Battery Cover (Located on Arm Cuffs bottom of unit) Memory Recall Button User-Select START/STOP Button Button Other Accessories: 1 6V DC Output AC Adapter 4 “AA” size, 1.5V alkaline batteries (not included) Note: Please unload the batteries when operating with the AC adapter for an extended period of time. -
Page 10: Display Explanations
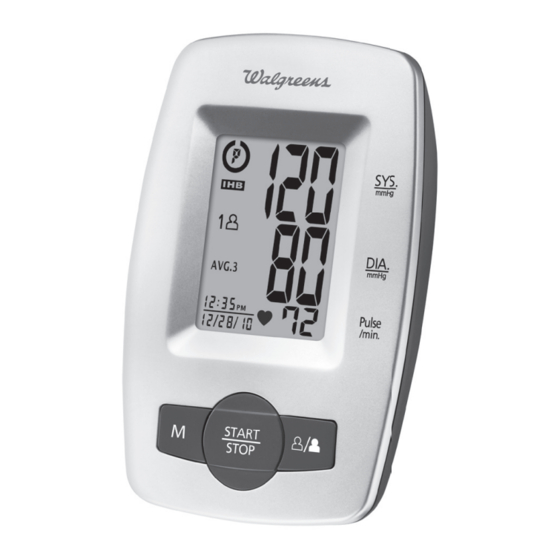
DISPLAY EXPLANATIONS Systolic Pressure Diastolic Pressure Date/Time Indicator Pulse Rate IB-WGNBPA540-manual.indd 9 2009/11/3 下午 1:42... - Page 11 Display Symbols: User 1: Appears when the monitor is operated by User 1. User 2: Appears when the monitor is operated by User 2. Weak Battery Symbol: Appears when batteries should be replaced. Pulse Symbol: Shows the pulse rate per minute. Irregular Heartbeat Detector: Refer to page 21 for more information. START START Memory Average: Displays average of last 3 readings START STOP...
-
Page 12: Installing Batteries
INSTALLING BATTERIES 1. P ress down on latch and lift the battery cover to open the battery compartment. 2. Install or replace 4 “AA ” sized batteries in the battery compartment according to the indications inside the compartment. 3. Close the battery cover by pushing in the top end of the battery door. -
Page 13: Using The Ac Adapter
USING THE AC ADAPTER Note: • P lease unload the batteries when operating with an AC adapter for an extended period of time. Leaving the batteries in the compartment for a long time may cause leakage, which may lead to damage to the unit. • No batteries are needed when operating with an AC adapter. -
Page 14: Date & Time Set Procedure
DATE & TIME SET PROCEDURE 1. T o adjust the date/time, press the Set button 2. The display will show a blinking number showing the HOUR. Change the HOUR by pressing the button. Each press will increase the number by one in a cycling manner. Press the Set button again to confirm the entry, and the screen will show a blinking number representing the MINUTE. -
Page 15: Using The Cuff
USING THE ARM CUFF Very Important: Proper cuff size is critical to accurate measurement. This monitor comes with two sizes of arm cuffs: Standard Size Fits 9”–13” (23 cm – 33 cm) Large Size Fits 13”–17” (33 cm – 43 cm) The appropriate cuff is suitable for your use if the colored arrow falls within the solid color line as shown below. - Page 16 1. I f the cuff is not assembled, pass the end of the cuff furthest away from the tubing through the metal D-ring in order to form a loop. The smooth side without the felt material should be on the inside of the cuff loop. End of cuff D-ring 2. Plug the cuff tube into the left side of the unit. Insert plug here 3.
- Page 17 5. P osition cuff edge 0.8-1.2 inches (2-3cm) above elbow. 6. Center tube over middle of arm. 7. Pull the end of the cuff so that it tightens evenly around your arm. Press the hook and loop material together to secure. Allow room for 2 fingers to fit between the cuff and your arm.
- Page 18 Note: If it is not possible to fit the cuff to your left arm, it can also be placed on your right arm. However, all measurements should be made using the same arm. To use on the right arm, you must position the artery symbol “...
-
Page 19: Measurement Procedure
MEASUREMENT PROCEDURE Important Notes: • B lood pressure changes with every heartbeat and is in constant fluctuation throughout the day. • B lood pressure measurement can be affected by the position of the user, his or her physiologic condition and other factors. For greatest accuracy, wait 1 hour after exercising, bathing, eating, drinking beverages with alcohol or caffeine, or smoking to measure blood pressure. - Page 20 1. P ress the User Select Button to choose User 1 or User 2. START STOP 2. With the cuff wrapped around your arm, press the START/ STOP button. Do not inflate the cuff unless it is wrapped around your arm. All digits will light up to check the display functions.
- Page 21 4. T he cuff will begin deflating as measurement continues. Note: T his monitor will re-inflate automatically if the system detects that your body requires more pressure for measurement. 5. W hen the measurement is completed, the cuff will deflate entirely. Systolic pressure, diastolic pressure and pulse will be shown simultaneously on the LCD screen. The measurement is then automatically stored into memory.
-
Page 22: Risk Category Index
RISK CATEGORY INDEX This monitor comes equipped with a Risk Category Index that automatically compares each reading to criteria established by the U.S. National Institute of Health’s (NIH) National Heart Lung and Blood Institute as described earlier in this manual, and provides a helpful cue if your reading falls into one of the stages that could potentially indicate increased risk. - Page 23 recommend you seek medical advice. Please note that Irregular Heartbeat the device does not replace Detector a cardiac examination, but serves to detect pulse irregularities at an early stage. Movement, shaking or talking during the measurement can result in pulse irregularities that may cause the appearance of this icon.
-
Page 24: Recalling Values From Memory
RECALLING VALUES FROM MEMORY This monitor can be used by two individuals. Each user can store up to 60 measurements. 1. Press the User-Select button. START STOP 2. Choose User 1 or User 2. 3. Press the “M” button to access the memory. START STOP 4. T he monitor will first display the calculated average applied to the last 3 memories. -
Page 25: Clearing Values From Memory
5. E very new press of the “M” button will recall a previous reading. The latest reading will be recalled first. CLEARING VALUES FROM MEMORY 1. P ress the User-Select button to select User 1 or User 2. START STOP 2. Press and hold the Date & Time set buttons ) at the same time while in memory recall mode, and the data for the selected user will be erased automatically. -
Page 26: Important Notes Regarding Your Blood Pressure Measurement
IMPORTANT NOTES REGARDING YOUR BLOOD PRESSURE MEASUREMENT • T ake your reading in a comfortable environment as measurements can be affected by hot or cold temperatures. Take your blood pressure at normal body temperature. • D o not move or talk during measurement as this can elevate readings. -
Page 27: Care, Maintenance & Cleaning
• This device may have difficulty determining the proper blood pressure for users with irregular heartbeat, diabetes, poor circulation of blood, kidney problems, or for users who have suffered a stroke. CARE, MAINTENANCE & CLEANING 1. C lean the blood pressure monitor body and cuff carefully with a slightly damp, soft cloth. Do not press. Do not wash cuff or use chemical cleaner on it. - Page 28 8. D o not disassemble the monitor or cuff. If in need of repair, refer to the warranty section of this manual. 9. D o not subject the monitor to extreme shocks (do not drop on floor). 10. Do not inflate the cuff unless wrapped around arm. 11. D o not wrap the cuff around body parts other than your arm. 12. D o not drop or insert any object into any o pening or hose. 13. T o avoid accidental strangulation keep this product away from children. Do not drape tube around neck. 14. T his monitor may not meet its performance specifications if stored or used outside of these temperature and humidity ranges:...
-
Page 29: Potential For Electromagnetic Interference
POTENTIAL FOR ELECTROMAGNETIC INTERFERENCE To avoid inaccurate results caused by electromagnetic interference between electrical and electronic equipment, do not use the device near a cell phone or microwave oven. IB-WGNBPA540-manual.indd 28 2009/11/3 下午 1:42... -
Page 30: Troubleshooting
TROUBLESHOOTING If any abnormality arises during use, please check the following points POSSIBLE SYMPTOMS CORRECTION CAUSES Batteries have Replace them with Unit does not turn on when the START/ run down. four new AA alkaline batteries. STOP button is pushed. Battery polarities Re-insert the batteries have been positioned... -
Page 31: Specifications
SPECIFICATIONS Power Source: Four 1.5V DC (AA) batteries or 6V DC AC adapter Measurement Method: Oscillometric Pressure: 40~280 millimeters mercury (mmHg) Measurement Range: Pulse: 40~199 beats/minute Pressure: ±3 mmHg Accuracy: Pulse: ±5% of reading Pressure Sensor: Semi-conductor Inflation: Pump driven Automatic Pressure release valve Deflation: 60 memories for each User (120 total) Memory Capacity: Auto-shut-off: 1 minute after last button operation Operation Temperature: 50°F~104°F (10°C ~40°C) Environment: Humidity: 15% ~ 90% RH Temperature: -4°F~158°F (-20°C~70°C) Storage Environment: Humidity: Less Than 90% RH Weight: 0.56 lb (255.5 g) (without batteries) Standard size cuff: 9”–13” (23-33 cm) Arm Circumference: Large size cuff:13”–17” (33-43 cm) -
Page 32: Year Limited Warranty
Made exclusively for LIMITED FIVE YEAR WARRANTY HoMedics sells its products with the intent that they are free of defects in manufacture and workmanship for a period of five years from the date of original purchase, except as noted below. HoMedics warrants that its products will be free of defects in material and work- manship under normal use and service. - Page 33 Brazo de lujo Monitor de la presión arterial WGNBPA-540 IB-WGNBPA540-manual.indd 32 2009/11/3 下午 1:43...
- Page 34 ÍNDICE INFORMACIÓN INICIAL: Avisos importantes del producto e instrucciones de seguridad ......35 Sobre la presión sanguínea ......37 ¿Qué es la presión sanguínea? ¿Por qué medir la presión sanguínea? Estándar de presión sanguínea ....... 37 Cómo funciona este monitor de presión sanguínea ............
- Page 35 Índice de Categoria de Riesgo ......52 Detector de latidos irregulares (IHB, por sus siglas en inglés) ..........53 Cómo recuperar los valores de la memoria ..54 Cómo borrar los valores de la memoria ..56 Notas importantes con respecto a las mediciones de presión sanguínea ....
-
Page 36: Avisos Importantes Del Productoe Instrucciones De Seguridad
AVISOS IMPORTANTES DEL PRODUCTO E INSTRUCCIONES DE SEGURIDAD Cuando utilice su monitor de presión sanguínea, debe seguir siempre las precauciones básicas. Sírvase leer y seguir todas las instrucciones y advertencias antes de utilizar este producto. Guarde estas instrucciones para referencia futura. • O bserve que éste es un producto doméstico de cuidado de la salud únicamente y no está... - Page 37 personas con latidos irregulares, diabetes, mala circulación, trastornos renales o usuarios que han sufrido una apoplejía. • L a pantalla de pulso no es adecuada para verificar la frecuencia de los marcapasos. • I nterferencia electromagnética: el dispositivo contiene componentes electrónicos sensibles. Evite los campos eléctricos o electromagnéticos fuertes cercanos al dispositivo (por ejemplo, teléfonos celulares, hornos de microondas). Éstos pueden causar la imposibilidad temporal de medir con precisión.
-
Page 38: Sobre La Presión Sanguínea
SOBRE LA PRESIÓN SANGUÍNEA ¿Qué es la presión sanguínea? La presión sanguínea es la presión que se ejerce en las paredes de la arteria cuando la sangre fluye por las arterias. La presión medida cuando el corazón se contrae y sale la sangre es la presión sanguínea sistólica (la mayor). - Page 39 Los usuarios pueden comparar sus propias lecturas de presión sanguínea con estos criterios establecidos para determinar si es posible que corran un mayor riesgo. Esta tabla se aplica a la mayoría de los adultos mayores de 18 años. La presión sanguínea tiende a subir y bajar, incluso en personas que normalmente no tienen lecturas altas. Si sus resultados permanecen por encima del rango “normal”...
-
Page 40: Cómo Funciona Este Monitor De Presión Sanguínea
CÓMO FUNCIONA ESTE MONITOR DE PRESIÓN SANGUÍNEA Este monitor utiliza tecnología innovadora para detectar su presión arterial. Esta tecnología permite que el monitor infle y desinfle automáticamente al nivel apropiado para cada persona. Al presionar un botón, el brazalete se inflará automáticamente para bloquear la circulación de sangre a través de la arteria. -
Page 41: Nombre/Función De Cada Pieza
NOMBRE/FUNCIÓN Botones de DE CADA PIEZA configuración de fecha y hora Tubo de aire y conector Pantalla LCD Tapa de las pilas (parte inferior de la unidad) Brazaletes Botón de recuperar memoria Botón de START/STOP Botón de selección (COMENZAR/DETENER) del usuario Otros accesorios: 1 Adaptador de CA de salida de 6V CC 4 pilas alcalinas “AA” de 1,5 V (no incluido) -
Page 42: Explicaciones De La Pantalla
EXPLICACIONES DE LA PANTALLA Presión sistólica Presión diastólica Indicador de fecha/ hora Pulso IB-WGNBPA540-manual.indd 41 2009/11/3 下午 1:43... - Page 43 Símbolos de la pantalla: Usuario 1: aparece cuando el Usuario 1 opera el monitor. Usuario 2: aparece cuando el Usuario 2 opera el monitor. Símbolo de pilas bajas: aparece cuando tiene que cambiar las pilas. Símbolo de pulso: muestra los pulsos por minuto. Indicador de latidos irregulares: Vea la página 53 para obtener más información.
-
Page 44: Instalación De Las Pilas
INSTALACIÓN DE LAS PILAS 1. P resione el seguro y levante la tapa de las pilas para abrir el compartimiento de las pilas. 2. I nstale o reemplace las 4 pilas “AA” en el compartimiento de las pilas según las indicaciones dentro del compartimiento. 3. Colocar la tapa de las pilas, luego presione el extremo superior de la tapa de las pilas. Tapa del compartimiento de las pilas Reemplace las pilas si:... -
Page 45: Uso Del Adaptor De Ca
USO DEL ADAPTADOR DE CA Nota: • d escargue las pilas cuando lo haga funcionar con el adaptador de CA durante mucho tiempo. Dejar las pilas en el compartimiento durante mucho tiempo puede causar pérdidas que pueden dañar la unidad. • n o se necesitan pilas cuando haga funcionar el dispositivo con el adaptador de CA. • s e deberán volver a configurar la fecha y hora si el adaptador de CA se desenchufa y la unidad no tiene baterías. -
Page 46: Procedimiento De Configuración De Fecha Y Hora
PROCEDIMIENTO DE CONFIGURACIÓN DE FECHA Y HORA 1. P ara ajustar la fecha/hora, presione el botón Set 2. La pantalla mostrará un número intermitente mostrando la HORA. Cambie la HORA presionando el botón. Cada vez que lo presione aumentará en uno el número de manera cíclica. -
Page 47: Uso Del Brazalete
USO DEL BRAZALETE Muy importante: El tamaño adecuado del brazalete es fundamental para obtener mediciones precisas. Este monitor está equipado con brazaletes de dos tallas: Talla Normal, de 9” a 13” (de 23 a 33 cm) Talla Grande, de 13” a 17” (de 33 a 43 cm) Este brazalete es adecuado para su uso si la flecha de color cae dentro de la línea de color sólido, como se muestra a continuación. - Page 48 1. S i el brazalete no está armado, pase el extremo del brazalete que se encuentra más lejos del tubo a través del anillo metálico en D, para formar un aro. El lado suave y sin el material de felpa, debe encontrarse en el lado interior del aro formado por el brazalete. 2. Conecte el tubo del brazalete en el costado izquierdo de la unidad.
- Page 49 7. Hale el extremo del brazalete para que quede ajustado y parejo alrededor de su brazo. Presione el cierre de gancho y aro para asegurarlo. Deje espacio suficiente para que 2 dedos quepan entre el brazalete y su brazo. 8. P onga el brazo en una mesa (con la palma hacia arriba) de modo que el brazalete esté...
-
Page 50: Procedimiento De Medición
PROCEDIMIENTO DE MEDICIÓN Notas importantes: • L a presión sanguínea cambia con cada latido del corazón y está en constante fluctuación durante todo el día. • L a medición de la presión sanguínea puede verse afectada por la posición del usuario, sus condiciones fisiológicas y demás factores. Para obtener la mayor precisión en la medición de la presión sanguínea, espere 1 hora después de hacer ejercicio, bañarse, comer, tomar bebidas con alcohol o cafeína o fumar. - Page 51 2. Con el brazalete puesto en el brazo, presione el botón START/STOP. No infle el brazalete a menos que esté puesto en el brazo. Todos los dígitos se encenderán para verificar las funciones de la pantalla. El procedimiento de verificación se completará después de aproximadamente 3 segundos. START STOP 3. Una vez que el símbolo desaparezca, la pantalla mostrará un “00”. El monitor está “Listo para medir”...
- Page 52 5. C uando la medición esté completa, el brazalete se desinfla por completo. Se mostrarán simultáneamente las lecturas de presión sistólica, presión diastólica y pulso en la pantalla LCD. La medida se almacenará automáticamente en la memoria. Nota: 1. E ste monitor se apaga automáticamente aproximadamente 1 minuto después de la última operación. También puede presionar el botón de START/STOP (COMENZAR/ DETENER) para apagar la unidad.
-
Page 53: Índice De Categoria De Riesgo
ÍNDICE DE CATEGORÍA DE RIESGO Este monitor viene equipado con un Índice de categoría de riesgo que compara automáticamente cada lectura al criterio establecido por el National Heart Lung and Blood Institute de los National Institutes of Health (NIH) de EE.UU. como se describió anteriormente en este manual y brinda una guía útil si su lectura entra en una de las etapas que podrían indicar un mayor riesgo. -
Page 54: Detector De Latidos Irregulares (Ihb, Por Sus Siglas En Inglés)
DETECTOR DE LATIDOS IRREGULARES (IHB, por sus siglas en inglés) SYS. Cuando aparece el ícono , indica que durante la medición se mmHg detectó una irregularidad en el pulso que es coherente con un latido irregular. Generalmente, esto no debería ser un motivo de preocupación. -
Page 55: Cómo Recuperar Los Valores De La Memoria
Para determinar la presencia de un latido irregular, el promedio de intervalos de latidos se calcula con los 3 primeros valores eficaces normales del ritmo cardíaco. Es importante tener en cuenta que el promedio no es un promedio matemático estricto de todos los intervalos registrados. - Page 56 3. Presione el botón “M” para acceder a la memoria. START STOP 4. E l monitor mostrará primero el promedio calculado aplicado a las últimas 3 memorias. 5. C ada vez que presiona el botón “M” se recuperará una lectura previa. La última lectura será la primera en recuperarse.
-
Page 57: Cómo Borrar Los Valores De La Memoria
CÓMO BORRAR LOS VALORES DE LA MEMORIA 1. P resione el botón de Selección de usuario para elegir Usuario 1 o Usuario 2. START STOP 2. Mantenga presionado los botones de fecha y tiempo ) en el modo de memoria, y los datos guardados serán borrados automáticamente. IB-WGNBPA540-manual.indd 56 2009/11/3 下午... -
Page 58: Notas Importantes Con Respecto A Las Mediciones De Presión Sanguínea
NOTAS IMPORTANTES CON RESPECTO A LAS MEDICIONES DE PRESIÓN SANGUÍNEA • T ome su lectura en un entorno cómodo ya que las medidas pueden verse afectadas por las temperaturas calurosas o frías. Tome su presión sanguínea a una temperatura corporal normal. • N o se mueva ni hable durante la medición ya que esto puede elevar las lecturas. -
Page 59: Cuidado, Mantenimiento Y Limpieza
CUIDADO, MANTENIMIENTO Y LIMPIEZA 1. L impie el cuerpo del monitor de presión sanguínea y el brazalete con cuidado con un paño suave, apenas húmedo. No lo apriete. No lave el brazalete ni utilice un limpiador químico para limpiarlo. Nunca utilice diluyentes, alcohol ni petróleo (gasolina) para limpiarlo. 2. L as pilas con pérdidas pueden dañar la unidad. Retire las pilas si el producto no se va a utilizar por un largo tiempo. - Page 60 13. P ara evitar estrangulaciones accidentales, mantenga este producto lejos de niños y no cuelgue el tubo del cuello. 14. E ste monitor puede no cumplir con sus especificaciones de rendimiento si se guarda o se utiliza fuera de estos rangos de temperatura y humedad: • Ambiente para guardar • Ambiente de funcionamiento Temperatura: Temperatura: 50°F~104°F (10°C ~40°C) -4°F~158°F (-20°C~70°C) Humedad: Humedad: 15% ~ 90% HR Menos de 90% HR IB-WGNBPA540-manual.indd 59 2009/11/3 下午...
-
Page 61: Potencial De Interferencia Electromagnética
POTENCIAL DE INTERFERENCIA ELECTROMAGNÉTICA Para evitar resultados incorrectos provocados por la interferencia electromagnética entre los equipos eléctricos y electrónicos, no use el dispositivo cerca de un celular o un horno microondas. IB-WGNBPA540-manual.indd 60 2009/11/3 下午 1:43... -
Page 62: Diagnóstico Y Resolución De Problemas
DIAGNÓSTICO Y RESOLUCIÓN DE PROBLEMAS Si aparece alguna anomalía durante el uso, sírvase verificar los siguientes puntos CAUSAS SÍNTOMAS SOLUCIÓN POSIBLES Se han acabado las pilas. Cambie por unas pilas AA La unidad no se enciende cuando presiono el botón alcalinas nuevas. -
Page 63: Especificaciones
ESPECIFICACIONES Cuatro pilas de 1,5V CC (AA) o adaptador de 6V Fuente de energía: para CC y CA Método de medición: Oscilométrico Presión: 40~280 milímetros mercurio (mmHg) Rango de medición: Pulso: 40~199 latidos/minuto Presión: ±3 mmHg Precisión: Pulso: ±5% de la lectura Sensor de presión: Semiconductor Inflado: Por bombeo Desinflado: Válvula de liberación de presión automática Capacidad de memoria: 60 memorias para cada Usuario (120 en total) Apagado automático: 1 minuto después de haber presionado algún botón por última vez Temperatura: 50°F~104°F (10°C ~40°C) Ambiente de Humedad: 15%~90% HR funcionamiento: Temperatura: -4°F~158°F (-20°C~70°C) -
Page 64: Años De Garantía Limitada
GARANTÍA LIMITADA POR CINCO AÑOS Fabricado exclusivamente HoMedics vende sus productos con la intención de que no tengan defectos de fabricación ni de mano de para obra por un plazo de cinco años a partir de la fecha de compra original, con las siguientes excepciones. HoMedics garantiza que sus productos no tendrán defectos de material ni de mano de obra bajo condi- ciones de uso y servicio normales.
Need help?
Do you have a question about the WGNBPA-540 and is the answer not in the manual?
Questions and answers