
Related Manuals for AMS AS3935


Summary of Contents for AMS AS3935
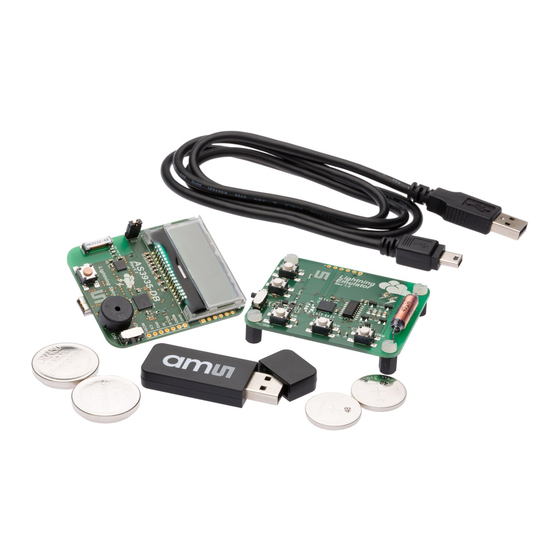
- Page 1 Demo Kit Manual DN[Document ID] AS3935 Standard Board AS3935 DK ams Demo Kit Manual, Confidential Page 1 [v1-03] 2014-Jul-08 Document Feedback...
-
Page 2: Table Of Contents
AS3935 Standard Board Table of Contents Features ..........................3 Programmable Lightning Sensor AS3935 Key Features ............. 3 Franklin Lightning Sensor Description ................. 4 Board Description ......................... 4 Component Description Top ....................4 Component Description Bottom ................... 4 Buzzer ..........................5 LCD ............................ -
Page 3: Features
128x32 display with blue backlight for detail information about storm warning Automatic antenna and RCO tuning implemented USB connection for adjusting AS3935 detail settings Handheld Lightning Emulator Emulation of lightning with different distance (far, close, closest) and noise generation 1.1 Programmable Lightning Sensor AS3935 Key Features... -
Page 4: Franklin Lightning Sensor Description
Power on/off the Demo Board. BUTTON Short Press: The actual time of the RTC is shown. Long Press (>1s): The statistics of the AS3935 is cleared IDD Jumper for current measurement of AS3935 BUZZER Audio Information for Lightning and Disturber... -
Page 5: Buzzer
The demo board can be connected via USB. As soon as the USB bus is connected the sensor is turned off and all settings of the AS3935 can be saved in the GUI. If the demo board is power USB connected... -
Page 6: Real Time Clock (Rtc)
The distance to the head of the storm increases. Continuous noise is jamming the Noise Floor AS3935 AFE; during this time the Detected sensor cannot detect the presence of lightning activities. Disturbers have been received by the Disturber Detected AS3935 and rejected by the disturber rejection embedded algorithm. -
Page 7: Lightning Emulator
Red LED flashes up for 3s in case noise is emulated Yellow LED flashes up in case far strike is emulated Strike Orange LED flashes up in case mid strike is emulated ams Demo Kit Manual, Confidential Page 7 [v1-03] 2014-Jul-08 Document Feedback... -
Page 8: How To Get Started With Franklin Lightning Sensor Demo Kit
Keep a distance of 10-15 cm between both boards. Turn on the AS3935 Lightning Sensor via the ON/OFF – switch “A”. When you switch on the board you will see on the LCD the austriamicrosystems logo followed by the LCO and the RCO calibration. -
Page 9: Gui Description
Power Down In power down mode (R0<0>=1), the entire AS3935 is switched off. The typical current consumption is 800nA. After power up, the TRCO is not calibrated. The calibration must be done by the user pressing the button “Calibrate RCOs”, and respectively “Calibrate LCO” if needed. - Page 10 Oscillators In case the AS3935 demo board is connected to the GUI via USB before powering up the demo board, the oscillators will not be calibrated. The calibration procedure can be executed manually via the GUI. The first step is to measure the default resonance frequency of the oscillators by pressing “Measure”.
- Page 11 AS3935 Standard Board Figure 3: Register Map ams Demo Kit Manual, Confidential Page 11 [v1-03] 2014-Jul-08 Document Feedback...
-
Page 12: History Description
Zoom out of the history by pressing the right mouse button. Select some strikes in the graph and the details will be highlighted in the table below. ams Demo Kit Manual, Confidential Page 12 [v1-03] 2014-Jul-08 Document Feedback... -
Page 13: Layer Stack Of Lightning Sensor
Make sure that the GND plane is routed carefully. Do not run SPI or any other interface on 500 kHz clock speed, in order to avoid cross-coupling. ams Demo Kit Manual, Confidential Page 13 [v1-03] 2014-Jul-08 Document Feedback... -
Page 14: Schematic, Layout And Bom Of Lightning Sensor
AS3935 Standard Board Schematic, Layout and BOM of Lightning Sensor 9.1 Schematic of Lightning Sensor Demo Board Figure 6: Board Schematics of Lightning Sensor Demo Board ams Demo Kit Manual, Confidential Page 14 [v1-03] 2014-Jul-08 Document Feedback... -
Page 15: Board Layout Of Lightning Sensor Demo Board
AS3935 Standard Board 9.2 Board Layout of Lightning Sensor Demo Board Figure 7: Top Layer Figure 8: Bottom Layer ams Demo Kit Manual, Confidential Page 15 [v1-03] 2014-Jul-08 Document Feedback... -
Page 16: Bill Of Material Of Lightning Sensor Demo Board
AS3935 Standard Board 9.3 Bill of Material of Lightning Sensor Demo Board ams Demo Kit Manual, Confidential Page 16 [v1-03] 2014-Jul-08 Document Feedback... -
Page 17: Schematic, Layout And Bom Of Lightning Emulator
AS3935 Standard Board 10 Schematic, Layout and BOM of Lightning Emulator 10.1 Schematic of Lightning Emulator Figure 9: Board Schematics of Lightning Emulator ams Demo Kit Manual, Confidential Page 17 [v1-03] 2014-Jul-08 Document Feedback... -
Page 18: Board Layout Of Lightning Emulator
AS3935 Standard Board 10.2 Board Layout of Lightning Emulator Figure 10: Top Layer Figure 11: Bottom Layer ams Demo Kit Manual, Confidential Page 18 [v1-03] 2014-Jul-08 Document Feedback... -
Page 19: Bill Of Material Of Lightning Emulator
AS3935 Standard Board 10.3 Bill of Material of Lightning Emulator ams Demo Kit Manual, Confidential Page 19 [v1-03] 2014-Jul-08 Document Feedback... -
Page 20: Ordering & Contact Information
AS3935 Standard Board 11 Ordering & Contact Information Ordering Code Description AS3935 DK AS3935 Demo Kit Standard Board Buy our products or get free samples online at: www.ams.com/ICdirect Technical Support is available at: www.ams.com/Technical-Support Provide feedback about this document at: www.ams.com/Document-Feedback... -
Page 21: Copyrights & Disclaimer
AG shall not be liable to recipient or any third party for any damages, including but not limited to personal injury, property damage, loss of profits, loss of use, interruption of business or indirect, special, incidental or consequential damages, of any kind, in connection with or arising out of the furnishing, performance or use of the technical data herein. -
Page 22: Revision Information
Changes from 1-02 (2013-Mar-11) to current revision 1-03 (2014-Jul-08) Page Update to corporate format 1-21 Note: Page numbers for the previous version may differ from page numbers in the current revision. ams Demo Kit Manual, Confidential Page 22 [v1-03] 2014-Jul-08 Document Feedback...
Need help?
Do you have a question about the AS3935 and is the answer not in the manual?
Questions and answers