Table of Contents
Advertisement
WARRANTY
Top Flite
®
Model Manufacturing Co. guarantees this kit to be free from defects in both material and
workmanship at the date of purchase. This warranty does not cover any component parts damaged by use
or modification. In no case shall Top Flite's liability exceed the original cost of the purchased kit.
Further, Top Flite reserves the right to change or modify this warranty without notice.
In that Top Flite has no control over the final assembly or material used for final assembly, no liability shall be
assumed nor accepted for any damage resulting from the use by the user of the final user-assembled
product. By the act of using the user-assembled product, the user accepts all resulting liability.
If the buyer is not prepared to accept the liability associated with the use of this product, the buyer is
advised to return this kit immediately in new and unused condition to the place of purchase.
To make a warranty claim send the
defective part or item to Hobby
Services at this address:
Include a letter stating your name, return shipping address, as much contact information as possible (daytime
telephone number, fax number, e-mail address), a detailed description of the problem and a photocopy of the
purchase receipt. Upon receipt of the package the problem will be evaluated as quickly as possible.
READ THROUGH THIS MANUAL BEFORE STARTING CONSTRUCTION. IT CONTAINS IMPORTANT INSTRUCTIONS AND WARNINGS CONCERNING THE ASSEMBLY AND USE OF THIS MODEL.
®
Entire Contents © 2010 Hobbico
, Inc.
Hobby Services
3002 N. Apollo Dr. Suite 1
Champaign IL 61822 USA
Top Flite Models Champaign, IL
Ph: (217) 398-8970, Ext. 5
Fax: (217) 398-7721
airsupport@top-flite.com
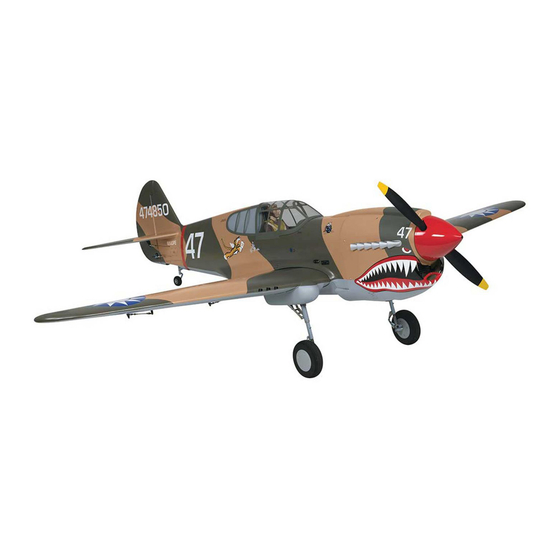
SPECIFICATIONS
Wingspan:
86 in [2185mm]
Wing Area:
1262 sq in [81.4 dm
23– 24 lb
Weight:
[10430– 10880 g]
Wing
42– 44 oz/sq ft
2
Loading:
[128–134 g/dm
]
72 in
Length:
[1830mm]
Radio:
5-7 channel minimum
Engine:
2.6–3.3 cu in
[43–55cc] two-stroke
gasoline engine
TOPA0705 Mnl 1.3
2
]
Advertisement
Table of Contents

Related Manuals for Top Flite P-40 Warhawk


Summary of Contents for Top Flite P-40 Warhawk
- Page 1 Further, Top Flite reserves the right to change or modify this warranty without notice. 23– 24 lb In that Top Flite has no control over the final assembly or material used for final assembly, no liability shall be Weight: [10430– 10880 g] assumed nor accepted for any damage resulting from the use by the user of the final user-assembled product.
-
Page 2: Table Of Contents
Mount The Retractable Tail Gear ..18 Top Flite is very proud to bring you the P-40 Warhawk Academy Of Model Aeronautics... . 2 Install The Elevator &... -
Page 3: Scale Competition
3. You must take time to build straight, true and strong. instructions to end up with a well-built model Though the Top Flite P-40 is an ARF and may not have that is straight and true. 4. You must use an R/C radio system that is in the same level of detail as an “all-out”... -
Page 4: Engine Recommendations
❍ Mixing cups (GPMR8056) Depending on your choice of receiver and the number ADDITIONAL ITEMS REQUIRED ❍ Denatured alcohol (for epoxy clean up) of channels you will be using you may have to use ❍ Panel Line Pen (TOPQ2510) “Y” harnesses on the aileron, flaps and elevator. REQUIRED HARDWARE &... -
Page 5: Common Abbreviations
Frequently you can study photos in Before starting to build, take an inventory of this kit Top Flite Product Support following steps to get another view of the same parts. to make sure it is complete, and inspect the parts to 3002 N Apollo Drive, Suite 1 ●... -
Page 6: Ordering Replacement Parts
TOPA1808 Tail Gear Cover dealer or mail-order company. To locate a hobby dealer, visit the Top Flite web site at PREPARATIONS www.top-fl ite.com. Select “Where to Buy” in the menu ❏ 1. If you have not done so already, remove the major across the top of the page and follow the instructions parts of the kit from the box and inspect for damage. - Page 7 Futaba servos. Place your particular brand of servo on the cover making sure they fi t between the locations for the blocks. Adjust the positioning of the blocks for your brand of servo. ❏ ❏ 6. Install the servo arms onto your servos. The ❏...
- Page 8 ❏ ❏ 11. Install the modifi ed control horn to the fl ap using the same method used for the aileron. ❏ ❏ 10. Place a black nylon control horn onto the plywood mounting plate in the aileron in line with the servo arm.
-
Page 9: Install The Fixed Wire Landing Gear
❏ ❏ You now need to make a decision on the type of 14. Once the solder has cooled slide a silicone landing gear you will be installing. We provide fi xed clevis keeper over each clevis. Install the pushrod wire landing gear as part of the kit. - Page 10 bolts or blind nuts, it will be very diffi cult to remove the mounting bolts. As a precaution, you might consider applying a small amount of petroleum jelly or lightweight oil to the threads of the bolts before installing them. Place the wood blocks in position on the rails.
- Page 11 pointing toward the wing tip. If it does not, you have the wrong wire. Install two aluminum landing gear straps into the block and screw them to the block with four #6 × 1/2" [13mm] screws. ❏ ❏ 10. At the location of the wheel collars make a fl...
-
Page 12: Install The Retractable Landing Gear
❏ ❏ 3. Install the right side landing gear between ❏ ❏ ❏ ❏ 1. Locate the four hardwood landing gear the mounting blocks. The landing gear fi ts between 13. Secure the outer wheel cover to the wheel blocks. Place them on your work bench exactly as the blocks best if you install it with the gear retracted. - Page 13 ❏ ❏ 7. Remove the landing gear from the right wing panel. ❏ ❏ 8. If you have purchased the Robart air pressure tubing, cut a piece of the red and blue line to a length of 18" [457mm]. Cut the remaining line in half, leaving ❏...
-
Page 14: Mount The Wing Nacelles
❏ ❏ 3. Insert and then remove a #2 × 3/8" [9.5mm] screw into each of the holes in the wing. Around each ❏ ❏ 17. Insert the axle and wheel into the landing gear. of the holes you made pierce four holes with a pin. Apply a drop of threadlocker onto the set screw;... -
Page 15: Join The Wing Halves
JOIN THE WING HALVES ❏ 1. Glue the 1/4" × 3/4" [6mm × 19mm] dowel into the hole at the rear of the root rib in the right wing. ❏ 4. When you are satisfi ed with the fi t of the joiner, glue ❏... - Page 16 HOW TO CUT COVERING FROM BALSA ❏ ❏ 11. Locate six 3/8" × 1-3/4" [9.5mm × 44mm] black 9. Apply epoxy to the belly pan fl ange. Then glue tubes. These tubes replicate the machine guns. Test the belly pan in place on the fuselage. Tape the belly fi...
-
Page 17: Assemble The Fuselage
❏ 2. Once you are satisfi ed with the fi t of the stabilizer halves, remove the stabilizer halves and joiner tubes. Use medium grit sandpaper to roughen up the Did You Know?… Did You Know?… aluminum tubes. Clean the tubes with denatured alcohol and insert both tubes back into the fuselage until the end exits on the opposite side by approximately 1"... -
Page 18: Install The Tail Gear Assembly
of oil to the pivot point on the hinges. This will prevent gear. The two tail gears are interchangeable; you can the top of the tail gear wire and perpendicular to the the epoxy from adhering to the pivot point. Make sure install the fi... - Page 19 in the steering arm to lock onto. Mount the steering arm to the shaft with a drop of threadlocker and the set screw. ❏ 2. File another fl at spot near the bottom of the shaft for one of the set screws in the strut. Tighten both set screws with a drop of threadlocker on each.
-
Page 20: Install The Elevator & Rudder Servos
2. Thread a 4-40 nut, threaded clevis and a silicone fl at spot on it and mount it to the strut. The P-40 Warhawk was a deadly fi ghting machine in clevis retainer, 12 turns, onto both elevator pushrods. trained hands. The formidable armament of 6 × 12.7mm (.50 caliber) machine guns (up to 200 rounds per gun) - Page 21 ❏ 4. Mount the control horns to the elevators and ❏ 6. Install solder clevises on the elevator servo arms the rudder. Follow the same procedure used for the in the outer hole from the center of the servo arm. ailerons, by drilling 3/32"...
-
Page 22: Install The Engine, Muffler, Radio And Remaining Servos
INSTALL THE ENGINE, MUFFLER, RADIO AND REMAINING SERVOS The following engine mounting instructions shows the installation of the DLE-55 gas engine. The installation of other brands of engines will be similar and the following instructions can be used as a guide. ❏... - Page 23 ❏ 2. We have included 1/8" [3.2mm] plywood spacers to help space different engines out the required distance for the engine to fi t the cowl. Drill a 3/16" [4.8mm] hole through the “+” marks on one of the plywood spacers. It’s a good idea to fuel proof the spacer.
- Page 24 ❏ box in the bottom of the box as shown. Pass the vent 10. Install fuel lines onto the brass tubes from the and carburetor lines through the holes. fuel tank. To route the fuel lines as will be shown here you will need to use a 24"...
- Page 25 ❏ 17. Install a .080 metal ball into the hole in the air control valve. Secure it with a .080 nut. Be sure to put a couple of drops of thread locker in the threads before installing the nut. Install the air control valve into the tray. ❏...
- Page 26 ❏ 20. Look closely at the photo in step 19. You will fi nd an elongated hole in the fuselage former. (Hole for choke.) Feed the choke tube through this hole. The tube should pass through the hole into the fuselage approximately 5"...
- Page 27 valve servos to the tray as shown. Make single servo the air tank and the air valve. Install an air line to the [254mm–152mm]. Make all of the connections between arms from 3/4" [19mm] servo arms. Enlarge the outer “T” fi tting and the air control valve. If you are unfamiliar the switch harness and the radio.
- Page 28 ❏ 33. Install a “T” fi tting into each of the red and purple airlines from the tail wheel. Connect an 8" [203mm] length of red and purple air line to the end of the “T” fi tting and the quick connect air line connectors. Finish the installation by installing a 2"...
- Page 29 the tray with #64 rubber bands. Install the plastic sleeve with the engine over the spark plug wire. ❏ 39. Mount the switch using just the screws that came with the switch. Glue the switch mount to the fuselage as shown in the picture in the next step. ❏...
-
Page 30: Install The Cowl
between two 3/8" × 3/8" × 5/8" [10mm × 10mm × 15mm] hardwood blocks. INSTALL THE COWL NOTE: After this manual was completed we made a change to the cowl mounting blocks. The following instructions correctly explain how to mount the cowl however the pictures may differ slightly. -
Page 31: Install The Cockpit, Pilot And Canopy
INSTALL THE COCKPIT, PILOT AND CANOPY We have provided a cockpit interior that, on its own, gives a very realistic look to the interior of the aircraft. With a little time and creative use of additional materials you can make a very detailed interior. Look through the following instructions to gain a better understanding of how the cockpit goes together. -
Page 32: Apply The Decals
❏ 2. Cut the left and right sidewalls on the cut lines as shown. ❏ 4. Install the two instrument panel decals to the panel. Complete the cockpit by gluing the instrument panel, control stick and headrest in place as shown. ❏... - Page 33 ❏ 3. Position decal on the model where desired. Holding the decal down, use a paper towel to wipe most of the water away. ❏ 4. Use a piece of soft balsa or something similar to squeegee remaining water from under the decal. Apply the rest of the decals the same way.
-
Page 34: Get The Model Ready To Fly
GET THE MODEL READY TO FLY SET THE CONTROL THROWS To ensure a successful fi rst fl ight, set up your P-40 CHECK THE CONTROL DIRECTIONS according to the control throws specifi ed in this ❏ 1. Turn on the transmitter and receiver and center manual. -
Page 35: Check The Retract Operation
❏ At this stage the model should be in ready-to-fl y These are the recommended control surface throws: 3. If the tail drops, the model is “tail heavy.” If the condition with all of the components in place including nose drops, the model is “nose heavy.” Use Great HIGH RATE LOW RATE the complete radio system, engine, muffl... -
Page 36: Preflight
15 hours using the slow-charger that We use a Top Flite Precision Magnetic Prop Balancer™ came with the radio system. This will “condition” Keep these items away from the prop: loose clothing,... -
Page 37: Ama Safety Code (Excerpts)
❏ AMA SAFETY CODE (excerpts) 3) At all fl ying sites a straight or curved line(s) must be 4. Extend your receiver antenna and make sure it established in front of which all fl ying takes place with has a strain relief inside the fuselage to keep tension Read and abide by the following excerpts from the the other side for spectators. -
Page 38: Flying
❏ the rudder and may need to use ailerons to help keep 17. Tighten the propeller nut and spinner. CAUTION (THIS APPLIES TO ALL R/C AIRPLANES): the wing level during the take off or landing roll out. If, while fl ying, you notice an alarming or unusual ❏... -
Page 39: Landing
you would expect. With the landing gear retracted, descent. Level the airplane about three feet (1 meter) low rates). A fl ight plan greatly reduces the chances there is nothing more impressive than a high speed above the runway and allow the plane to touch down of crashing your model just because of poor planning fl...
Need help?
Do you have a question about the P-40 Warhawk and is the answer not in the manual?
Questions and answers