Table of Contents
Advertisement
Quick Links
Wingspan: 63.5 in [1613mm]
Wing Area: 711.5 sq in [45.9 sq dm]
Weight: 8 -10 lbs [3.6 - 4.5kg]
Wing Loading: 26-32 oz/sq ft
[80-98 g/sq dm]
Length: 57.75 in [1467mm]
WARRANTY.....
does not cover any component parts damaged by use or modification. In no case shall Top Flite's liability exceed the original cost of the purchased kit. Further, Top Flite
reserves the right to change or modify this warranty without notice. In that Top Flite has no control over the final assembly or material used for final assembly, no liability shall
be assumed nor accepted for any damage resulting from the use by the user of the final user-assembled product. By the act of using the user-assembled product the user
accepts all resulting liability. If the buyer is not prepared to accept the liability associated with the use of this product, the buyer is advised to immediately return this kit in
new and unused condition to the place of purchase.
Top Flite Models P.O. Box 788 Urbana, Il 61803
READ THROUGH THIS INSTRUCTION BOOK FIRST. IT CONTAINS IMPORTANT INSTRUCTIONS AND WARNINGS CONCERNING THE ASSEMBLY AND USE OF THIS MODEL.
Entire Contents © Copyright 2000
Top Flite Models guarantees this kit to be free of defects in both material and workmanship at the date of purchase. This warranty
Technical Assistance Call (217)398-8970 productsupport@top-flite.com
™
FW60P03 for TOPA0150
V1.0
Advertisement
Table of Contents

Related Manuals for Top Flite Focke-Wulf 190 D9


Summary of Contents for Top Flite Focke-Wulf 190 D9
- Page 1 In no case shall Top Flite‘s liability exceed the original cost of the purchased kit. Further, Top Flite reserves the right to change or modify this warranty without notice. In that Top Flite has no control over the final assembly or material used for final assembly, no liability shall be assumed nor accepted for any damage resulting from the use by the user of the final user-assembled product.
-
Page 2: Table Of Contents
Hook up the flaps and ailerons ...40 Top Flite Gold Edition Focke-Wulf 190 D9. If you DECISIONS YOU MUST MAKE ... . .3 Finish the wing . -
Page 3: Precautions
.75 2-stroke and will fly the Focke-Wulf extremely YOURSELF & OTHERS well. If you use a .61 2-stroke engine, a ball FOLLOW THESE IMPORTANT Your Top Flite Gold Edition Focke-Wulf is bearing, Schnuerle-ported engine intended for scale and general sport flying recommended. -
Page 4: Exhaust System
(8) #6 x 1/2" screws (GPMQ3160, pkg. of 8) SuperTigre .61-.75 G series (muffler bolts go Top Flite also offers a 1/7 scale WW II American Full Body Pilot (he could be painted in German These items are required for fixed landing gear: through the engine and screw into the muffler) flight gear!). -
Page 5: Competition-Minded Modelers
Order numbers are in parentheses (GPMR6048) epoxy for a rule book that will tell you everything you need to (HCAM2200). TOP is the Top Flite brand, GPM is the ❏ 6-minute epoxy (GPMR6045) know. You can find a contest schedule in the back of brand and HCA is the Hobbico ®... -
Page 6: Tools
Assortment pack of 5-1/2" strips (GPMR6189) ❏ Hobbico Builder’s Triangle (HCAR0480) -and- ❏ T-Pins (HCAR5100 — small, Top Flite Sealing Iron (TOPR2100) We also use Top Flite 320-grit (TOPR8030, 4 sheets) Top Flite Hot Sock ™ (TOPR2175) HCAR5150 — medium, HCAR5200 — large) -
Page 7: Important Building Notes
IMPORTANT BUILDING NOTES you are working on it. Similarly, move the former up means move the former toward the top of the fuselage even if the fuselage is upside-down when There are two types of screws used in this kit: you are working on it. -
Page 8: Die-Cut Patterns
DIE-CUT PATTERNS - 8 -... -
Page 9: Die-Cut Patterns
DIE-CUT PATTERNS - 9 -... -
Page 10: Get Ready To Build
GET READY TO BUILD BUILD THE TAIL SURFACES Build the stabilizer and elevators ❏ 1. A miniaturized building plan is included in the ❏ 1. Cut the stab plan from the fuse plan sheet and middle of this manual. It may be removed and used as place it over your building board. - Page 11 Top Flite selects balsa that is intended for sheeting, though occasionally a few of these sheets may have a small nick or split near the ends. If your kit contains a few of these sheets, arrange them and glue them together so the defects will not interfere with the final shape of the skin.
- Page 12 that is required should be done before the sheeting is steps (you can get three skins from one sheet, but glued in place. The only sanding that should be will have to use the second sheet for the fourth skin). Note that the grain is parallel with the LE.
- Page 13 ❏ 18. Sand a similar bevel to the inside of the remaining two elevator skins. Glue the skins to the bottom of the elevators. ❏ 19. Glue the bottom stab skins to the bottom of the stab. Press the sheeting down evenly, being careful not to add any twist.
-
Page 14: Finish The Elevators
❏ ❏ ❏ ❏ ❏ ❏ 25. Finish shaping the stab and elevator tips by 3. Glue one of the 1/2" x 5/8" x 1-15/16" balsa 6. Using the centerlines you marked as a guide, elevator root blocks to the end of one of the rounding the corners. -
Page 15: Build The Fin
Build the fin ❏ 1. Cut the fin plan from the side view of the fuse plan along the dashed lines. Place the fin plan over your building board. The same as the stab, if you work carefully there is no need to protect the plan from glue. -
Page 16: Build The Fuselage
BUILD THE FUSE right side of the fin ribs. Cut two fin hinge blocks from the same 1/4" x 3/8" stick used for the stab and Frame the fuse top elevator hinge blocks, then glue the hinge blocks to the fin TE spar where shown. Note: The formers that have part names stamped on them are stamped with only the necessary ❏... - Page 17 F- 2A, F-3A and F-4A. Fit the assembly to the main stringers over their location on the plan. ❏ 8. If you are going to install the optional Top Flite Scale Cockpit kit, use a straightedge and a ballpoint ❏...
-
Page 18: Mount The Stab And Fin
stringers into the notches of F-5A to F-9A Sand the main stringers to match the angle of the (immediately under the cockpit deck) on both sides formers. Replace the fuse top on the building board, of the fuse (you’ll have two half-stringers leftover). holding it down with T-pins. -
Page 19: Sheet The Top Of The Fuse
Sheet the top of the fuse distances are not equal (if the stab is not level), lightly trim the stab bases until you can get the stab level. Use caution not to change the incidence By now you’ve noticed that the Focke-Wulf fuselage angle of the stab. - Page 20 This is really the only “tricky” piece of sheeting. bottom of the sheet rests against the sub stringer. A We’ve provided three photos to make sure you piece of leftover 1/16" sheeting will have to be added can do it correctly. to the top of the sheet where it cannot reach the cockpit deck.
- Page 21 the blocks to match the shape of the sheeting and F-6B to a point 7/8" ahead of F-4A. Save the the spine. Hint: After carving the block to the remaining 12" piece to sheet the fuse under the stab. approximate shape, wrap a piece of Great Planes Sheet the rest of the front of the fuse using a 1/16"...
-
Page 22: Build The Fuse Bottom
❏ do not round the tip of the fin until instructed to do so. 6. Cut two 3/16" pushrod guide tubes to a length Fill the gap between the fuse sheeting and the fin of 29" and 31". Scuff the guide tubes with coarse fillet block with balsa filler. -
Page 23: Sheet The Bottom Of The Fuse
Sheet the bottom of the fuse wing saddle area between F-4 and F-7 (it most likely will), first allow the water you applied for bending to fully dry. This may take a few hours or even overnight. If the sheeting is still bowed outward, cut that part of sheeting from the fuse and replace it with a separate piece of leftover 1/16"... -
Page 24: Mount The Tail Gear
Mount the tail gear across the two forward holes in the plate. Temporarily mount the tail gear mount to the tail gear mount plate with two #2 x 3/8" screws (you can see the assembly in the photo at step 6). ❏... - Page 25 ❏ Refer to this photo for the following three steps. 13. Pop off the aft fuse bottom block that you tack glued earlier. Permanently mount the tail gear mount ❏ 6. Thread a nylon dual-ended ball link onto the to the tail gear mount plate with two #2 x 3/8" screws. ❏...
-
Page 26: Build The Rudder
❏ 15. Glue the die-cut 1/8" balsa fin TE to the fin TE the blocks to the rudder core, then shape them to match the rudder core, but do not round them yet. spar. Sand the fin TE to blend in with the fin and the bottom of the fuse. -
Page 27: Finish The Turtle Deck
❏ Finish the turtle deck sander to shape the block to match the outline you 10. Adjust the metal clevis so the rudder will be drew on the front. The block blends to the fuse in the centered when the tail gear is centered. rear. -
Page 28: Mount The Engine
❏ mount for mounting your engine. Remove the engine, 6. Trim the bottom edges of the canopy so that it then drill four #29 (or 9/64") holes at the marks. Tap 8- overlaps the fuse by approximately 3/16" to provide 32 threads into the holes. - Page 29 Perform steps R5 through R8 only if you are W-1, W-2 and W-3. The holes should be located near Perform steps F2 through F4 only if you are building your wing with RETRACTABLE landing the top of the ribs and the aft edge of the holes building your wing with FIXED landing gear.
-
Page 30: Frame The Wing Panel
Frame the wing panel Refer to this photo for the following two steps. insert T-pins through the spar web to hold the bottom spar and the spar web flat on the building board. Insert Refer to this photo for the following two steps. T-pins through the TE spar (or use leftover rib jigs) to hold the TE spar to the building board. - Page 31 ❏ ❏ the top spar. The grain direction is parallel with the grain is parallel with the outer TE spar. You’ll have to 9. Cut the remainder of the shaped LE to the LE. The gap between the front of the skin and the LE trim a piece from the trailing edge of the sheet near correct length, then glue it to ribs 2 and 3.
- Page 32 certain that the TE of the skin (the end with the 1/32" space between the forward skin and the LE. Look for ply strip) aligns with the TE of the flap on the plan. glue joints you’ve missed, or ones that could use a little extra glue and reinforce them with CA.
-
Page 33: Fit The Landing Gear
❏ ❏ ❏ ❏ Fit the landing gear R4. Extend the landing gear. Adjust the strut so you R9. Test mount the landing gear to the rails with can barely detect any tow-in the wheel—about one- #6 x 1/2" screws. Retract and extend the gear to Perform steps R1 through R12 only if installing degree of tow-in is desirable to aid ground handling. - Page 34 ❏ ❏ F18. Chamfer the opening of the hole to accommodate the bend in the landing gear wire. Test fit one of the 3/16" landing gear wires into the landing gear mount and torque block. ❏ ❏ F19. Test fit the die-cut 1/8" plywood fixed landing gear plate to the landing gear wire and the grooved mount.
-
Page 35: Finish The Bottom Of The Wing
Finish the bottom of the wing Join the wing panels Refer to this photo for the following three steps. ❏ 1. Cut the center out of rib W-1 on both wing ❏ ❏ panels. Make a half-round groove in the center LE F22. -
Page 36: Sheet The Bottom Of The Wing
workbench. Measure the distance from the tip of the other panel down to the workbench. The distance should be 6-11/16", plus or minus 1/8", as measured from the bottom main spar at rib 12. If necessary, make adjustments so this measurement can be achieved. ❏... -
Page 37: Build The Wing Tips
Build the wing tips aft skins to fit between the forward skins and the outer TE spar. The aft edge of the skins should extend beyond the outer TE spar by approximately Refer to this photo for the following two steps. 3/32"... -
Page 38: Build The Flaps
middle of rib W-2C. Glue both skins into position. Sand the skins and the 1/8" x 3/16" balsa strips on the underside of the top flap skins even with the bottom of the wing. Refer to this photo for the following two steps. ❏... -
Page 39: Hinge The Flaps
❏ ❏ outer TE spar 1/8" above the bottom of the wing for from the leading edge. Use a razor plane, followed by 9. Test fit the flap to the wing. With the flap Great Planes small Pivot Point Hinges GPMQ4001 a bar sander with 80-grit sandpaper, to bevel the flap resting in position, sand the 1/8"... -
Page 40: Hook Up The Flaps And Ailerons
❏ Hook up the flaps and ailerons 2. With the hatch in the wing, drill 1/16" holes through the punch marks in the hatch and through the servo rails. Remove the hatch. Enlarge the holes in the hatch only with a 3/32" drill. Use a Dremel #178 cutting bit to countersink the holes in the hatch Note: All the die-cut 1/16"... -
Page 41: Finish The Wing
apply an additional coat. You will see that in between balsa inside the flap where the aft #2 x 3/8" screw coats, most or all of the epoxy will have soaked in, goes through the bottom flap skin. The same as the leaving little behind for gluing. - Page 42 Perform steps R3 through R6 only if installing and the landing gear strut fit into the wing. Remove retractable landing gear. If installing fixed gear, the portion of rib W-2 that you temporarily tack-glued skip to step F7. back into position. Note: The hole in the wing for the wheel won’t be circular, but will be oval shaped due to the angle at which the wheel fits into the wing.
-
Page 43: Final Construction
FINAL CONSTRUCTION the fuse sheeting a little further to accommodate the fillet bases. Mount the wing to the fuse ❏ ❏ 7. With the fillet bases taped to the fuse and the 1. Round one end of the 5/16" x 5" wing dowel. Test wing in position, place the fuse upside-down in a fit the rounded end into the hole in former F-4. - Page 44 C. Remove the wing and see where you made the ❏ A. Use masking tape to securely hold the elevators 10. Remove the wing from the fuse. Use a 1/4-20 marks. This is where the holes will be drilled. tap to tap threads in the wing bolt blocks. Enlarge the neutral.
-
Page 45: Make The Wing Fillets
❏ Make the wing fillets 3. Remove the wing and the fillet bases from the fuse. Mix up a batch of 30-minute epoxy and ❏ microballoons. Apply the glue to the fuse crutches 1. Remove the wing from the fuse. Cover the top and to the fuse sheeting. -
Page 46: Build The Belly Pan
Build the belly pan ❏ 8. Carve the bottom of one of the 1" x 1-1/4" x 3" balsa belly pan blocks to fit the wing when placed ❏ 5. Glue two pieces of leftover 1/4" x 3/8" balsa to on the forward belly pan former and the wing. -
Page 47: Assemble The Cowl
❏ Assemble the cowl 11. Sheet the other side of the belly pan and add the paper wing bolt tube and the belly pan block. ❏ 4. Temporarily clamp the 1/2" x 1/2" x 5/8" maple cowl mount blocks to former W-1 in the “3, 6, 9 & 12"... -
Page 48: Mount The Muffler
in the cowl only with a 1/8" bit. Test mount the cowl to and the baffle. Glue a 4" strip of glass cloth across the fuse with four #4 x 3/8" screws and #4 washers. the aft edge of the bottom of the cowl. Glue three 1" strips over the three remaining cowl attachment ❏... -
Page 49: Hook Up The Throttle
Mark the location of the holes in the muffler for the mounting screws onto the plate, then remove the plate and drill 3/32" holes for the screws. Reinstall the plate, glue it to F-2, then mount the muffler to the plate with the screws and the silicone pads included with the muffler. -
Page 50: Install The Fuel Tank
3. While you’re working on the cockpit kit, now is a mount with rubber bands and a sheet of R/C foam If you are not installing the Top Flite scale cockpit good time to assemble and test fit your pilot. We rubber in between. -
Page 51: Mount The Receiver And Battery Pack
Mount the receiver and battery pack On our prototype we mounted a 6 volt battery pack, cushioned with a piece of 1/2" R/C foam rubber, to the top of the plate and secured it with nylon filament tape. Connect the retract servo to the air valve Some modelers prefer to mount the receiver, according to the manufacturer's instructions (CJM battery pack and associated hardware (on/off... -
Page 52: Balance The Airplane Laterally
❏ Balance the airplane laterally RLM #76, and Grauviolette (gray violet) RLM # 75. 3. Inspect all surfaces for uneven glue joints and The cockpit interior was painted Gray RLM #02. RLM seams that require filler. Apply filler where needed. IMPORTANT: Do not confuse this procedure with numbers are Germany’s official, standardized Many small dents or scratches in the balsa can be... -
Page 53: Machine Gun Cover
Supercharger intake 3. Use a sharp hobby knife to carefully cut the 1. Use a dust brush, compressed air or a Top Flite Tack Cloth to remove balsa dust from the model. covering from the model slightly inside the lines you... -
Page 54: Landing Gear Covers
Landing gear covers thick basswood. If you are using CJM retracts, start (DUBQ3704) and a Master Airscrew 14" 3-bladed by drilling a 3/8" hole through an approximately 3/8" propeller (MASQ1947). This spinner and prop are Note: The landing gear covers as featured on the kit thick sheet of basswood, then cut the sheet through the approximate scale size for a Focke-Wulf of this the middle of the hole and trim the edges to make... -
Page 55: Exhaust Stacks
If the paint you are using is not fuelproof, coat the exhaust stacks with fuelproof paint. ❏ 7. Apply panel lines with a Top Flite Panel Line Pen (TOPQ25210). Draw the various hatches and rivets with a Top Flite Scale Template (TOPR2187). -
Page 56: Final Assembly
❏ ❏ FINAL ASSEMBLY 7. Mix enough 30-minute epoxy to do one flap Do not use CA accelerator on any of the at a time. Use a piece of wire or a toothpick to hinges and do not glue the hinges with Join the control surfaces thoroughly coat the holes in one of the flaps and the anything but thin CA. -
Page 57: Mount The Canopy
❏ ❏ neutral, use a felt-tip pen to mark the pushrods 3. Apply a few drops of thin CA to the holes in the 3. Securely glue the canopy to the fuse using where they cross the holes in the servo arms. Make canopy glue such as J &... -
Page 58: Set The Control Throws
CONTROL SURFACE THROWS by shifting the C.G. up to 13/64" forward or back to fuse over F-2 until the model balances. Once you change the flying characteristics. Moving the C.G. have determined the amount of weight required, it forward may improve the smoothness and arrow-like can be permanently attached to F-2 inside the fuse. -
Page 59: Preflight
Fill out the identification tag heat, sparks or flames, as fuel is very flammable. Do We use a Top Flite Precision Magnetic Prop included with the decal sheet and place it on or not smoke near the engine or fuel; and remember ™... -
Page 60: Ama Safety Code
❏ RADIO CONTROL To stop a glow engine, cut off the fuel supply by 4. Extend your receiver antenna and make sure it closing off the fuel line or following the engine has a strain relief inside the fuselage to keep I will have completed a successful radio manufacturer’s recommendations. -
Page 61: Flying
The Top Flite Focke-Wulf is a great-flying scale warbird at low speeds on the runway. Hold “up” elevator to extending the gear to see how the model handles at that flies smoothly and predictably. - Page 62 Height: 11 ft 1/4 in If you enjoyed building this Top Flite Gold Edition kit, Have a ball! But always stay in control and fly in Empty weight: 7,720 lbs and if you've ever thought of getting into giant-scale a safe manner.
- Page 63 Great Planes AccuPoint Laser Great Planes C.G. Machine Great Planes Cordless Slot ® ™ ® ™ ® Incidence Meter Airplane Balancer Machine Motorized Hinge ™ Slotting Tool (GPMR2400) (GPMR4020) (GPMR4011) • Measures incidence, washout and engine thrust angle with 1/4 degree accuracy! •...
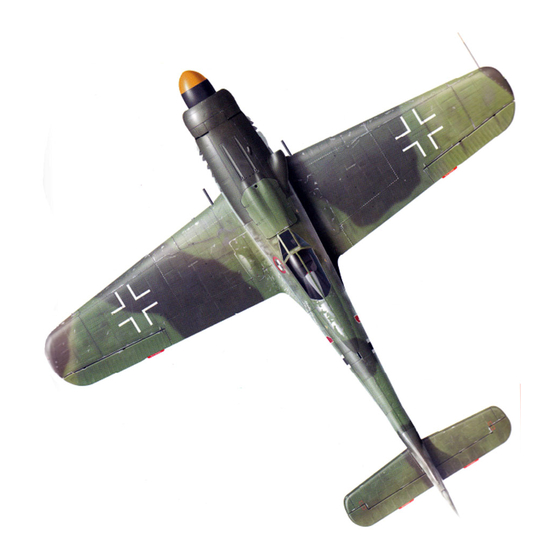
- Page 64 3-VIEW DRAWING Use this layout for your trim scheme planning only. Not suitable for scale documentation. Printed in USA...
Need help?
Do you have a question about the Focke-Wulf 190 D9 and is the answer not in the manual?
Questions and answers