Advertisement
Quick Links
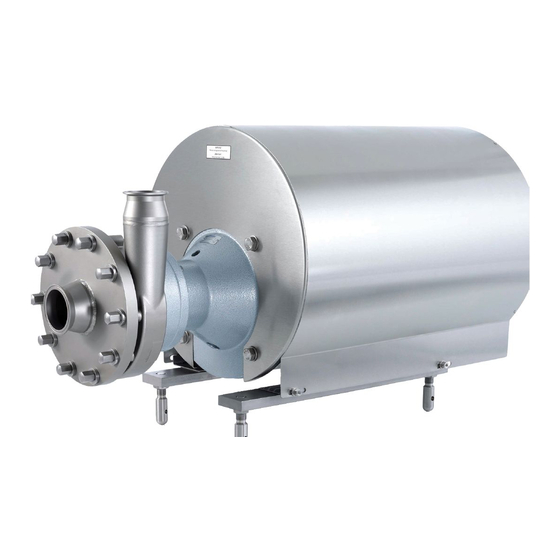
Task Instructions for Seal Replacement - Fristam FPH 3542
Disassembly (with double mechanical seal)
Model FPH3542 with double mechanical seal. Remove cover nuts with 1" wrench.
Remove flat washers.
Remove cover.
Remove the two water pipes from either side of the pump housing.
Loosen the four
guard screws and remove two plastic shaft guards from either side of the pump bearing
block.
10/23/07
1
Advertisement

Related Manuals for Fristam Pumps FPH 3542


Summary of Contents for Fristam Pumps FPH 3542
- Page 1 Task Instructions for Seal Replacement - Fristam FPH 3542 Disassembly (with double mechanical seal) Model FPH3542 with double mechanical seal. Remove cover nuts with 1” wrench. Remove flat washers. Remove cover. Remove the two water pipes from either side of the pump housing.
- Page 2 Place a chain wrench on the pump shaft near the coupling to keep the shaft from rotating while loosening the impeller nut with a 15/16” socket wrench. Remove the impeller nut and impeller gasket. Remove the impeller from the pump shaft. Use impeller pullers to assist in removing the impeller, as needed.
- Page 3 Remove the rotating seal assembly which includes the impeller gasket, seal driver, rotating seal, seal spring, and rotating seal o-ring. To remove this assembly from the shaft, place the impeller pullers on both sides of the assembly and pull toward the end of the pump shaft.
- Page 4 To remove the stationary seal and the flush seal components, the pump housing needs to be removed. Remove the four pump housing bolts and lock washers, which attaches the pump housing to the bearing block, using a 3/4” wrench. Carefully slide the pump housing off the end of the pump shaft, ensuring that the stationary seals (which are mounted in the pump housing) do not contact the pump shaft.
- Page 5 Now remove the rotating water flush components from the pump shaft, which include the rotating water seal ring, the water seal o-ring, the water seal spring and the water seal drive ring. The water seal driver may be left on the shaft. The above pictures show the components of the rotating water flush seal assembly.
- Page 6 Task Instructions for Seal Replacement - Fristam FPH 3542 Assembly You are now ready to install the new seal and reassemble the pump head. Note: when installing the new seal components make sure that you use all of the components supplied with the replacement seal kit. Using some of the old components may reduce seal life.
- Page 7 Turn the housing over and place it on the housing hub. Lubricate the stationary seal o-ring and place it on the new stationary seal. Place the stationary seal and o-ring into the bottom of the pump housing. Align the notch in the stationary seal with the pin in the housing.
- Page 8 Check the rear water seal assembly and make sure the short tabs of the water seal drive ring are positioned in the slots of the water seal driver. Install the four pump housing bolts with lock washers through the bearing block into the pump housing. Tighten them with the 3/4”...
- Page 9 Align the pins on the rotating seal with the grooves on the seal driver and press the two components together. Wipe the seal face clean with a clean, soft cloth. Slide the gapping spacer onto the pump shaft. Note: it is important to use the same gapping spacer that was removed, as this is unique to your pump.
- Page 10 Slide the rotating seal assembly onto the shaft so the face of the rotating seal meets the face of the stationary seal. Lubricate the impeller gasket and place it into the groove on the seal driver. This gasket seals on the back side of the impeller. Place the impeller key into the shaft keyway. Slide the impeller onto the pump shaft.
- Page 11 Place the chain wrench on the shaft near the coupling to keep the shaft from rotating while tightening the impeller nut with the 15/16” socket wrench. Tighten to 40 ft.-lbs. The picture at the right shows the pump serial number stamped on the side of the cover. Align this serial number with the matching serial number that is stamped on the pump housing when assembling the cover to the housing.
- Page 12 Install the cover onto the pump housing. Note: Align the serial numbers on the cover and housing. Place the flat washers and thread the cover nuts onto the housing studs. Tighten the cover nuts to 45 ft.-lbs. using a cross-tightening technique. Remove the chain wrench and rotate the impeller shaft to ensure the impeller moves freely.
Need help?
Do you have a question about the FPH 3542 and is the answer not in the manual?
Questions and answers