
Related Manuals for Touchboards CHIEF PSMH2079


Summary of Contents for Touchboards CHIEF PSMH2079
- Page 1 I N S T A L L A T I O N I N S T R U C T I O N S Large Flat Panel Static Wall Mount Spanish Product Description German Product Description Portuguese Product Description Italian Product Description Dutch Product Description French Product Description PSMH2079...
-
Page 2: Important Safety Instructions
PSMH2079 Installation Instructions DISCLAIMER WARNING: Exceeding the weight capacity can result in Milestone AV Technologies and its affiliated corporations and serious personal injury or damage to equipment! It is the subsidiaries (collectively “Milestone”), intend to make this installer’s responsibility to make sure the weight of the screen manual accurate and complete. -
Page 3: Installation Instructions
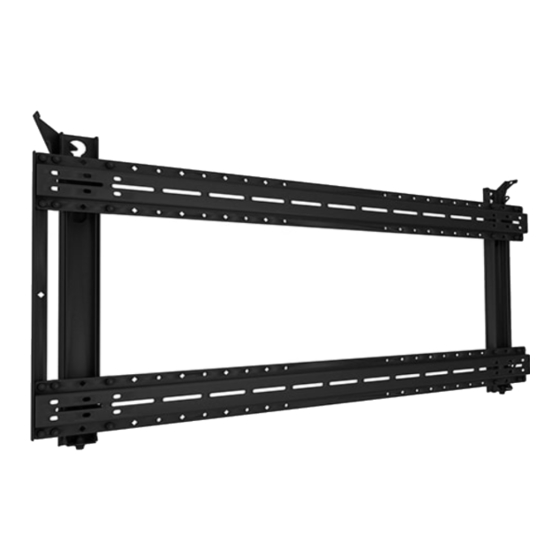
Installation Instructions PSMH2079 DIMENSIONS LATCHING FLAGS CAN BE 2.51 63.8 23.62 600.0 SHOWN SET UP FOR A SCREEN WITH A MOUNTING PATTERN OF 1200 mm WIDE X 600 mm TALL 1.00 25.4 26 X 3.00 76.2 DIMENSIONS: INCHES [MILLIMETERS]... - Page 4 PSMH2079 Installation Instructions DIMENSIONS -- continued 47.24 1200.0 MOUNT UPRIGHTS CAN BE ATTACHED AT ANY OF THE ABOVE SPACINGS DISTANCE FROM TOP OF SCREEN TO DISTANCE FROM TOP FIRST MOUNTING HOLE OF SCREEN TO FIRST MOUNTING HOLE 5.56 4.44 141.3 112.7 SHOWN WITH MICROSOFT SURFACE HUB 55...
- Page 5 Installation Instructions PSMH2079 LEGEND Tighten Fastener Pencil Mark Apretar elemento de fijación Marcar con lápiz Befestigungsteil festziehen Stiftmarkierung Apertar fixador Marcar com lápis Serrare il fissaggio Segno a matita Bevestiging vastdraaien Potloodmerkteken Serrez les fixations Marquage au crayon Loosen Fastener Drill Hole Aflojar elemento de fijación Perforar...
-
Page 6: Tools Required For Installation
PSMH2079 Installation Instructions TOOLS REQUIRED FOR INSTALLATION 3/8" 1/2" 7/32" - wood 3/8" - concrete PARTS Mounting Hardware Kit B (6) A (6) [Fischer UX10x60R] 5/16 x 2-3/4" C (6) 5/16" Screen Attaching Hardware Kit D (4) H (4) E (4) [Mounting button] F (4) G (4) -
Page 7: Assembly And Installation
Installation Instructions PSMH2079 ASSEMBLY AND INSTALLATION IMPORTANT ! : The minimum spacing between outside attachment points is 32 inches (81.3cm).The maximum Attaching Latching Flags spacing between outside attachment points is 48 inches NOTE: (121.9cm). Determine if vertical mounting pattern on screen is 400mm or 600mm. - Page 8 PSMH2079 Installation Instructions Slide wall plate (X) in between wall and lower end of side 15. Reference Dimensions drawings for locating of upright brackets (Z). (See Figure 4) brackets dependent on screen size. Loosely install two side brackets (Z) to lower wall plate (X) IMPORTANT ! : Upright brackets must be placed such using four 5/16 x 1/2"...
- Page 9 Installation Instructions PSMH2079 Adding Screen to Mount WARNING: IMPROPER INSTALLATION CAN LEAD TO CLOSED SCREEN FALLING CAUSING SERIOUS PERSONAL INJURY OR DAMAGE TO EQUIPMENT! Using screws of improper size may damage your screen. Properly sized screws will easily and completely thread into screen mounting holes.
- Page 10 PSMH2079 Installation Instructions...
- Page 11 Installation Instructions PSMH2079...
- Page 12 PSMH2079 Installation Instructions USA/International A 6436 City West Parkway, Eden Prairie, MN 55344 P 800.582.6480 / 952.225.6000 F 877.894.6918 / 952.894.6918 Europe A Franklinstraat 14, 6003 DK Weert, Netherlands P +31 (0) 495 580 852 F +31 (0) 495 580 845 Chief, a products division of Asia Pacific A Office No.
Need help?
Do you have a question about the CHIEF PSMH2079 and is the answer not in the manual?
Questions and answers