Table of Contents
Advertisement
Quick Links
SECURITY DOOR CONTROLS
3580 Willow Lane, Westlake Village, CA 91361-4921 • (805) 494-0622 • Fax: (805) 494-8861
www.sdcsecurity.com • E-mail: service@sdcsecurity.com
1
See template for measurements.
Affix paper template to door and follow template instructions in preparing door.
Install latch.
2
Spacer
OUTSIDE
MOUNTING
PLATE
1. Locks are factory assembled with a spacer for 1-3/4" door thickness, (when
lock chassis is firmly against ring.)
2. Locks can be adjusted for 1-5/8" to 1-7/8" door thickness. Before installation,
use door thickness gauge on template as shown, to check lock chassis position.
Center of latch retractor should align with mark on gauge for appropriate
door thickness.
3. If chassis is not on center, screw chassis in or out to align with mark.
If adjusting for doors thinner than 1-3/4" thickness, split spacer must be
removed. Check that lever engages lever catch before installation.
4. Make sure to adjust for correct door thickness.
M:\INS\INST-E72.qxd
REV B
INSTALLATION INSTRUCTIONS
Latch
Serial Number
on steel exterior
backplate
DETACH ON DOTTED LINE
Latch
retractor
Door Thickness Gauge
CENTER OF
RETRACTOR
1-5/8" DOOR
1-3/4" DOOR
1-7/8" DOOR
0202
Page 1
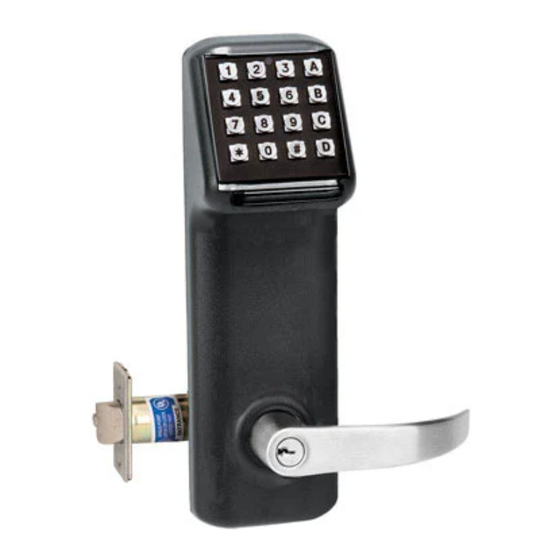
E72 EntryCheck™
3
To position latch retractor for proper handing of door opening, line up retaining clip
located on lever handle with the slot in the escutcheon. Depress retaining clip with
pin tool provided. While depressing, rotate chassis 180 deg to desired position.
4
Pass the cable assembly with connectors through the 3/4" hole, then mount the
exterior housing through door preparation. Make sure that the lock chassis and
latch are properly engaged as shown. (See Figure 2A.)
Pin Tool
Retaining clip
Figure 2A
Advertisement
Table of Contents

Subscribe to Our Youtube Channel
Related Manuals for SDC EntryCheck E72


Summary of Contents for SDC EntryCheck E72
- Page 1 SECURITY DOOR CONTROLS 3580 Willow Lane, Westlake Village, CA 91361-4921 • (805) 494-0622 • Fax: (805) 494-8861 www.sdcsecurity.com • E-mail: service@sdcsecurity.com INSTALLATION INSTRUCTIONS E72 EntryCheck™ Pin Tool Latch Retaining clip See template for measurements. Affix paper template to door and follow template instructions in preparing door. To position latch retractor for proper handing of door opening, line up retaining clip Install latch.
- Page 2 Remove screw from Battery Cover to access backplate. 1. Feed the cable assembly with connectors through the backplate and raceway nut. 1. Slide the inside lower housing over the lever tube until it has passed over the 2. While holding the interior backplate in position, loosely install the two thru-bolts. lever catch.
- Page 3 7. Slightly wiggle and push until lever engages lever catch and connector. Conventional Tailpieces For the E72 I.C. Tailpieces For the E72 Part No. Part No. E1903 SDC Cylinders ER1984 7 pin IC Core Cylinder E1903-L Ilco Cylinders ER1981 Spacer to convert 7 pin tailpiece to use with 6 pin IC core.
- Page 4 IMPORTANT Latch Hole PLACE TEMPLATE 5/16” Hole at Center Line ON HIGH EDGE OF of Door Thickness DOOR BEVEL SDC • 3580 Willow Ln., Westlake Village, CA 91361 • www.sdcsecurity.com 805-494-0622 • Fax 805-494-8861 M:\INS\INST-E72.qxd REV B 0202 Page 4...
Need help?
Do you have a question about the EntryCheck E72 and is the answer not in the manual?
Questions and answers