Table of Contents
Advertisement
Quick Links
Advertisement
Table of Contents
Troubleshooting

Related Manuals for Classe Audio Delta PRE


Summary of Contents for Classe Audio Delta PRE
- Page 1 Owner’s Manual Delta PRE Stereo Preamp/Processor...
-
Page 2: Table Of Contents
.............5 flexible GUI ....................5 network connectivity and streaming audio ..........5 extraordinary longevity ................5 Unpacking and Placement ................6 unpacking your Delta PRE .................6 Delta PRE placement considerations ............6 warm-up/break-in period ................7 operating voltage ..................7 Front Panel .......................8 Rear Panel ......................10... - Page 3 Tone Control ....................32 Balance ......................32 Configurations ....................32 Mono ......................33 Status ......................33 Firmware Updates ..................33 CAN-Bus ......................34 features ....................34 hardware setup ..................34 using CAN-Bus ..................34 CAN-Bus amp features ................35 operate ....................35 Mute ....................... 35 Global Standby ..................35 Global Dim ....................
-
Page 4: Welcome To The Classé Family
For details, please consult the Warranty Card that comes with your unit a word about installation Every effort has been made to make the Classé Delta PRE simple and straightforward to install and use. -
Page 5: Exceptional Design Features
Exceptional Design Features The Delta PRE is a stereo preamp/processor, designed for music lovers who demand the ultimate in sonic performance from their audio system. Its connectivity and processing power accommodate the ever increasing array of music sources, allowing them to be accessed and enjoyed without compromise. -
Page 6: Unpacking And Placement
Also keep the unit out of direct sunlight. • Place the Delta PRE so that the IR window on the front panel is clearly visible and not blocked. • Position the Delta PRE in a central and convenient location for both visibility and use. -
Page 7: Warm-Up/Break-In Period
After initial break-in, you’ll enjoy consistent performance levels for years to come. operating voltage The operating voltage of your Delta PRE is specified on the rear panel label that also includes its serial number. . Important! Attempting to operate your Delta PRE from an incorrect AC voltage source may cause irreparable damage which may not be covered by your warranty. -
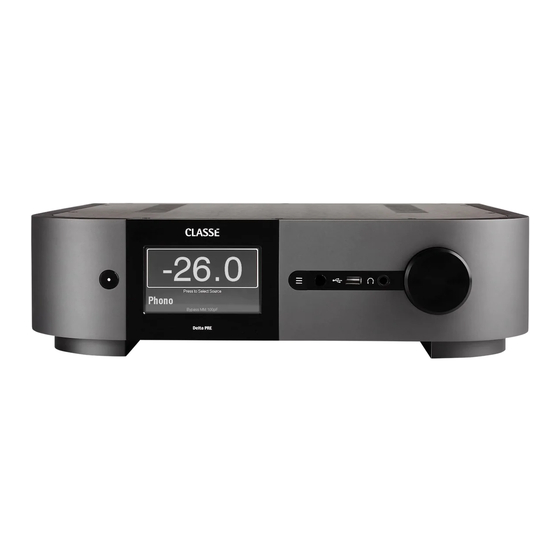
Page 8: Front Panel
Delta PRE Front Panel Delta PRE The front panel of the Delta PRE is shown above. The numbers in the drawing refer to the descriptions that follow. Standby/On Button and Status Indicator LED Pressing the Standby button puts the Delta PRE into standby mode – a... - Page 9 When updates are posted in the software downloads section of the Classé web site, they may be loaded onto a USB stick and plugged into the front panel of the Delta PRE. More information on this can be found in the Firmware Updates section of this manual.
-
Page 10: Rear Panel
You’ll find your Delta PRE serial number on the rear panel, next to the AC Inlet. Please record this number for future reference. And since you have found the serial number, please use it to register your purchase, if you haven’t done so yet. - Page 11 Delta PRE is installed in a cabinet. Attach this input to an infrared repeater system to route signals from the remote control to the Delta PRE via a mono mini- jack (3.5mm phono).
- Page 12 10 RS-232 Port The primary purpose of the RS-232 port is to support the use of external commands to allow remote control of the Delta PRE by such systems as ® ® , Control 4, Creston and Savant .
- Page 13 Delta PRE via your home Network. 14 Phono Input The Delta PRE supports 1pr of RCA type connectors labeled Phono R/L dedicated to a phono input and supporting high output MM and both high and low output MC type phono cartridges. For instructions on setting gain and loading for MM/MC type phono cartridges, see the section on Phono Setup.
-
Page 14: The Remote Control
Preamp/Processor itself and several aspects of the rest of a Classé- based system. The buttons are arranged in logical groups according to their functions. The remote control of the Delta PRE is shown on the left. The numbers in the drawing refer to the descriptions that follow. - Page 15 Remote Fkeys description in the Menu System section found later in the manual for more information. Note: You may also remotely control the Delta PRE by connecting it to a Network and using the Classé App, available free of charge in the Apple App and Google Play stores.
-
Page 16: Initial Setup
However, if you can’t wait to get started, this section is designed to assist you in setting up and becoming familiar with the Delta PRE hardware. Once the initial setup is complete, be sure to read the rest of this manual to familiarize yourself with the daily operation and customizable features of your Delta PRE. - Page 17 Connect the Main L&R Outputs, either RCA or XLR, from the rear panel of the Delta PRE to the corresponding inputs on your amplifier(s). • If you are using a subwoofer, connect the Delta PRE subwoofer output to the input of the designated amplifier or powered subwoofer.
- Page 18 (–) terminals to black (–) terminals. Step 6 Power up the system! Now you are ready to power up your Delta PRE and your audio system. • Turn the rear panel power switch of the Delta PRE to ON. The Standby LED will turn red.
-
Page 19: Using The Delta Pre
This section of the owner’s manual outlines the use of the touchscreen in routine operation of the system. When you bring the Delta PRE out of Standby mode, the touchscreen displays the Home page of the menu system, as shown below. -
Page 20: The Menu System
The Delta PRE has up to 18 selectable source buttons which are all interchangeable: Any source may be assigned to any button location and associated with any connector. Touch any source button on the touchscreen to select it as the current source. -
Page 21: System Setup
At the top right of the menu pages you may find a button which uses the arrow icon when additional menu options are available, and/or a Home button for returning to the Home page. When on the main Menu page, pressing the Menu button returns to the Home page. -
Page 22: Source Setup
Source Setup Each of the 18 source buttons supported by your Delta PRE can be customized in several ways to enhance system performance and/or to simplify operation. The source select page is dynamic in that it shows up to nine sources on a single page. -
Page 23: Configuration
CONFIG SELECT buttons from the Configurations page on the Classé app, or from the Configurations button on the main Menu page. See the section, Using the Delta PRE, for more details. Input Offset Input Offset is used to ensure that all sources playback at comparable level. -
Page 24: Phono Setup
Phono Setup The Delta PRE supports up to two phono inputs, one through the RCA R/L connectors and a second through the XLR R2/L2 connectors. Each may have its own gain and loading, adjusted from the touchscreen. Go to System Setup, Phono Setup and choose the phono input you want to configure, first. -
Page 25: Volume Setup
This can sometimes be useful. As an example, F1 could set the Delta PRE to the CD Player input, and also set the CD player to Play, both from the press of a single Fkey. -
Page 26: Max Volume
Delta PRE can provide. This setting is interactive. It is easiest to play the system at increasing levels until you reach the volume which you want to use as the maximum for the system. -
Page 27: Configuration Setup
Configuration Setup The Configuration Setup page allows you to define up to six different speaker configurations. Touch the button for the specific configuration you want to set up to open its configuration setup menu. The page contains buttons for naming the configuration and enabling balanced (XLR) and/or single-ended (RCA) outputs for Main, Aux and Subwoofer channels. -
Page 28: Auxiliary Channels
Auxiliary Channels The Delta PRE has two auxiliary channels that can be utilized for bi-amping the L&R speakers. Alternatively, Aux 1 may be used in conjunction with the Sub output to provide a second mono subwoofer or stereo subwoofer configuration. -
Page 29: Network Setup
If you prefer the display of the Delta PRE to remain on whenever not in Standby mode, select the Never timeout option. The lamp in the touchscreen display is designed for harsh automotive environments and will give you many years of reliable operation. -
Page 30: Tone Control Setup
Control particularly easy, allowing quick selection of Tilt, Bass/Treble and None while using its virtual volume control knob to adjust levels. DC Triggers The Delta PRE has two available trigger controls. Each may be programmed using normal 12 V or “inverse logic” (0 V) settings. The ability to change the... -
Page 31: Headphones X-Feed
Standby feature to be disabled.* If you want this feature to be enabled, toggle the checkbox on. Note: The methods used to detect small signals in the Delta PRE are designed to avoid any possibility of degrading sound quality and as such, they do an imperfect job of recognizing when small or low volume signals are present. -
Page 32: Tone Control
To compensate for this, play a simple vocal recording and put the Delta PRE in Mono (press Menu, then Mono). Open the Balance control page and using the remote, adjust the balance until the sound image is perfectly centered. -
Page 33: Mono
Delta PRE. While on this page, pressing the more button will access the CAN-Bus features for connected Classé... -
Page 34: Can-Bus
CAN-Bus CAN-Bus Classé’s Controller Area Network, or CAN-Bus, allows communication and control between similarly featured Classé components. When the Delta PRE is connected with other CAN-Bus-equipped Classé components, the different elements in the system are in constant communication, creating a “global”... -
Page 35: Can-Bus Amp Features
Selecting a unit on the CAN-Bus devices screen identifies it as the target unit. The front panel LED(s) or meter light of the target unit will start flashing (unless you choose the unit that you are using to access CAN-Bus). Once you have chosen the target unit, the touch screen will list the CAN-Bus features available to it. -
Page 36: Other Status
Network Sources Network sources are those which stream audio to the Delta PRE using its rear panel Ethernet connection. The Delta PRE is equipped with a hard-wired Ethernet connection because it provides a more reliable and higher speed connection than is typically available over WiFi. -
Page 37: Apple Airplay
Network Setup page. The Delta PRE display will show the status of the audio stream, so when using AirPlay, it will show the sampling frequency of the signal as well as its format (ALAC is the format AirPlay streams use). -
Page 38: Dlna
Using an iOS device for AirPlay works the same way. Choose the Music App icon, tap the AirPlay icon, select the Delta PRE from the list of AirPlay speakers, choose your music and play. Volume is likewise adjusted in the Delta PRE by using the volume control on the device. -
Page 39: Troubleshooting
ON position. P If the Delta PRE is properly plugged in and the power from the electrical outlet is at the proper level, try the following: Switch off the main power switch on the rear panel, and unplug the unit for at least thirty seconds. - Page 40 P Check the interconnect cables between the source component and the Delta PRE. The IR remote control does not seem to function. P Ensure that there are no obstacles between the IR remote and the IR sensor.
-
Page 41: Network/Streaming Troubleshooting
(cycle the power off and on) and then your router. If the problem persists verify that you have a valid IP address. If your address is “Limited Auto IP” then the Delta PRE has auto assigned itself an address and this indicates that your DHCP IP address server is not working. -
Page 42: Care & Maintenace
Care & Maintenance To remove dust from the cabinet of your Delta PRE, use a feather duster or a lint-free soft cloth. To remove dirt and fingerprints, we recommend using a microfibre cloth and an anti-static spray such as lens or display cleaner applied to the cloth, not directly onto the Delta PRE. -
Page 43: Specifications
Specifications All specifications are accurate at the time of printing. Classé reserves the right to make improvements without notice. General n Gain Range -93 dB to +14 dB n Input impedance (at 1kHz, single-ended / balanced) 50 kΩ n Output impedance (single-ended) 50 Ω n Output impedance (balanced) 200 Ω... - Page 44 Continued n Crosstalk -143dB at 100Hz (one channel undriven - BAL/SE) -140dB at 1kHz -124dB at 10kHz n Channel Matching (Left to Right) +/- 0.03dB (Digital inputs) n Frequency response 5Hz - 90kHz (-3dB, sweep Fs=192kHz) n Harmonic Distortion <0.0015% (20Hz to 20kHz) (measurement bandwidth: 90kHz) n Dynamic range 124dB (-60dBFS, Fs=44.1kHz, A-wtd)
- Page 45 Continued Format n USB Front 44.1k, 48k, 88.2k, 96k (iOS specific) (Charging capability : 2.1A) n USB Back 32k, 44.1k, 48k, 88.2k, 96k, 176.4k, 192k, 352.8k, 384k, DSD64, DSD128, DSD256 (Native - requires Windows driver), DSD64, DSD128 (DoP) 32k, 44.1k, 48k, 88.2k, 96k, 176.4, 192k, n SPDIF (optical, coax, AES/EBU)) DSD64 (DoP)
- Page 46 Made for: iPod touch (5th generation) iPod nano (7th generation) iPod touch (4th generation) iPod nano (6th generation) iPod touch (3rd generation) iPod nano (5th generation) iPod touch (2nd generation) iPod nano (4th generation) iPod touch (1st generation) iPod nano (3rd generation) iPod classic iPod nano (2nd generation) Made for:...
-
Page 47: Dimensions
Dimensions 0.75" (20mm) 16.5" (419mm) 4" (102mm) 16" (406mm) 17.5" (445mm) 4.75" (121mm) 17.5" (449mm) -
Page 48: Installation Worksheet
Installation Worksheet Source: ______________________________________________________________ Audio Connector:______________________________________________________ Input:_______________________________________________________________ Source: ______________________________________________________________ Audio Connector:______________________________________________________ Input:_______________________________________________________________ Source: ______________________________________________________________ Audio Connector:______________________________________________________ Input:_______________________________________________________________ Source: ______________________________________________________________ Audio Connector:______________________________________________________ Input:_______________________________________________________________ Source: ______________________________________________________________ Audio Connector:______________________________________________________ Input:_______________________________________________________________ Source: ______________________________________________________________ Audio Connector:______________________________________________________ Input:_______________________________________________________________ Source: ______________________________________________________________ Audio Connector:______________________________________________________ Input:_______________________________________________________________... - Page 50 Classé 380, rue McArthur Saint-Laurent, Québec H4T 1X8 CANADA Classé offers International Service and Support for its Products. Please visit our Website to find up-to-date Contact Information. https://classeaudio.com Copyright © 2019 Sound United, LLC V 1.4 271119...
Need help?
Do you have a question about the Delta PRE and is the answer not in the manual?
Questions and answers