
Subscribe to Our Youtube Channel
Related Manuals for ProGear RIDEFREE

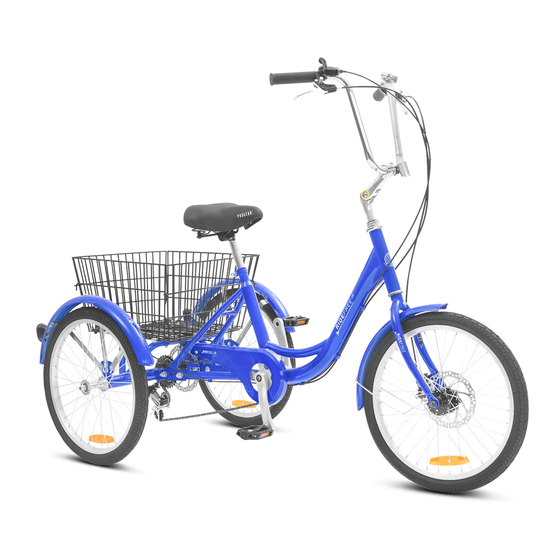
Summary of Contents for ProGear RIDEFREE
- Page 1 RIDEFREE TRIKE OWNER’S MANUAL ONLY TO BE ASSEMBLED BY A SKILLED BICYCLE MECHANIC. Read all instructions carefully before using this product. Retain this owner’s manual for future reference.
-
Page 2: Table Of Contents
TABLE OF CONTENTS I. IMPORTANT SAFETY INSTRUCTIONS II. OWNER’S INFORMATION AND RESPONSIBILITY You should read this manual Owner’s information and responsibility What kind of bicycle is it? Section 1: Safety Precautions 1.1 Fitting your bicycle for a safe ride 1.2 Safety check before riding your bicycle 1.3 Safety equipment and sensible riding Section 2: Service and Basic Maintenance 2.1 Maintaining your bicycle... -
Page 3: Important Safety Instructions
I. IMPORTANT SAFETY INSTRUCTIONS Failure to obey all of the warnings and instructions contained in this manual may result in serious injury, or permanent damage to your bike. Always wear a properly fitted and fastened helmet when riding. This is Wet weather significantly detracts from brake performance. -
Page 4: Owner's Information And Responsibility
YOU SHOULD READ THIS MANUAL Your bicycle is legally a vehicle. It can be ridden on roads mixing with other traffic. You need to know about certain legal and common sense requirements for the enjoyable, safe and trouble free use of your bicycle. II. -
Page 5: What Kind Of Bicycle Is It
WHAT KIND OF BICYCLE IS IT? Bicycles can be broadly categorised into four types: Cross, Hybrid, City or Comfort n BMX Road or Touring Freestyle Mountain or Off Road Bicycles for younger riders use are generally scaled down versions of adult bicycles including the step through design. Other bicycles include tandems, recumbents and folding bicycles. - Page 6 FREESTYLE Modelled on a trick riding style machine, featuring 360 degree revolving handlebar/fork assembly, axle pegs and wide profile tyres. Using a freestyle type bicycle for trick or competition riding may void warranty. POWER ASSISTED BICYCLES Have characteristics and equipment which may require special instruction, adjustment, care and maintenance. Read carefully all instruction manuals. Ask your bicycle retailer for advice on maintenance, adjustments and repair.
-
Page 7: Section 1: Safety Precautions
WARNING: Handlebar handgrips or tube-end plugs should be replaced if damaged. Unprotected tube-ends can cause injury. Bicycles used by children should especially be checked to ensure bar end handgrips are in good condition. FOR ALL TYPES Where a suspension unit, disk and/or hydraulic brake units, multi-gear hub, electric gear changing system, etc, are fitted, consult manufacturers specification and warranty documents. - Page 8 SADDLE HEIGHT Close To ride comfortably and pedal efficiently, it’s very important to have the saddle at the correct height. Close Your leg length determines the correct saddle height. The saddle is at the correct height for you when, while seated on the saddle, your knee is slightly bent when the crank is at the maximum down stroke Open (pedal is closest to the ground).
-
Page 9: Safety Check Before Riding Your Bicycle
Rear Brake Lever Front Brake Lever If the front brake cable is attached to the handlebar stem moving the stem up or down will require a reasjustment of the brake. If in doubt, ask your bicycle retailer to make the adjustment. CONTROLS POSITION ADJUSTMENT The brake and shifting controls on your bicycle are positioned where they work best for most riders. - Page 10 QUICK RELEASES Are the front wheel, rear wheel and seat post quick releases properly adjusted and in the locked position? Check all quick release mechanisms are correctly and securely closed. CHECK LIGHTS AND REFLECTORS Working. Correctly aligned. HANDLEBAR AND SADDLE Are the handlebar and saddle system: horizontal? tight enough so they won’t twist? handlebars secure, good condition? handle bar ends plugged? Is a bell fitted and working?
-
Page 11: Safety Equipment And Sensible Riding
1.3 SAFETY EQUIPMENT AND SENSIBLE RIDING As a road user you have responsibility for your own safety and the safety of others. You need to know: the road rules. how to ride safely. YOUR BICYCLE (CONT) Know how to work all bicycle controls. For riding in low light and night conditions, fit your bicycle with appropriate front and rear lamps. - Page 12 WARNING: Always wear a correctly fitted and fastened helmet when riding your bicycle. Correct Fit BE ALERT Obey all road rules. Watch out for other road and pathway users. Adapt your riding to suit the conditions. Incorrect Fit HOOK TURN This manoeuvre can assist in safer right hand at intersection.
- Page 13 RIDING IN LOW LIGHT Riding when light levels are low: use lamps and reflectors. wear bright reflective clothing. BE RESPONSIBLE Follow the road rules. Use common sense. If riding in remote areas: go with a friend. leave details of route and return time with a responsible person. tell them when you get back! PARENTS Most cycling incidents involve small children and teenagers.
-
Page 14: Section 2: Service And Basic Maintenance
2.1 MAINTAINING YOUR BICYCLE SERVICE AND BASIC MAINTENANCE Bicycles perform best when they are kept clean, lubricated and serviced regularly. How much of your bicycle’s service and maintenance you can do yourself depends on your level of skill and experience, and whether or not you have the special tools required. WARNING: Some bicycle service and repair tasks require special knowledge and tools. -
Page 15: Monthly Service Chart
2.2 MONTHLY SERVICE CHART Monthly servicing of your bicycle is recommended. This consists of lubrication and adjustment of components. Use the correct type of lubricants and tools, service the bicycle’s components in logical groups and clean before you start. TYRES AND TUBES Clean the tyres and inspect treads for wear. - Page 16 GEAR AND BRAKE CABLES Inspect all cable housing for damage. Replace if necessary. Clean and examine all cable wires for kinks and frayed ends. Replace if necessary. Adjust barrel adjusters and/or cable anchor bolts to compensate for cable stretch. HUBS Check front and rear hub bearings for excess play or binding.
- Page 17 BOTTOM BRACKET/AXLE Test bottom bracket bearings for excess play or binding. Check that the locknut is tight. Check bottom bracket is correctly lubricated. HEADSET Check headset for excess play or binding. Check the locknut is tight. PEDALS Check pedal bodies are not cracked. If pedals are loose, tighten the mounting bolts firmly.
-
Page 18: About Your Bicycle Retailer
3. ADDITIONAL INFORMATION HELPFUL HINTS, SPECIAL INSTRUCTIONS AND WARRANTY 3.1 ABOUT YOUR BICYCLE RETAILER Your bicycle retailer will help you to select bicycle accessories for the kind of riding you wish to do. Bicycle shop staff have the knowledge, tools and experience to give you reliable advice and provide maintenance services. - Page 19 All nuts and bolts should be checked on a regular basis for tightness. To assist in achieving the correct tension when tightening nuts and bolts the use of a torque wrench is recommended. Apply the following torque for the nominated parts of your bicycle: Front Wheel Nuts 22-27 Newton Metres Rear Wheel Nuts...
-
Page 20: Lock Your Bicycle
Fit pedals to crank in correct order; pedal marked R on the right hand side; L on the left. Fit frame mounted reflector brackets and reflectors. Align reflectors to vertical. Tighten all bolts. Confirm that wheel reflectors are fitted. Recheck that all components are correctly assembled, all bolts, nuts and QR correctly secure. Check that handlebar and saddle cannot be swivelled sideways. -
Page 21: Keep A Record Of Your Bicycle
Refer to Guide to Traffic Engineering Practice Part 14 - Bicycles (AUSTROADS 1999). www.bikeoz.com.au - provides additional information. www.cyclingpromotion.com.au - helping you get more out of your riding. 3.5 KEEP A RECORD OF YOUR BICYCLE Take a colour photograph of your bicycle, write the frame number on the back of the photograph and keep it in a safe place. - Page 22 TROUBLESHOOTING CHART (CONTINUED) PROBLEM POSSIBLE CAUSE REMEDY Brake blocks worn down Replace blocks Brake block toe-in incorrect Correct block toe-in When applying the brakes they squeal/squeak Brake blocks / rim dirty or wet Correct block toe-in Brake arms loose Tighten mounting bolts Brake blocks worn down Replace brake blocks Brake blocks or rims greasy, wet or dirty...
- Page 23 TROUBLESHOOTING CHART (CONTINUED) PROBLEM POSSIBLE CAUSE REMEDY Excessively worn / chipped chainring or freewheel Replace chainring, sprockets and chain Chain worn / stretched Replace chain Slipping chain Stiff link in chain Lubricate or replace link Non compatible chain / chainring / freewheel Seek advice at a bicycle shop Chainring bent Replace Chainring...
- Page 24 KEEP A RECORD OF YOUR NEW BICYCLE OWNER: ADDRESS: POSTCODE: TEL: BRAND & SERIAL NUMBER: MODEL: FRAME STYLE: FRAME SIZE: FRAME COLOUR(S): WHEEL SIZE: TYRE SIZE & TYPE: BRAKE TYPE & BRAND: TRANSMISSION BRAND: SADDLE BRAND: OTHER ACCESSORIES (LIST & BRAND NAMES): PURCHASED FROM (SHOP NAME): SHOP ADDRESS: DATE OF PURCHASE:...
-
Page 25: Bicycle Record Chart
KILOPASCAL FROM PSI CONVERSION TABLE 10.0 1000 10.3 1034 10.7 1069 11.0 1103 NOTES... -
Page 26: Bicycle Assembly Instructions
III. BICYCLE ASSEMBLY INSTRUCTIONS ASSEMBLE FRONT WHEEL & FRONT FENDER STEP 1.B Assemble the front fender on front frame fork, using M6X60 hexagon bolt, flat pad attached & nylon nuts. STEP 1.A Assemble front fender support on front fender first as shown. STEP 1.C Install the front wheel on front fork , use locking M5*10 hexagon... - Page 27 ASSEMBLE REAR FENDER & REAR WHEEL STEP 2.D Assemble rear left and right wheel as shown, adjust the angle then tighten bolts. STEP 2.A Assemble rear fender support on rear frame using M6X12 hexagon bolt, flat pad. STEP 2.E STEP 2.B Final assembly shown.
- Page 28 CONNECT FRONT AND REAR FRAME & ASSEMBLE BASKET ASSEMBLE CHAIN STEP 4.A Assemble bottom basket first. STEP 3.A Connect the front and rear frame and attach as shown. Do not tighten as you will need to adjust the frame after NOTE assembling the chain.
- Page 29 ASSEMBLE HANDLE BAR, DISPLAY, BRAKE & BELL STEP 5.A STEP 5.C Assemble handle bar on stems. Assemble bell on handle bar right side. STEP 5.B Pull the slack out of the cable. Retighten the anchor bolt and test the brake lever again.
- Page 30 PEDAL INSTALLATION ASSEMBLE CHAIN COVER LEFT RIGHT STEP 7.A To fit your pedals, start by identifying left and right pedals. These will be marked ‘L’ and ‘R’ for left and right. STEP 7.B Insert the right pedal by screwing it in CLOCKWISE like a normal screw.
-
Page 31: Warranty
IV. WARRANTY AUSTRALIAN CONSUMER LAW Many of our products come with a guarantee or warranty from the manufacturer. In addition, they come with guarantees that cannot be excluded under the Australian Consumer Law. You are entitled to a replacement or refund for a major failure and compensation for any other reasonably foreseeable loss or damage. - Page 32 www.progearbikes.com.au...
Need help?
Do you have a question about the RIDEFREE and is the answer not in the manual?
Questions and answers