Advertisement
Quick Links
1. Unpack all parts and check for damage that may have occurred during shipping. If damage has occurred,
notify Kwik Goal immediately. Lay out all parts. Remove all cardboard and packaging immediately. Wet or
damp packaging may damage contents.
2. Read through entire instruction before beginning assembly and installation.
3. A minimum of two qualified persons are required to assemble this goal.
NOTE: Components may be packaged in one or more additional boxes.
Left Arm (1)
2F501(Part# UZ738)
Side Board (2)
(Part# WZ1176-03)
This equipment has been designed to be used for the game of field hockey only. Field equipment
must be anchored AT ALL TIMES and shall be secured against overturning. Do not climb on the net
or equipment framework at anytime! All fastenings must be checked to insure they are fully
tightened before and after each use of this product. Equipment not in use must be disassembled
and properly stored in a safe, secure area. Assembled field equipment should not be left
unattended. Remove nets when equipment is not in use. Do not use this equipment during the
threat of high winds. Field equipment must be checked for safety before and after each use. All
warning and safety labels included with this product must be visible at all times. Any modifications
to this or any Kwik Goal product will void any and all warranties.
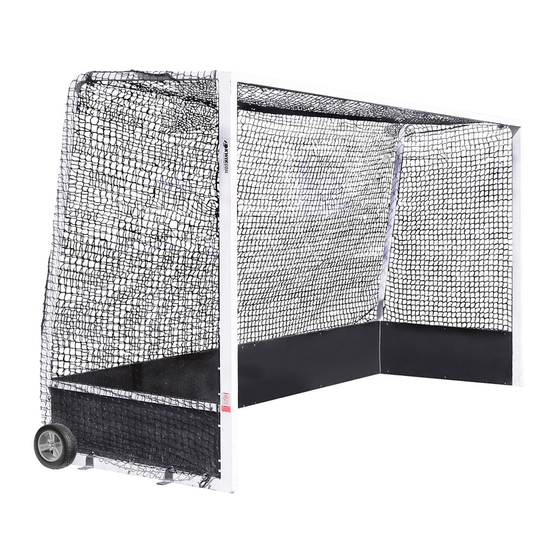
ASSEMBLY INSTRUCTIONS FOR 2F501 FIELD HOCKEY GOAL
Right Arm (1)
2F501(Part# UZ733)
140 Pacific Drive Quakertown, PA 18951
(P) 215-536-2200 / (P) 800-531-4252 / (F) 215-536-4309 / (F) 800-778-8869
Visit our website @ kwikgoal.com
Crossbar (1)
2F501(Part# UZ734)
***CAUTION***
2011 Rev 2018 Kwik Goal Ltd.
136"
End
View
NZ261 Rev. 09/26/18
Advertisement

Related Manuals for KwikGoal 2F501


Summary of Contents for KwikGoal 2F501
- Page 1 ASSEMBLY INSTRUCTIONS FOR 2F501 FIELD HOCKEY GOAL 1. Unpack all parts and check for damage that may have occurred during shipping. If damage has occurred, notify Kwik Goal immediately. Lay out all parts. Remove all cardboard and packaging immediately. Wet or damp packaging may damage contents.
- Page 2 10. Fully disassemble goals for seasonal storage. 140 Pacific Drive Quakertown, PA 18951 (P) 215-536-2200 / (P) 800-531-4252 / (F) 215-536-4309 / (F) 800-778-8869 Visit our website @ kwikgoal.com 2018 Kwik Goal Ltd. NZ261 Rev. 09/26/18...
- Page 3 Ground Anchor (4) Ground Back Board (1) Secure Net Clip Includes Hex Bolt 2F501(Part# UZ735) Anchor Peg (4) Driver (1) and Flat Washer (Part# 10B1404 Pack of 4) (Part# VZ140) (Part# 10B103 Set of 4) 16” Back Board (2) Anchor Plate (4)
- Page 4 4. Lay out right arm assembly and left arm assembly face down on turf as shown. Insert channel spacers into channel on each side of crossbar. Insert sleeve of left and right arm assemblies into crossbar. Line up all holes. Connect crossbar with hex bolts as shown. Press joints together firmly before tightening bolts. CAUTION: DO NOT OVER TIGHTEN BOLTS.
- Page 5 5. Attach back board and fasten eye bolt to back drop on left and right arm assemblies as shown. IMPORTANT: FIELD HOCKEY BOARDS HAVE BEEN DESIGNED FOR GAME USE ONLY. CLOSE-RANGE SCORING PRACTICE WILL CAUSE PERMANENT DAMAGE TO BOARDS. 1/4” Lock Nut 3/8”...
- Page 6 6. For ground anchor use, mark ground anchor hole location, move goal and dig holes a minimum of 24“ in diameter and 20” deep as shown. Areas subject to heavy ground frost may go as deep as 36”. Attach ground anchors to assembled goal and secure with coated bolts.
- Page 7 7. For ground anchor peg use only, attach anchor plate. 7/16” Hex Nut 7/16” Lock Washer 7/16” Flat Washer Anchor Plate 7/16” X 3-1/2” Carriage Bolt Ground Anchor Peg Anchor Plate ***CAUTION*** This equipment has been designed to be used for the game of field hockey only. Field equipment must be anchored AT ALL TIMES and shall be secured against overturning.
- Page 8 8. Remove net rope from net and attach to the top back of goal as shown. Note: Make net rope taut so net will look and perform as designed. Net Rope Eye Bolt Eye Bolt Net Rope ***CAUTION*** This equipment has been designed to be used for the game of field hockey only. Field equipment must be anchored AT ALL TIMES and shall be secured against overturning.
- Page 9 9. Put net over goal frame and attach with secure net clips using net clip driver as shown. Place base of secure net clip into channel and turn 90 degrees to lock into place. CAUTION: DO NOT ATTEMPT TO CLIMB ON GOAL WHILE ATTACHING NET. Secure Net Clip Driver Secure Net Clip Secure Net Clip Driver...
- Page 10 NOTE: See steps 8 & 9 to attach net before using counterbalance weight. Go to kwikgoal.com for additional product information. ***CAUTION*** This equipment has been designed to be used for the game of field hockey only. Field equipment must be anchored AT ALL TIMES and shall be secured against overturning.
- Page 11 ASSEMBLY INSTRUCTIONS FOR 2F501 WHEELS 1. Unpack all parts and check for damage that may have occurred during shipping. If damage has occurred, notify trucking company immediately. Lay out all parts. Remove all cardboard and packaging immediately. Wet or damp packaging may damage contents.
- Page 12 3. Assemble left and right wheel assemblies. Left Side Wheel 5/8" Jam Nut 5/8" Lock Nut Stop Plate 5/8" X 3 1/2" Hex Bolt Tire and Wheel Assembly 3/8" Lock Nut Mounting Bracket 1/2" Flat Washer 3/8" X 3/4" Socket Head Capscrew 1/2"...
- Page 13 4. Assemble right wheel assembly. Right Side Wheel 3/8" Lock Nut Stop Plate 5/8" Lock Nut 3/8" X 3/4" Socket Head Capscrew Mounting Bracket Tire and Wheel Assembly 5/8" Jam Nut 1/2" Flat Washer 1/2" Lock Nut 5/8" X 3 1/2" Hex Bolt Large Nylon Washer Apply two small (1/4”...
- Page 14 5. Attach left and right wheel assemblies to bases using threaded channel spacers as shown below. NOTE: Right Tire & Wheel If using wheel as back wheel move Assembly wheel as far back as possible. Mount wheels on outside of goal. 3/8”...
- Page 15 Lift Front Post Stop Go to kwikgoal.com for additional product information. ***CAUTION*** This equipment has been designed to be used for the game of field hockey only. Field equipment must be anchored AT ALL TIMES and shall be secured against overturning. Do not climb on the net or equipment framework at anytime! All fastenings must be checked to insure they are fully tightened before and after each use of this product.
Need help?
Do you have a question about the 2F501 and is the answer not in the manual?
Questions and answers