Table of Contents
Advertisement
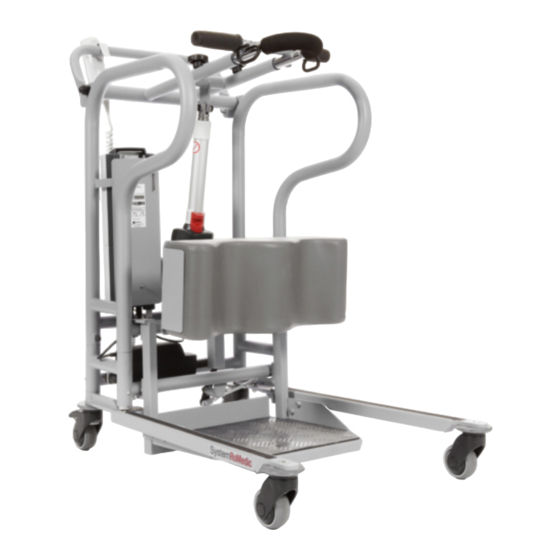
MiniLift160 Classic
1
2
A
B
C
D
E
F
G
H
Safety information
1
2
Visual inspection
Inspect lift functions regularly. Check to ensure that material is free from damage.
Before use
Ensure that the product is correctly assembled.
Check slingbar connection and safety latch function.
Check lift and base-width movement.
Check to ensure that the actuator is correctly installed.
Always read the user manual
Always read the user manuals for all assistive devices used during a transfer.
Keep the user manual where it is accessible to users of the product.
The lift may only be used by persons who have received instruction in the operation of the lift.
Manual nr: 903 En Ver. 1
3
4
5
3
4
5
6
7
8
SWL: 160 kg/352 lbs
6
7
8
Service manual - English
9
10
NAME
DATE
400641436
hc-jope
2010-07-27
DRAWN
APPROVED BY
400641437
STATUS:
COMMENTS:
Unless otherwise stated, general
tolerances according to ISO 2768-m
9
10
11
TITLE
SIZE
DWG. NO.
A2
MATERIAL:
g
SCALE:1:4
WEIGHT:
11
Advertisement
Table of Contents

Related Manuals for Handicare MiniLift160 Classic


Summary of Contents for Handicare MiniLift160 Classic
- Page 1 MiniLift160 Classic Service manual - English NAME DATE 400641436 hc-jope 2010-07-27 SWL: 160 kg/352 lbs DRAWN APPROVED BY 400641437 STATUS: TITLE COMMENTS: Unless otherwise stated, general tolerances according to ISO 2768-m SIZE DWG. NO. MATERIAL: Safety information SCALE:1:4 WEIGHT: Visual inspection Inspect lift functions regularly.
-
Page 2: Table Of Contents
Table of contents Assembly -Final inspection ..................Using the product - Important information ................- Trouble-shooting ................... Exploded view and components ..........Spare part list ................13 Changing of spare parts ............15 Periodic inspection - protocol ............17 - Description for periodic inspection ............18 - Periodic inspection - instruction ............ -
Page 3: Assembly
Assembly Final inspection Check to ensure that no parts have been left in the packaging. Inspect the lift for signs of wear and damage. Check all four castor wheels and castor wheel locks. Check all connections and fixtures including screws and bolts. Check the emergency stop function by activating the emergency stop, and then DRAWN APPROVED BY... -
Page 4: Using The Product
• Ensure that the user’s feet do not get caught between the footplate and the floor. Ensure that the user’s feet do not get caught between the footplate and the base when adjusting the base width. • MiniLift160 Classic is not intended for transporting users. It may only be used for short transfers. • Never move the lift by pulling on the actuator! Do not push •... -
Page 5: Exploded View And Components
Exploded view and components - MiniLift160 Classic... - Page 6 Thermoplastic rubber 18 mm This drawing and any information or descriptive matter set out hereon are the confidential and copyright property of Handicare and must not be disclosed, loaned, copied or used for manufacturing, tendering or any other purpose without their written permission.
- Page 7 SHEET 1 OF 1 This drawing and any information or descriptive matter set out hereon are the confidential and copyright property of Handicare and must not be disclosed, loaned, copied or used for manufacturing, tendering or any other purpose without their written permission.
- Page 8 SHEET 1 OF 1 This drawing and any information or descriptive matter set out hereon are the confidential and copyright property of Handicare and must not be disclosed, loaned, copied or used for manufacturing, tendering or any other purpose without their written permission.
- Page 9 Exploded view and components - MiniLift160 Classic with low leg...
- Page 10 16.21 kg SHEET 1 OF 1 90004969 Thermoplastic rubber 18 mm This drawing and any information or descriptive matter set out hereon are the confidential and copyright property of Handicare -4954 and -4955 updated color 151211 hc-matfre and must not be disclosed, loaned, copied or used for manufacturing, tendering or any other purpose without their written permission.
- Page 11 SHEET 1 OF 1 This drawing and any information or descriptive matter set out hereon are the confidential and copyright property of Handicare and must not be disclosed, loaned, copied or used for manufacturing, tendering or any other purpose without their written permission.
- Page 12 4905, -4903, -0605, -0423, -4920. This drawing and any information or descriptive matter set out hereon are the confidential and copyright property of Handicare and must not be disclosed, loaned, copied or used for manufacturing, tendering or any other purpose without their written permission.
-
Page 13: Spare Part List
Spare part list Article no. Product Unit Components Parts 80100045 Cable for charger US 1 pce 1 x Cable for charger 80100046 Cable for charger UK 1 pce 1 x Cable for charger 80100048 80100047 Cable for charger AUS 1 pce 1 x Cable for charger 80100048 Cable for charger EU... - Page 14 Article no. Product Unit Components Parts 80100049 Front castor 80mm 1 pce 1 x Castor 80 mm 1 x Locking nut M10 80100049 80100073 Rear castor kit 1 pce 1 x Castor w brake 80100073 80100074 Bumper kit 80 mm 1 set 4 x Rubber bumper 80100074...
-
Page 15: Changing Of Spare Parts
Changing spare parts 80100041 Actuator mast LA34 Lower the boom to the lowest position. Activate the emergency stop. Disconnect the actuator from the control box. Loosen the nut and pull the screw out; then, loosen the screw and nut on the lower end of the actuator. Lift the boom and remove the actuator. - Page 16 80100072 Actuator LA31-L4 mast Lower the boom to the lowest position. Activate the emergency stop. Disconnect the actuator from the control box. Loosen the nut and pull the screw out; then, loosen the screw and nut on the lower end of the actuator. Lift the boom and remove the actuator.
-
Page 17: Protocol
Periodic inspection - protocol Lift type: Contract no: s/n: Name: Version: Address: Prod. year: Sling bar id.: Situation of use: Home Institution Other Comments: 1. Attention 2. Correct 3. Do not use! Base: Check for visible damage Check: Castor Brakes Screws Mast: Inspect the mast... -
Page 18: Description For Periodic Inspection
Description for periodic inspection... -
Page 19: Periodic Inspection - Instruction
Periodic inspection - instruction Base -Check the base for visible damage to the surfaces, finish, etc. Castors -Roll the lift unloaded on the floor, check that the castors roll and turn freely. -Check that the castor fasteners are tight. Brakes -Lock the brakes. - Page 20 - Check the serial number so that the label is there and readable. Note the serial number on the protocol. Test loading Test loading of MiniLift160 Classic is done with 120 kg weight, which corresponds to a patient weight of 160 kg. Test loading with loose weights NOTE! Both hooks must bear the weight.
-
Page 21: Maintenance
The air pressure should be between 700 and 1060 hPa. Let the hoist reach room temperature before the batteries are charged or the hoist is used. 1060 hPa +50 °C -10 °C 700 hPa Service agreements Handicare offers the possibility of service agreements for maintenance and regular testing of your mobile lift. Contact your local Handicare representative. -
Page 22: Symbols
Symbols Read user manual May not be discarded in domestic waste The product complies with the requirements of the Medical Devices Directive 93/42/EEC. Type B, according to the degree of protection against electric shock. The device is intended for indoor use. Class lI equipment Always Read The User Manual Technical Information... -
Page 23: Dimensions
Dimensions MiniLift160 Classic All measurement are in mm/inch Tolerance +/- 5 mm/ 0.2” 91/3.5 57/2.2 121/4.7 34/1.3 873/34.3... - Page 24 All measurement are in mm/inch Tolerance +/- 5 mm/ 0.2”...
- Page 25 Dimensions MiniLift160 Classic, with low legs All measurement are in mm/inch Tolerance +/- 5 mm/ 0.2” 58/2.2 28/1.1 924/32.4...
- Page 26 All measurement are in mm/inch Tolerance +/- 5 mm/ 0.2” 935/36.8...
- Page 28 Please contact your local Handicare representative. A complete list of all our partners with their contact details can be found on our website; www.handicare.com. Handicare offers solutions and support to increase the independence of disabled or elderly people as well as to improve the convenience of those who are caring for them.
Need help?
Do you have a question about the MiniLift160 Classic and is the answer not in the manual?
Questions and answers