Table of Contents
Advertisement
Quick Links
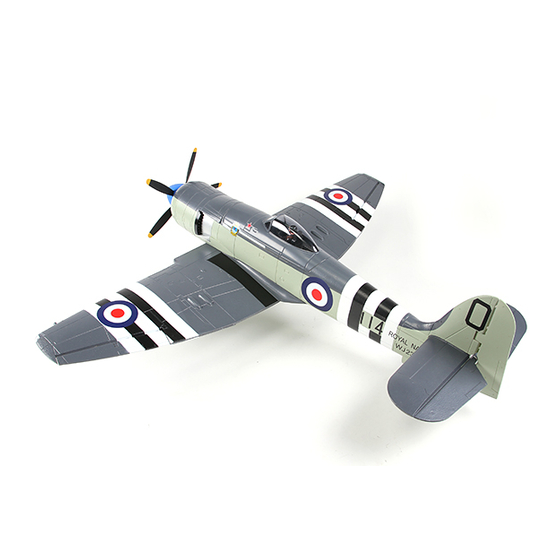
1200mm Hawker Sea Fury FB11 EPO Warbird
Sea Fury Specs
Length: 1100mm
Wingspan:1200mm
Weight: 2100g
Servos: 9G servos x10
Motor: Brushless Motor 3648 Out runner KV600
ESC: 60amp Brushless Speed Control
Features
Scale Hawker Sea Fury FB11 EPO Foam Warbird
Magnetic actuated drop tanks
Working retractable landing gear and gear doors
Markings of Royal Navy Pilot Peter "Hoagy" Carmichael
USER MANUAL
Required
4S 14.8V 3300mAh 30C LiPo Battery
7 Channel Transmitter and Receiver
Scale 5 blade propeller
LED Navigational lights
No glue required, all bolt together construction
Advertisement
Table of Contents

Related Manuals for Avios Hawker Sea Fury FB11 EPO Warbird


Summary of Contents for Avios Hawker Sea Fury FB11 EPO Warbird
- Page 1 1200mm Hawker Sea Fury FB11 EPO Warbird USER MANUAL Sea Fury Specs Required Length: 1100mm 4S 14.8V 3300mAh 30C LiPo Battery Wingspan:1200mm 7 Channel Transmitter and Receiver Weight: 2100g Servos: 9G servos x10 Motor: Brushless Motor 3648 Out runner KV600...
- Page 2 Avios is not responsible for any injury or property damage inflicted due to negli- gence in assembly or maintenance.
-
Page 3: Table Of Contents
CONTENTS Contents Content of Box Specification Assembly 3-10 CG location Spare Parts Listing Trouble shooting Pre-flight checks Notes... -
Page 4: Content Of Box
1200mm Hawker Sea Fury FB11 EPO Warbird Content of Box: 1. Fuselage 5. 5-Blade Spinner 9. Drop Tank Set 2. Main Wing 6. Wire Set 10. Scale Accessory Set 3. Horizontal Stabilizer 7. Screw Set 11. Control Horn/Pushrod Set 4. 5-Blade Propeller Set 8. -
Page 5: Assembly
ASSEMBLY: 1. Locate the flap control horns and screws. Attach to each flap panel with 2 screws. Repeat for both wing halves. Since the flaps are molded plastic, it is not necessary to attach the small square backing plate included with the control horns. - Page 6 1200mm Hawker Sea Fury FB11 EPO Warbird 3. Locate aileron hardware bag. Install aileron control horns using two scews per horn. Repeat for both ailerons. 4. Connect aileron control rods to servo arm and control horn. Suggest installing control rod to outer hole on servo and control horn.
- Page 7 5. To install option drop tanks. Locate the foam insert in outer wing panel. Remove carefully, saving for later if you choose to not use drop tanks. Insert into slot in wing. Drop tanks are magnetically actuated. If the tanks do not firmly seat, the magnetic actuator is in the wrong position.
- Page 8 1200mm Hawker Sea Fury FB11 EPO Warbird 7. Install the scale pitot tube and antenna parts to the wing as shown in the photos. Use a foam safe glue to attach. 8. Locate the elevator control horn bag. Install elevator control horn using the...
- Page 9 9. Attached the horizontal stabiliser to the fuselage by first inserting the spar into one stabiliser half. Insert this half into the fuselage. Next insert the other stabiliser half, being careful to line up the elevator joiner in the center. 10.
- Page 10 1200mm Hawker Sea Fury FB11 EPO Warbird 11. Attach the scale tail hook to the aft fuselage using foam safe glue. This accessory can be left off if you fly from grass fields. 12. Attach the wing to the fuselage, securing with the three supplied wing bolts.
- Page 11 13. Connect the male to male servo leads to the PCB board. Refer to the wiring diagram below for connecting to your receiver. Gear Front Flap Wing Aileron 14. Assemble the propeller. Insert each blade into the propeller hub making sure the blades are all assembled in the same direction.
- Page 12 1200mm Hawker Sea Fury FB11 EPO Warbird 15. Attach the propeller and spinner to the motor shaft. First install the spinner backplate, then the propeller. The lock nuts on the propeller hub will align into depressions in the spinner backplate. Secure the spinner with a washer and the propeller nut.
-
Page 13: Cg Location
CG LOCATION: Before flight, check the center of gravity (CG) If the model is found to be nose heavy or tail heavy, the flight battery can be shifted forwards or backwards to achieve the correct balance point. Refer to the drawing below for the correct CG. Control throws: 6-10mm 6-10mm... - Page 14 1200mm Hawker Sea Fury FB11 EPO Warbird...
-
Page 15: Spare Parts Listing
SPARE PARTS LISTING: Main Wing Fuselage Horizontal Stabilizer Part No: 9306000130 Part No: 9306000131 Part No: 9306000132 5-Blade Propeller Set 5-Blade Spinner Wire Set Part No: 9306000133 Part No: 9306000134 Part No: 9306000135 Screw Set Rocket Set Drop Tank Set Part No: 9306000136 Part No: 9306000137 Part No: 9306000138... -
Page 16: Trouble Shooting
1200mm Hawker Sea Fury FB11 EPO Warbird TROUBLE SHOOTING: Problem Cause Solution 1. Battery is not fully charged. 1. Charge the batteries. 2. Transmitter battery low. 2. Install a full charged battery. 3. Motors not connected . 3. Check for connection between the ESC and motor. -
Page 17: Pre-Flight Checks
PRE-FLIGHT CHECKS: Always range check your model before any flight (especially when flying a new model for the first time). Follow your radio manufacturers guidelines for performing this check. Check all screw/bolts and mounting points are firmly secured, including control horns and clevises. Only fly with fully charged batteries (both in your radio and model). -
Page 18: Notes
1200mm Hawker Sea Fury FB11 EPO Warbird Notes:... - Page 20 1200mm Hawker Sea Fury FB11 EPO Warbird...
Need help?
Do you have a question about the Hawker Sea Fury FB11 EPO Warbird and is the answer not in the manual?
Questions and answers