Table of Contents
Advertisement
Quick Links
M8
M824
&
Model number:
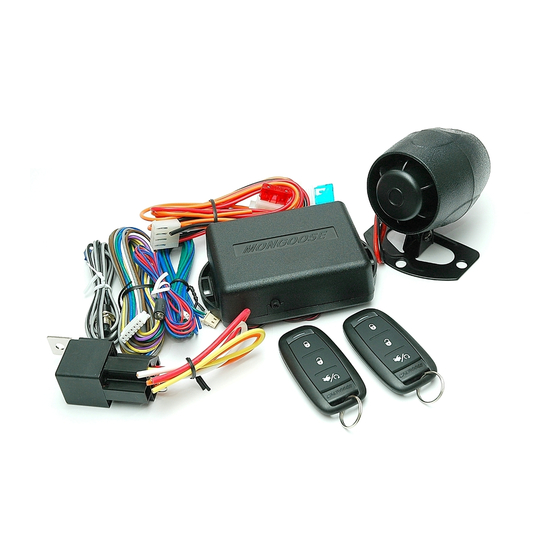
VEHICLE ALARM SYSTEM
r'
Owne
s Operation/Installation Manual
Please read and try out all the features
For correct operation and warranty compliance,
we recommend professional installation of this
product by your authorised Mongoose dealer.
M8 Suitable for 12volt, negative ground vehicles
M824 Suitable for 24volt, negative ground vehicles
Advertisement
Table of Contents

Related Manuals for Mongoose M8


Summary of Contents for Mongoose M8
- Page 1 Please read and try out all the features For correct operation and warranty compliance, we recommend professional installation of this product by your authorised Mongoose dealer. M8 Suitable for 12volt, negative ground vehicles M824 Suitable for 24volt, negative ground vehicles...
- Page 2 Congratulations on your purchase of this state-of-the-art Mongoose security system. To fully appreciate the many functions and safeguards incorporated in this system, please spend a few minutes reading this manual. “ ” “f ”. You may find unexpected features that could mean the difference between...
-
Page 3: Alarm Remote Control
– ALARM REMOTE CONTROL 2 supplied BUTTON 1 ‘ ’ (& L OCK) PRESS FOR 1.5 SECONDS PANIC PRESS FOR 3 SECONDS BUTTON 2 ‘ ’ DISARM (& UNLOCK) PRESS FOR 1.5 SECONDS BUTTON 3 BOOT RELEASE (If vehicle equipped) ‘PANIC’... -
Page 4: Defective Zone Bypass
OPERATING YOUR VEHICLE SECURITY SYSTEM ARMING (& LOCKING*) Turn off the engine, exit the vehicle and close all doors, bonnet and boot. ‘A ’ REMOTE- Press and release the rm (Lock) button on the keychain transmitter. The siren will "chirp" once, the vehicle's parking lights will flash once, the doors will lock (optional), and the dash mounted LED will begin to slow flash. - Page 5 DISARMING (& UNLOCKING*) ‘ )’ As you approach the vehicle, press and release the Disarm (Unlock button on the keychain transmitter. The siren will "chirp" 2 times and the vehicle's parking lamps will flash two times. The dash mounted LED will flash until door is opened, and then remain off until the system is re-armed. –...
-
Page 6: Eliminating The Arm / Disarm Chirps
Enter the vehicle and observe the dash mounted LED it will flash a code. If the LED is flashing one time... pause...one time... etc., then the alarm was triggered via the shock sensor. If the LED is flashing two times...pause. ..two times...etc., then the alarm was triggered via the bonnet or boot ..or an optional sensor, such as a glass break sensor, has been connected to one of these circuits. - Page 7 BOOT RELEASE BY REMOTE If you vehicle is equipped with electric release of the boot, it can be connected to this alarm system. This may incur additional charges. Press the ‘boot’ button on the remote control to activate. PANIC In the event of personal attack, the alarm can be ‘panicked’ by pressing the ‘arm’ button on the remote control button for 3 seconds.
- Page 8 Press the Lock Button of each transmitter you want programmed until you hear a chirp from the siren. Press and release the valet/programming switch 1 time to advance to channel 2 UNLOCK. Press the unlock button of each transmitter you want to unlock the vehicle. Press and release the valet/programming switch 1 time to advance to channel 3 BOOT.
-
Page 9: Dash Mounted Warning Light - Led
INDICATOR LIGHT FLASH CONFIRMATION / CODES This is a visual indication of system status. A ) 1 Flash - Armed B ) 2 Flash - Disarmed C ) 3 Flash - Indicates system has been triggered SIREN CHIRP CODES This is an audible indication of system status. A ) 1 Chirp - Armed B ) 2 Chirps - Disarmed C ) 3 Chirps - Open circuit when arming... - Page 10 REMOTE CONTROL CODE LEARNING If you need to replace a remote control, it must be memorised to the alarm system before it can be used. A power surge or interruption to the power supply may cause loss of memory. If your alarm fails to respond to the remote try re-learning them. The following action deletes any previous remotes, so all existing remotes must be memorised with this sequence.
-
Page 11: Installation
INSTALLATION It is strongly recommended that this product be professionally installed. MAIN CONTROL MODULE Select a mounting location inside the passenger compartment (up behind the dash) and secure to the vehicle body structure using screws. As the control module contains a built-in shock sensor, mounting by cable ties maybe ineffective. -
Page 12: Adjusting The Shock Sensor
ADJUSTING THE SHOCK SENSOR The sensitivity of the sensor is adjusted by turning the adjustment knob located on the side of the alarm module clockwise to increase and counter clockwise to decrease. (1) Close the doors, bonnet and boot and arm the alarm. Leave the driver’s window open. (2) Wait 6 seconds for the shock sensor to stabilise (3) Test A: Firmly strike the vehicle (rear bumper or wheels) with the side of a closed fist considering the... - Page 13 PROGAMMABLE OPTIONS Program Part 1 New Remote Learning If you need to replace a remote control, it must be memorised to the alarm system before it can be used. A power surge or interruption to the power supply may cause loss of memory. If your alarm fails to respond to the remote try re-learning them.
- Page 14 5) Use the lock button of the remote to select the setting for the feature. The chirps confirm the setting. 1 chirp = ON 2 chirps = OFF 6) To exit the programming mode, turn the ignition key off. The program mode is automatically exited when there is no activity on the valet switch or the remote control for 30 seconds.
-
Page 16: Year Product Warranty
Warranty for the installation is borne by the original installing agent only. This will be chargeable if not returned to the original installer. Whilst every care is taken by our installers in fitting the alarm, Mongoose takes no responsibility for any damage caused to a vehicle in the installation process. -
Page 19: Proof Of Purchase
Please complete the above details, detach from this manual and keep in a safe place. These details should be presented he ‘ to your Mongoose dealer in the unlikely event that you require this product to be repaired under the terms of t product ’. - Page 20 Manufactured for: Mongoose (Australia) Pty Ltd Make & Model Number: Mongoose M8 / M824 Series Country of manufacture: China – Supply voltage: 12v DC nominal negative ground Current consumption: 0.3amps Suitability: All vehicles with 12v negative earth batteries Date of manufacture: Refer date code on alarm module case...
Need help?
Do you have a question about the M8 and is the answer not in the manual?
Questions and answers