ELRO CZ60RIP11S Manual
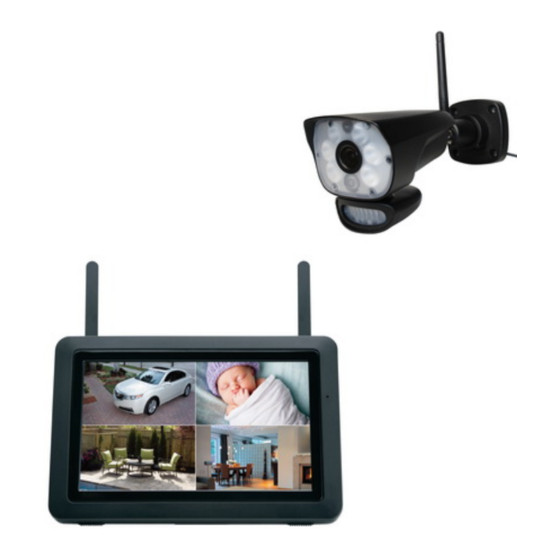
Camera security set
Hide thumbs
Also See for CZ60RIP11S:
- Quick start manual (2 pages) ,
- Extended manual (30 pages) ,
- Manual (23 pages)

Related Manuals for ELRO CZ60RIP11S


Summary of Contents for ELRO CZ60RIP11S
- Page 1 CAMERA SECURITY SET COLOR NIGHT VISION Home is not a place, it’s a feeling CZ60RIP11S CZ60RIP11S Manual Version: V2...
-
Page 2: Table Of Contents
Contents Introduction ............................ - 3 - Package contents ..........................- 3 - Monitor & symbol overview ......................- 4 - Overview camera ..........................- 6 - Micro SD Card ..........................- 6 - Camera installation ......................... - 7 - Mounting the camera ........................- 7 - Overview menu screens ........................ - Page 3 4.5.3 Network setup – Information ..................- 12 - 4.6 Upgrade ..........................- 12 - 5. ELRO Monitoring App ........................ - 13 - 6. Overview app & symbols......................- 14 - 7. App management & settings..................... - 15 - 7.1 Edit device ..........................- 16 - 7.2 View events ..........................
-
Page 4: Introduction
Micro SD card into the card slot of the monitor. The monitor can be connected to the internet with the supplied UTP cable. You can use the ELRO Monitoring app to look at the live feed on a smartphone or tablet. The monitor has two antennas that provide an extra strong wireless connection to the camera. -
Page 5: Monitor & Symbol Overview
Monitor & symbol overview Antennas; for optimal wireless reception Power button; press and hold to turn ON or OFF* *Short press in the ON position to enter the ''Standby'' mode. Table stand Speaker UID number/ QR code; for connection to smartphone/tablet Internet;... - Page 6 Signal indicator SD indicator Visible when an SD card is inserted in the monitor. Blue; there is recording space available. Red; the SD card is full. New recording indicator New recordings are stored on the SD card. Recording indicator Red blinking; recording is being made. Network status indicator Green;...
-
Page 7: Overview Camera
Battery indicator Flashing red; battery is empty Continuous blue; battery is full Flashing blue; battery is charging Zoom indicator Select 1 of the 5 areas to zoom. Switch channel Manual switch between channels. Sequence indicator Automatic channel switching. New download New firmware version is ready for download. -
Page 8: Camera Installation
Camera installation Important • Before mounting, check the signal of the system by viewing the live feed of the camera on the monitor from the same location/position as where the camera is mounted. • The location should be free of dust and not in view of a strong light source or direct sunlight. •... -
Page 9: Navigation
Navigation Navigating the menu and subsections is very easy with the help of your index finger. Tapping this will return you to the main screen. Tapping this will return you to the previous screen. 1. Lighting settings The 3 lighting settings can be set per camera. 1.1 Duration Adjusts how long the lights stay on after movement. -
Page 10: Alarm Volume
2. Alarm volume If the camera is activated by motion and starts recording the images, the monitor emits an alarm tone. Here you can set the alarm volume. Tap plus to increase the volume and minus to decrease the volume of the alarm. 3. -
Page 11: Camera Setup - On/Off
Do the following: Tap pairing in camera setup screen. Tap the channel number you want to pair the camera with. A message appears with instructions for pressing the camera's PAIR button. This must be done within 30 seconds. See 8 "Camera overview”. 3 seconds after the camera has been paired successfully, the monitor shows the image from the camera. -
Page 12: Recording Setup - Planned Recordings
4.2.2 Recording setup Planned recordings – This function allows you to set a time schedule on which a camera should record. You can set multiple cameras at the same time and the recording times may overlap. The total recording time is limited to the available space on the SD card. If you set up the SD card to delete the oldest files when new it continues to record, otherwise it will stop the recording when the SD card is out of storage. -
Page 13: Motion Detection - Sensitivity/Area
4.4.1 Motion Detection – Sensitivity/area You can set the sensitivity (High - Low - Off) and the area to be scanned for each camera in this menu. This function is mainly used to make the detection as specific as possible. In the image of the camera, areas can be excluded, so that for example moving trees are not the cause of detection. -
Page 14: Elro Monitoring App
Connect the monitor to your modem with the supplied Ethernet cable. Also consider to use the adapter. See 6 and 7 "Overview monitor and symbols”. • Download and install the free ELRO Monitoring App on your smartphone or tablet. (App Store/ Google Play). -
Page 15: Overview App & Symbols
6. Overview app & symbols This symbol indicates which camera channel is selected. The system can be expanded with three additional ELRO CC60RXX security cameras. Tapping this will take you to the snapshot storage. Removing a snapshot is very easy by holding your finger on the snapshot for approx. -
Page 16: App Management & Settings
Using the speaker, you can hear the ambient noise which the camera detects. When it is grey it is turned off; you won't hear anything. Blue means that it is turned on. The microphone allows you to speak to an entity which is located near the camera. Grey is off, blue is on. -
Page 17: Edit Device
7.1 Edit device Here you can change the name ELRO Monitoring to e.g. "Camera driveway”. Advanced settings \Advance Here you can change and confirm the password. Video settings \ Video quality Video Quality selects the format in pixels. The larger the size, the more memory of your smartphone/tablet is used: •... -
Page 18: View Snapshots
2 seconds. You will be asked to if you would like to delete the snapshot. 8. FAQ Should any questions remain unanswered in spite of these detailed operating instructions, please contact our website www.elro.eu and see if you can find the answer under "Frequently Asked Questions" (FAQ). 9. Specifications 9.1 Specifications camera Frequency reach : 2400MHz~2483.5MHz... -
Page 19: Specifications Monitor
Protect the environment and human health, use natural resources responsibly! Read the manual (b) before use and keep it in a safe place for future use and maintenance. For warranty (c) visit www.elro.eu ELRO Europe | www.elro.eu Postbus 9607 - Box E800 1006 GC Amsterdam - The Netherlands...
Need help?
Do you have a question about the CZ60RIP11S and is the answer not in the manual?
Questions and answers