ELRO CZ60RIP11S Extended Manual
Hide thumbs
Also See for CZ60RIP11S:
- Quick start manual (2 pages) ,
- Manual (19 pages) ,
- Manual (23 pages)
Table of Contents
Advertisement
Quick Links
Advertisement
Table of Contents

Related Manuals for ELRO CZ60RIP11S


Summary of Contents for ELRO CZ60RIP11S
- Page 1 ELRO Camera surveillance Set CZ60RIP11S Extended manual...
-
Page 2: Feature List
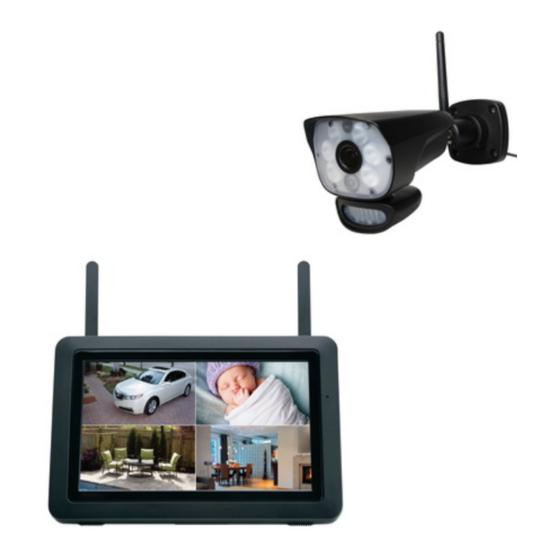
Feature list: 9" rechargeable, wireless LCD monitor Record up to 1080p FHD video with audio Weatherproof HD cameras featuring Infra Red LEDs with range up to 45 feet for nightview 500 lumens white LED to light your way or for added security ... -
Page 3: Monitor Overview
Monitor Overview 1. Wireless Antennas: Position the antennas as needed for best reception. 2. Power Button: Press and hold to turn the receiver on / off. Press power button shortly while the unit is powered on to enter Scan mode. 3. -
Page 4: Signal Indicator
The Icons display on Monitor Icon What it Means SIGNAL INDICATOR Shows how strong the camera's signal is. Signal ranges from 4 bars down to 0 bars (out of range). SD CARD This graphic displays if an SD card is inserted into the monitor. If blue, recording space is available. -
Page 5: Change Channel
LED LINGHT CONTROL DICATOR Touch this icon to control the LED light on/off SD CARD OVERWRITE Displays if the SD card is allowed to overwrite files when it is full. CHANNEL Displays the current channel number you are currently viewing. If INDICATOR viewing multiple cameras at once, the camera indicator will appear above each video display. -
Page 6: Pop-Up Menu Tab
MOTION RECORDING Indicates motion detection status. INDICATOR Blue- Automatic recording OFF. Red- Automatic recording ON. POP-UP MENU TAB Tap to access the pop up menu system. Wireless Camera 1. Microphone –Captures the sound on camera side and transmits the sound from camera to receiver. 2. -
Page 7: Camera Installation
10. Pair Button – The pair button is located on the back of the camera, it is used to pair the camera with receiver. Note: This camera includes an Auto Mechanical IR Cut Filter. When the camera changes between day mode and night vision mode, an audible clicking noise may be heard coming from the camera. -
Page 8: Screen Descriptions
Power Adaptor Connect the power adaptor to the camera. Make sure is the DC 9V for camera, and DC 5V for Receiver Make sure the power adaptor is placed into a grounded outlet or surge bar to protect the camera from power fluctuations. SCREEN DESCRIPTIONS OVERVIEW This section describes the monitor pop-up menu screens in detail. - Page 9 The following screen displays. 1. Duration: This part controls how long you want the light to turn on after motion triggered. You can turn off the light or set it to 1 min/ 3min/ 10min. 2. Timer: Set up a schedule that you want the light to turn on.
- Page 10 3. Dimmer: When the file finishes, the monitor displays the Recording File List screen again. ALARM When motion triggers the camera to begin recording, the monitor sounds an alarm tone. This screen lets you determine how loud that tone will be. .
-
Page 11: General Settings
Tap + or – to increase or decrease the monitor screen brightness. Tap when you are finished. GENERAL SETTINGS The General Settings screen contains 6 subsections, each of which may contain sub-screens. These sub-screens let you set features about your system. You can turn cameras on and off, establish a specific schedule for specific cameras to record, set the date and time, and motion detection sensitivity, among other features. -
Page 12: Camera Setup Screen
Changes languages setting for the montior Language (English, French or Spanish) Default Settings Restores the system to default settings. Format SD Reformats the SD card and deletes all existing Card data. Displays firmware information for the monitor and Information each camera. A single screen lets you set motion detection sensitivity for each Motion camera. - Page 13 Tap Paring on the Camera Setup screen. Tap the channel number you want to pair the camera to. A message displays with instructions to press the PAIR button on the camera. Press and release the PAIR button on the front of the camera. A 30-second countdown begins. You must press the PAIR button during the 30-second countdown;...
-
Page 14: Recording Setup Screen
Tap High or Low to set the frame rate for each camera. to return to the previous screen. RECORDING SETUP SCREEN Use the Recording Setup screen to: Set the length of time the system will automatically record when something triggers motion sensitivity. ... -
Page 15: System Setting
Tap MODIFY in the lower right corner. The Schedule Recording Setup screen displays. Select a camera. If you want more than one camera to record at the same time, select both cameras. Set the recording start time. Tap the AM/PM block to toggle between them. ... - Page 16 Date and Time Time Zone Language Default Settings Format Memory Card Information Date and Time to access the Date & Time screen. Tap the up or down arrow to set the month, day, and date. Tap the up or down arrow to set the time.
- Page 17 . The Time Zone screen displays, Scroll up and down to your camera’s time zone and then tap it. Tap the next option to turn Daylight Savings Time on or off. to return to the previous screen. Language to set the language used on your system. Options are English, Japanese, and French (Français). Tap the language you want your system to use.
- Page 18 Tap YES on the Restore Default Settings screen. Tap OK to confirm the reset. Format SD Card Formatting the SD card erases all data stored on the card. (Default = NO) to reformat your SD card. Tap YES on the All stored files will be deleted! Screen (Default = NO). A confirmation screen displays. Tap YES to it.
-
Page 19: Network Setup Screen
Motion detection settings control how strong the motion needs to be to trigger recording. This settings screen also lets you mask off any areas in the image for the camera to ignore. For example, you may have trees in the image area that would set off motion detection if there is a breeze. Sensitivity This selection allows you to set the camera’s motion detection sensitivity levels to High, Low, or Off. - Page 20 This selection lets you determine your network connection type, reset the APP password, and review your network details. to see the Nework Setup screen and option. Advanced Setup to display the Advanced Setup screen. Tap on your selection and fill in the fields requested. Tap SAVE. Tap on your selection and fill in the fields requested.
- Page 21 Information This screen displays current IP information when the system is connected to the internet. to display the information screen, then tap to return to the Information screen. FIRMWARE UPGRADE SCREEN We recommend that you check your monitor firmware version against the most recent version at least twice a year.
- Page 22 When the update is complete, the monitor displays Firmware Upgrade Successful and automatically reboots. Upgrade from Server Use the Ethernet cable (provided) to connect your monitor to your router. to upgrade the firmware through the Server. A confirmation screen displays. Tap YES. The system checks to see if new firmware is available.
- Page 23 Remote View from APP 1. Download app MyCam View from App Store or Google play on your smart phone or tablet.(Make sure your phone connect with network) 2. Connect the 7’’monitor with your home router by Ethernet cable. 3. Add camera(Android APP for example) Touch the App icon MyCam View to launch the app, Tap “Click here to add camera”...
- Page 24 Option B: Tap Scan button to scan the QRcode on the back of monitor. Name: Press it to rename the camera (original name is MyCam View) what you want. Enter the Password: 000000(Default setting) Then press OK to confirm it. 4.
- Page 25 Icons in the APP View icon : press this icon to view Snapshot photos already taken. Snapshot Icon : press this icon to take photo from camera side Mute Icon : It cut off the audio on the camera side. Press this icon to listen the audio from camera side.
- Page 26 6. Back to the add camera menu, and then press the down arrow, a new interface pops out as showed. Reconnect: If your remote device connected failed with the camera, press it to reconnect. Edit Device: Device setting and Advanced setting are under this menu.
- Page 27 View Event: Select it to playback the video on your phone. You can tap icon to view live video by selecting a period of time(within an hour, within half a day, within a day, and within a week) or as you want by Custom time. View Snapshot: Select it to view the photos you have taken by Snapshot key.
-
Page 28: Electrical Parameter
Electrical Parameter: Camera(s) Transmit Frequency Range 2400Mhz~2483.5Mhz Data Rate 4 Mbps Transmitting Power 16dBm (TYP) Modulation Type GFSK with FHSS Transmitting Distance 150m (Line of Sight) Image Sensor Type 1/4” Color CMOS Image Sensor Effective Pixels H: 1280 V: 720 Light sensitivity 3.5 Lux (w/o IR-LEDs) Image Processing... - Page 29 Lcd monitor Receiving Frequency Range 2400Mhz~2483.5Mhz Data Rate 4 Mbps Receiving Sensitivity -81dBm Modulation Type GFSK with FHSS Lcd Panel size 9 Inch Recording format SDHC-Memory card Max 128G recommended:32G Lcd Resolution 1024 RGB (H) x 600 (V) max.recording capacity in hours approx.
Need help?
Do you have a question about the CZ60RIP11S and is the answer not in the manual?
Questions and answers