Table of Contents
Advertisement
Quick Links
Advertisement
Table of Contents

Subscribe to Our Youtube Channel
Related Manuals for Bartscher SV G25L


Summary of Contents for Bartscher SV G25L
- Page 1 SV G25L - SV G16L 115130 - 115131...
- Page 2 Bartscher GmbH Phone: +49 5258 971-0 Franz-Kleine-Str. 28 Fax: +49 5258 971-120 Technical Support Hotline: +49 5258 971-197 D-33154 Salzkotten Germany www.bartscher.com Version: 3.0 Date of preparation: 2020-03-18...
-
Page 3: Table Of Contents
Original instruction manual Safety ......................2 Explanation of signal words ..............2 Safety instructions..................3 Intended use .................... 5 Unintended use ..................5 General information ..................6 Liability and warranty ................6 Copyright protection ................. 6 Declaration of conformity ................. 6 Transport, packaging and storage .............. -
Page 4: Safety
Safety Diese Bedi enungsanlei tung besc hrei bt di e Installation, Bedi enung und Wartung des Geräts und gilt als wic htige Infor mationsquelle und N achschl agewer k. Di e Kenntnis aller enthaltenen Sic herheits hinweis e und H andlungs anweisungen schafft die Vorauss etz ung für das sichere und s ac hger echte Ar beiten mit dem Gerät. D arüber hi naus müs sen die für den Ei ns atz ber eic h des Geräts geltende n ör tlichen Unfall verhütungs vorsc hriften und allgemeinen Sicherheits besti mmungen eing ehalten wer den. Dies e Bedi enungs anleitung is t Bes tandteil des Produkts und muss i n unmi ttelbarer N ähe des Ger äts für das In¬s tall ations-, Bedi enungs-, Wartungs- und R einigungspers onal jederzeit z ugänglich auf¬bewahrt werden. Wenn das Ger ät an eine dritte Pers on weiterg egeben wird, muss die Bedi enungsanlei tung mit ausgehändigt wer den. -
Page 5: Safety Instructions
Safety WARNING! The signal word WARNING warns against hazards that may lead to moderate or severe injuries or death if the hazards are not avoided. CAUTION! The signal word CAUTION warns against hazards that may lead to light or moderate injuries if the hazards are not avoided. , di e IMPORTANT! The signal word IMPORTANT indicates possible property damages,... - Page 6 Safety • Never place the appliance or other objects on the power cord. • Always take hold of the plug to disconnect the appliance from the power supply. Flammable materials • Never subject the appliance to contact with high temperature sources, e.g.: oven, furnace, open flame, heat generating devices, etc.
-
Page 7: Intended Use
Safety • The appliance may only be used when its technical condition is flawless and allows for safe operation. • The appliance may only be used when all connections are executed according to rules of law in force. • The appliance may only be used when it is clean. •... -
Page 8: General Information
General information General information Liability and warranty All information and instructions in this instruction manual account for legal regulations in force, current level of technical engineering knowledge as well as our expertise and experience, developed over the years. If special models or additional options are ordered, or state-of-the-art technical solutions were implemented, the actual scope of delivery of the appliance may, in some circumstances, differ from descriptions and numerous drawings in this instruction manual. -
Page 9: Transport, Packaging And Storage
Transport, packaging and storage Transport, packaging and storage Delivery check Immediately upon reception, check the delivery for completeness and possible shipping damage. In the case of visible transport damage refuse to accept the appliance or accept it conditionally. Mark and note the scope of damage in shipping documents/consignment list of the shipping company and lodge a complaint. -
Page 10: Technical Data
• Programmable time setting • Acoustic timer • The set includes: holder/frame for vacuum bags Name: Sous-Vide cooker SV G25L 115130 Art. No.: Material: Stainless steel Number of tanks: Basin dimensions (W x D x H): 300 x 500 x 200 Temperature range, min.–max., in °C:... -
Page 11: Functions Of The Appliance
Technical data Name: Sous-Vide cooker SV G16L 115131 Art. No.: Material: Stainless steel Number of tanks: Basin dimensions (W x D x H): 300 x 330 x 200 Temperature range, min.–max., in °C: 25 - 90 Temperature control every °C: Time setting, in min.: 0 - 99 Time setting intervals, in min.:... -
Page 12: List Of Components Of The Appliance
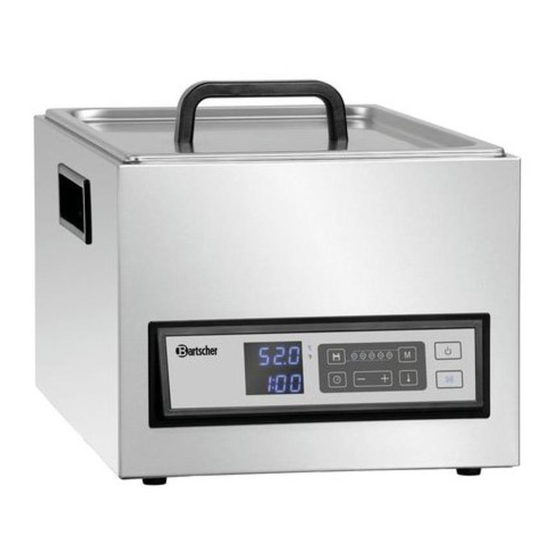
Technical data List of components of the appliance Fig. 1 1. Lid handle 2. Lid 3. Carrying handle (2 pcs) 4. Water drain with valve 5. Feet (4 pcs) 6. Control panel 7. Housing 8. Cable holders / drain hose 9. -
Page 13: Installation And Operation
Installation and operation Installation and operation Installation Unpacking / Positioning • Unpack the appliance, remove all external and internal packaging elements and shipment safeguards. CAUTION! Choking hazard! Prevent children from accessing package materials, for instance: plastic bags and EPS. • If the appliance is covered with a protective film, remove it. -
Page 14: Operation
Installation and operation Power supply connection • Verify if technical data of the appliance (see rating plate) correspond with the local electric power grid specification. • Connect the appliance to a single, properly grounded mains socket with protective contact. Do not connect the appliance to a multi-socket. •... - Page 15 Installation and operation Preparation of the appliance 1. Before operating the appliance clean it according to the instructions in section 6 'Cleaning'. 2. Fill the appliance with water before use, paying attention to the 'MIN' mark on the basin back wall. When the water level is below the “MIN”...
- Page 16 Installation and operation Control panel / functions off keys and displays Fig. 3 1 ON/OFF key Press and hold the key for 1 second to turn the appliance on. The LED indicator comes on and indicates that the appliance is connected to the power supply.
- Page 17 Installation and operation 8 Setting key for decreasing temperature or time 9 Setting key for increasing temperature or time 10 Temperature setting key The temperature may be set within the range from 25 °C to 90 °C. The default temperature is 60 °C. 11 Start/Stop key When pressed, the key starts and stops thermal processing.
- Page 18 Installation and operation – 3–99 h in 30-minute intervals. 2. Press 'Save' key (4) and hold it for 6 seconds to save the set cooking time. When the set cooking time elapses the appliance turns off and after 5 seconds the digital display returns to the temperature indicator.
- Page 19 Installation and operation 10. After setting of M1 program, press 'M' program key (2) twice to select free M2 program and input data for it. Setting of all subsequent programs should be executed in the same way as for M1 program.
- Page 20 Installation and operation 4. Using the handle, carefully remove the lid. 5. Place frame in the holder and insert the prepared vacuum packed food products into the frame. 6. Using the handles, put the frame with holder and food products in the heated water in the basin bottom.
-
Page 21: Cleaning
Cleaning Further Setting Indications • In the case of manual setting of the cooking process (without selecting any of the saved M1–M5 programs), the temperature and cooking time may be changed at any time during the cooking process. Follow the indications in sections 'Settings' / 'Temperature' and 'Cooking time'. -
Page 22: Cleaning
Cleaning Cleaning 1. Clean the appliance thoroughly after each use. 2. Remove all food products from the basin. 3. Remove the frame and holder. 4. Clean the accessories and appliance lid thoroughly with warm water and a gentle washing agent. 5. - Page 23 Cleaning 11. Always remember to keep the water inlet and outlet clean. To avoid clogging with impurities, a removable filter is placed at the basin water outlet. 12. Remove this filter for cleaning. 13. After each use, wash the filter in warm running water with a mild cleaning agent.
-
Page 24: Possible Malfunctions
Possible malfunctions Possible malfunctions Mögliche The table below contains descriptions of possible causes and solutions to malfunctions or errors during operation of the appliance. When malfunction cannot be removed, contact the technical service. In the appliance does not work: 1. Check the power cord to make sure it is properly connected to the socket. 2. - Page 25 Possible malfunctions Error Possible cause Solution code Impurities in water have Execute the cleaning/descaling process (section 'Cleaning') clogged the water outlet filter The vacuum bags clog the Use the supplied frame and holder to water inlet in the basin place vacuum bags in the basin Vacuum bags clog the water outlet in the basin E002...
-
Page 26: Disposal
Disposal Disposal Electrical appliance Electric appliances are marked with this symbol. Electrical appliances must be disposed of and recycled in a correct and environmentally friendly manner. You must not dispose of electric appliances with household waste. Disconnect the appliance from the power supply and remove power cord from the appliance.
Need help?
Do you have a question about the SV G25L and is the answer not in the manual?
Questions and answers