Advertisement
Quick Links
Advertisement

Related Manuals for Makeblock Smart Target


Summary of Contents for Makeblock Smart Target
- Page 1 Building Instructions Smart Target...
- Page 2 Take out the wood boards you need. Assemble the wood boards as shown. Pro tips Use the sandpaper included to sand a smooth finish on the wood board before you start installing it. Attach a rubber band.
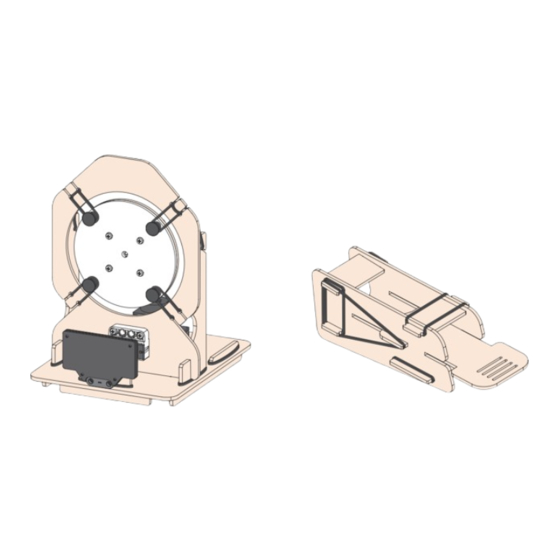
- Page 3 Slot in the wood boards as shown and hold them in place with rubber bands. Adjust the servo hub. Turn the servo hub clockwise all Turn the servo hub's opening to the the way down to the bottom. side of the servo with a ring mark. Attach a rubber band.
- Page 4 Slot in the wood board as shown and secure it with rubber bands. Install the servo. Make sure you correctly identify the front and back sides. The front side has marks while the back side has M3 *14mm no marks. Attach a rubber band.
- Page 5 Install Halocode. Align the holes on the acrylic board Tighten the stud. and wood board, then push the big head rivets through the holes, and press them all the way down. M3 *14mm Peel off the protective film on both sides. 20 cm Do the same with the rest of the screws and studs.
- Page 6 Use rubber bands to secure the Halocode-embedded disc to the stand. Add the LED matrix. Make sure the Micro USB port on Halocode faces down. Hook four rubber bands around the four big head rivets and the four corners on the stand. Micro USB port faces down.
- Page 7 Insert a 10 cm connection cable and a 20 cm connection Install the power module. Connect the power module and cable into the ports of the power module. LED matrix. 10 cm 20 cm 20 cm Thread the connection cable through the hole. 10 cm Insert the connection cable into the LED...
- Page 8 Take out the servo driver. Connect the Insert the servo cable into the servo Insert a 10 cm connection cable Fix the servo driver to the power power module to the servo driver as driver. into the servo driver. module. shown.
- Page 9 Take out the speaker and connect Connect Halocode and the speaker. Install the speaker. the servo driver to the speaker as shown.
- Page 10 Remove these wood boards from the sheet. Rotate Rotate Attach a rubber band. Attach a rubber band.
- Page 11 Attach a rubber band. Attach a rubber band.
- Page 12 Wow! You’ ve made it! Attach a rubber band. Rotate Flip Attach a rubber band. Attach a rubber band.
- Page 13 Now, return to mBlock on your PC or iPad and program your project. https://hezi.makeblock.com mBlock...
Need help?
Do you have a question about the Smart Target and is the answer not in the manual?
Questions and answers