Advertisement
Quick Links
Makeblock Co., Ltd.
Address: 4th Floor, Building C3, Nanshan iPark, No.1001 Xueyuan Avenue,
Nanshan District, Shenzhen, Guangdong Province, China
Technical support: support@makeblock.com
www.makeblock.com
D1.2.2_KD010373000
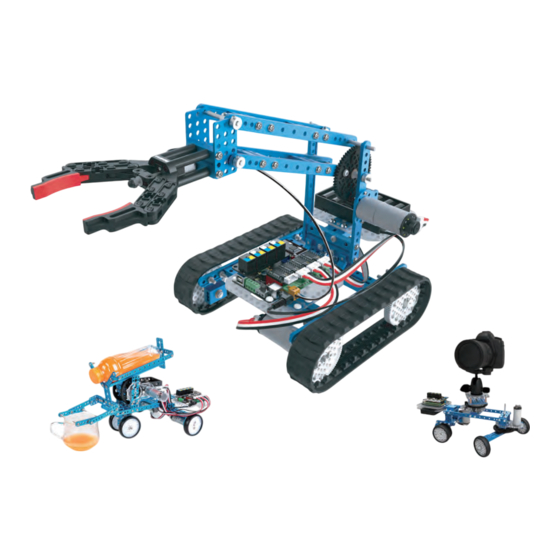
Robotic Arm Tank
Beverage Robot
MegaPi
Make & Control Your Own Robot
inside
Ultimate
2.0
10-in-1 Robot Kit
Infinite
Extensibility
10-in-1
Heavy-duty
Arduino & Raspberry Pi
Aluminum Alloy
Compatible
Encoder Motors
App-Enabled
Camera Dolly
Support Various Programming Languages
Advertisement

Subscribe to Our Youtube Channel
Related Manuals for Makeblock Ultimate 2.0


Summary of Contents for Makeblock Ultimate 2.0
- Page 1 Ultimate 10-in-1 Robot Kit Infinite Extensibility 10-in-1 Makeblock Co., Ltd. Address: 4th Floor, Building C3, Nanshan iPark, No.1001 Xueyuan Avenue, Nanshan District, Shenzhen, Guangdong Province, China Technical support: support@makeblock.com www.makeblock.com Heavy-duty Arduino & Raspberry Pi Aluminum Alloy Compatible Robotic Arm Tank...
- Page 2 Ultimate 2.0 is a flagship robot kit of Makeblock platform. It contains various mechanical parts and electronic modules, allowing you to build more complicated robots and develop your creativity. Get started and build your own Ultimate 2.0 for exploring more interesting cases! Note: This user manual includes building instruction for the three main building forms.
- Page 3 By adding a smartphone or a digital Control your robot with smartphone, Ultimate 2.0 supports graphical Check the parts of Ultimate 2.0 Explain in detail how to use the programming to realize more interest- according to the Part List .
-
Page 4: Part List
4× Beam0824-016 4× Stiffener1616-08-M4 4× Brass Stud M4×16 1× Makeblock Robot Gripper to education field and all kinds of matches. It is based on Arduino MEGA 2560 and supports programming Raspberry Pi Communication with Arduino IDE perfectly. MegaPi can be divided into 6 function area, allowing you to connect with 5×... -
Page 5: Electronic Modules
Basic Knowledge -- Basic Knowledge -- Electronic Modules Electronic Modules Gyroscope Sensor Me Line Follower Sensor Gyro Sensor is a motion-processsing module. It can be used to measure the angular rate and the acceleration information of your robot or other devices. This gyro sensor Me Line Follower is designed for the line-following robots. -
Page 6: Assembly Tip
With many parts contained in this product, please assemble the Ultimate2.0 exactly as the steps in this instruction to avoid confusion. The Me RJ25 Adapter module converts the standard RJ25 port into six pins (VCC, GND, S1, S2, SDA, and SCL) so that they can be easily drawn out from Makeblock Pay especially attention to the mark of "O"... - Page 7 Basic Knowledge -- Assembly Requirement 2. Make sure to tighten the screw and the nut. Please assemble the robot in strict accordance with the following three requirements, otherwise it will result in inaccuracy or unsatisfying performance. Tighten the screw with force according Tighten the screw with force according to the direction of the diagram to the direction of the diagram...
- Page 8 3. Assembly Requirements ① Disassemble Gear 8T ② Tighten the Headless Set Screw and make sure the screw is pushing against the D-shape plane ③ Headless Set Screw require alignment with the D-shaped plane...
- Page 9 Reference I for Parts (Ratio 1:1) Reference II for Parts (Ratio 1:1) Beam0412-076 Slider0824-192 Beam0412-092 Beam0412-140 Slider0824-176 Beam0412-188 Beam0824-128 Beam0412-220 D shaft D4×50mm Shaft D4×88mm Beam0824-064 D shaft D4×160mm 4060 Plastic Rivet Plastic Ring 4×7×2 Screw M4×8 Countersunk Screw M3×8 Countersunk Screw M3×10 Plastic Ring 4×7×3 Plastic Rivet 4100...
- Page 10 Robotic Arm Tank 0412-188 0824-128 M4×8 Encoder Motor 185RPM Shaft Connector 25mm DC Motor Bracket M4×14 Countersunk Screw M3×8 Threaded Hole Pay attention to direction of the motor interface. Encoder Motor A 185RPM Note: Assemble two as shown.
- Page 11 M4×14 M4×14 Nut M4 Nut M4 tool Headless Set Headless Set Encoder Motor A 185RPM Screw M3×8 Screw M3×8 1.5mm Encoder Motor B 185RPM Back Pay attention to direction of the motor interface. Encoder Motor M4×14 185RPM Nut M4 25mm DC Motor 4×39mm Bracket Countersunk...
- Page 12 Shaft Collar 4mm Plastic Ring 4×7×3 0412-140 Shaft Collar 0824-064 M4×8 Flange Copper Sleeve Plastic Ring 4×7×3 Headless Set Screw M3×5 M4×14 Nut M4 Shaft Collar Flange Copper Sleeve Plastic Ring 4×7×3 Plastic Ring 4×7×3 Headless Set Screw M3×5 Shaft Collar 4mm You have finished building the first structure.
- Page 13 Pay attention to direction ≈4mm of the motor interface. Encoder Motor D4×88 0824-064 86RPM M4×14 25mm DC Motor Shaft Collar Bracket M4x14 Countersunk Flange Copper Sleeve Plastic Ring Screw M3×8 4×7×3 Plastic Ring 4×7×3 Encoder Motor 86RPM Headless Set Screw M3×5 Note: Assemble two as shown.
- Page 14 Shaft Collar Plastic Ring Shaft Collar 4×7×2 Headless Set Plastic Ring 4×7×3 Plastic Ring Screw M3×5 Headless screw M3×5 4×7×3 Headless screw M3×5 Plastic Ring 4×7×2 Headless Set 0412-188 Screw M3×5 0824-032 M4×8 You have finished 80% of the assembly.
- Page 15 3×6 Track 80×139mm 0824-032 Makeblock Gripper M4×8 M4×14 D Shaft D4×50mm D4×50 MegaPi Acrylic Bracket Shaft Collar Battery Holder Headless Set Screw M3×5 Plastic Rivet 4060 Note: Assemble two as shown. 0324-088 Shaft Collar Headless Set M4×8 Screw M3×5 Nut M4...
- Page 16 After assembly, please skip to page 54 for MegaPi Acrylic software instruction. Bracket Plastic Rivet 4100 Motor C (86RPM) Please connect the white and black wires with the sequence shown in the image, Makeblock Gripper then insert the plug to the 4B- and 4B+ port on mainboard.
- Page 17 Beverage Robot 0824-064 M4×14 Bracket 3×3 0324-088 Nut M4 M4×8 25mm Motor Bracket-72T Nut M4 M4×8 M4×14 M4×14 Pay attention to the Nut M4 direction of the Gear 72T. M4×22 0824-032 M4×8 Nut M4 M4×8 M4×22 Note: Assemble two as shown.
- Page 18 ≈75° Pay attention to the angle when assembling. Encoder Motor Shaft Connector M4×8 86RPM Plastic Ring 4×7×3 M4×8 M3×8 Plastic Ring 4×7×2 Encoder Motor 86RPM Threaded Plastic Ring 4×7×3 Hole Countersunk Screw M3×10 Plastic Ring 4×7×2 Flange Copper Sleeve Headless Set Screw M3×8 D4×88 (1) M3×10...
- Page 19 M3×8 Pay attention to direction Pay attention to direction Headless Set of the motor interface. of the motor interface. Screw M3×8 Encoder Motor 185RPM Countersunk Encoder Motor 185RPM B Screw M3×8 Encoder Motor 185RPM A 25mm DC Motor Bracket M4×14 Tire 90T B M4×14 (4) M4×16 (4)
- Page 20 Now take a look at the cool things you have built. M4×8 0824-032 Back Tire 90T B M4×8 Front 4×39mm M4×8 Flange Copper Sleeve M4×8 M4×14 (2) 0824-192 M4×8 M4×14 Nut M4 0412-188 0412-092 Shaft Collar M3×5 Shaft Collar Headless Set 1616-08-M4 Screw M3×5 0324-088...
- Page 21 M4×8 M4×14 0412-076 0412-076 M4×8 0412-092 M4×22 Nylon Lock Nut M4 M4×8 Bracket 3×3 M4×14 (4) Nut M4 M4×14 Flange Copper Sleeve Nut M4 M4×8 Note: Assemble two M4×14 as shown. M4×22 Nylon Lock Nut M4 To correctly assemble the main board onto the acrylic bracket, please pay attention to the direction of the arrows on the bracket.
- Page 22 Assembled Diagram NOTE: Please check whether the screw is tightened according to the instruction. If the robotic bartender can’ t work normally, please refer to FAQs for answers. 0824-128 M4×8 M4×8 M4×14 M4×22 M4×14 M4×22 Nut M4 100% Nut M4 100% Completed! Motor C (86RPM)
- Page 23 Camera Dolly 0824-176 Bracket 3×3 M4×8 Plastic Ring 4x7x2 Flange Copper Shaft Collar Sleeve 4×39mm tool Flange Copper Sleeve 1.5mm Plastic Ring 4×7×2 Note: Assemble two as shown. Headless Set Screw M3×5 Nut M4...
- Page 24 0824-016 Tire 90T B 0324-056 25mm Motor Bracket-72T M4×16 Pressure Threaded Hole Shaft Connector 4mm Shaft Collar Flange Copper Sleeve Flange Copper Sleeve M4×22 Headless Set M3x5 Screw M3×5 Note: Pay attention to the direction when assembling. Encoder Motor 86RPM Encoder Motor D4×88 86RPM...
- Page 25 Shaft Connector 0824-64 0824-32 Headless Set Screw M3×8 M4×14 M4×8 Threaded Hole Plastic Ring 4x7x3 0412-76 Shaft Connector Plastic Ring 4×7×3 Plastic Ring 4x7x10 M4×14 M4×14 Headless Set Screw M3×8 Note: Please check the M3×8 Plastic Ring 4x7x10 direction of the P3 bracket. 6 6 6 D4×160 Tire 90T B...
- Page 26 Pay attention to direction of the motor interface. Encoder Motor Encoder Motor 185RPM 185RPM Encoder Motor 25mm DC Motor 185RPM Bracket Countersunk Screw M3×10 Countersunk Screw M3×8 M4×14 M3×8 Encoder Motor 185RPM Nut M4 M4×22 0412-220 M4×14 7×9-B 0824-64 Quick Release Plate Plane Bearing Turntable Brass Stud M4x16...
- Page 27 Assemble mobile phone onto the robot 100% 100% Completed! MegaPi Acrylic Bracket Mobile Phone Battery Holder Bracket 4060 Plastic Rivet 0324-88 M4×30 To correctly assemble the main board onto the acrylic bracket, Nut M4 please pay attention to the direction of the arrows on the bracket. MegaPi Shield for RJ25 Encoder/DC Motor...
- Page 28 (185RPM) Wiring Port 3 Port 2 Motor A (86RPM) Port 1 Visit learn.makeblock.com/ultimate2/ for detailed assembling instructions and 3D models of other forms. After assembly, please skip to page 54 for Motor B (185RPM) software instruction. Rolling Tank Catapult Ram...
- Page 29 (IDE) and the core libraries. The IDE is written in Java and based on the Processing Development Environment. More Info: www.arduino.cc 3. Get to know how to use the Makeblock App with Ultimate 2.0, please visit learn.makeblock.com/ultimate2-play-with-app/ Required System: Windows/Mac/Linux Online Arduino Tutorials This online tutorial is great for beginners who want to learn about the basics of writing code while having fun playing with Ultimate 2.0.
- Page 30 firmware and upgrade it for MegaPi via Micro USB. Q6. Where can I find the instruction for other building forms? a. Visit learn.makeblock.com/ultimate2/ for more building instructions of Ultimate 2.0 robot kit.vt Me Joystick See more on Makeblock platform is normally used to control www.makeblock.com...
-
Page 31: Fcc Information
FCC Ultimate 2.0 Further exploration -- More Kits FCC Information This device complies with part 15 of the FCC Rules. Operation is subject to the following two conditions: (1) This device may not cause harmful interference, and (2) this device must accept any interference received, including interference that may cause undesired operation. -
Page 32: Battery Notes
ALL IMPLIED WARRANTIES, INCLUDING THE IMPLIED WARRANTY OF MERCHANT ABILITY AND, IF APPLICABLE, THE IMPLIED WARRANTY OF FITNESS FOR APARTICULAR PURPOSE, SHALL EXPIRE ON THE EXPIRATION OF THE STATED WARRANTY PERIOD. EXCEPT AS DESCRIBED ABOVE, THE WARRANTOR SHALL HAVE NO LIABI LITY OR RESPONSIBILITY TO THE PURCHASER OF THE PRODUCT OR ANY OTHER PERSON OR ENTITY WITH RESPECT TO ANY LIABILITY , LOSS OR DAMAGE CAUSED DIRECTLY OR INDIRECTLY BY USE OR PERFORMANCE OF THE PRODUCT OR ARISING OUT OF ANY BREACH OF THIS WARRANTY , INCLUDING, BUT NOT LIMITED TO, ANY DAMAGES RESULTING FROM INCONVENIENCE AND ANY LOSS OF TIME, DATA, PROPERTY , REVENUE, OR PROFIT AND ANY INDIRECT , SPECIAL, INCIDENTAL, OR CONSEQUENTIAL DAMAGES, EVEN IF THE WARRANTOR HAS BEEN ADVISED OF THE POSSIBILITY OF SUCH DAMAGES.
Need help?
Do you have a question about the Ultimate 2.0 and is the answer not in the manual?
Questions and answers