Advertisement
Quick Links
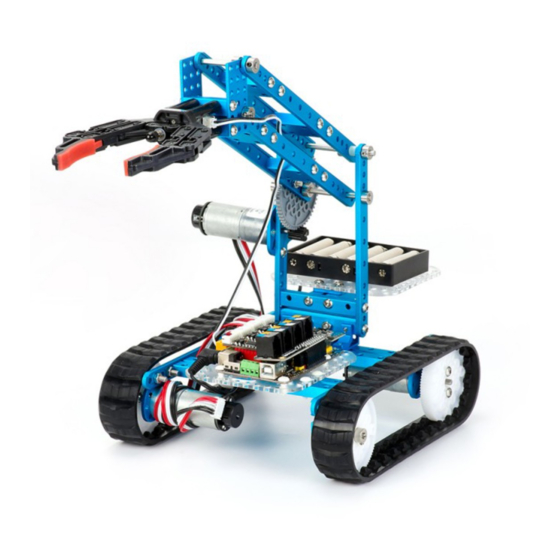
Ultimate
2.0
10-in-1 Robot Kit
Infinite
Extensibility
10-in-1
Makeblock Co., Ltd.
Technical Support: tec-support@makeblock.com
www.makeblock.com
Heavy-duty
Arduino & Raspberry Pi
Aluminum Alloy
Compatible
: @Makeblock
: @Makeblock
: +Makeblock
Robotic Arm Tank
Encoder Motors
App-Enabled
Beverage Robot
Camera Dolly
MegaPi
Make & Control Your Own Robot
inside
Support Various Programming Languages
TM
Advertisement

Related Manuals for Makeblock Ultimate 2.0


Summary of Contents for Makeblock Ultimate 2.0
- Page 1 Ultimate 10-in-1 Robot Kit Infinite Extensibility 10-in-1 Makeblock Co., Ltd. Technical Support: tec-support@makeblock.com www.makeblock.com Heavy-duty Arduino & Raspberry Pi Aluminum Alloy Compatible : @Makeblock : @Makeblock : +Makeblock Robotic Arm Tank Encoder Motors App-Enabled Beverage Robot Camera Dolly MegaPi Make & Control Your Own Robot...
- Page 2 Ultimate 2.0 is a flagship robot kit of Makeblock platform. It contains various mechanical parts and electronic modules, allowing you to build more complicated robots and develop your creativity. Get started and build your own Ultimate 2.0 for exploring more interesting cases! Note: This user manual includes building instruction for the three main building forms.
- Page 3 By adding a smartphone or a digital Control your robot with smartphone, Ultimate 2.0 supports graphical program- Check the parts of Ultimate 2.0 Explain in detail how to use the an easier way for you to distinguish and deliver objects.
-
Page 4: Part List
4× Beam0824-016 4× Stiffener1616-08-M4 4× Brass Stud M4×16 1× Makeblock Robot Gripper to education field and all kinds of matches. It is based on Arduino MEGA 2560 and supports program- Raspberry Pi Communication ming with Arduino IDE perfectly. MegaPi can be divided into 6 function area, allowing you to connect 5×... -
Page 5: Electronic Modules
Basic Knowledge -- Basic Knowledge -- Electronic Modules Electronic Modules Gyroscope Sensor Me Line Follower Sensor Gyro Sensor is a motion-processsing module. It can be used to measure the angular rate and the acceleration information of your robot or other devices. This gyro Me Line Follower is designed for the line-following robots. -
Page 6: Assembly Tip
With many parts contained in this product, please assemble the Ultimate2.0 exactly as the steps in this instruction to avoid confusion. The Me RJ25 Adapter module converts the standard RJ25 port into six pins (VCC, GND, S1, S2, SDA, and SCL) so that they can be easily drawn out from Makeblock Pay especially attention to the mark of "O"... - Page 7 Basic Knowledge -- Assembly Requirement 2. Make sure to tighten the screw and the nut. Please assemble the robot in strict accordance with the following three requirements, otherwise it will result in inaccuracy or unsatisfying performance. Tighten the screw with force according Tighten the screw with force according to the direction of the diagram to the direction of the diagram...
- Page 8 3. Assembly Requirements ① Disassemble Gear 8T ② Tighten the Headless Set Screw and make sure the screw is pushing against the D-shape plane ③ Headless Set Screw require alignment with the D-shaped plane...
- Page 9 Reference I for Parts (Ratio 1:1) Reference II for Parts (Ratio 1:1) Beam0412-076 Slider0824-192 Beam0412-092 Beam0412-140 Slider0824-176 Beam0412-188 Beam0824-128 Beam0412-220 D shaft D4×50mm Shaft D4×88mm Beam0824-064 D shaft D4×160mm 4060 Plastic Rivet Plastic Ring 4×7×2 Screw M4×8 Countersunk Screw M3×8 Countersunk Screw M3×10 Plastic Ring 4×7×3 Plastic Rivet 4100...
- Page 10 Robotic Arm Tank 0412-188 0824-128 M4×8 Encoder Motor 185RPM Shaft Connector 25mm DC Motor Bracket M4×14 Countersunk Screw M3×8 Threaded Hole Pay attention to direction of the motor interface. Encoder Motor A 185RPM Note: Assemble two as shown.
- Page 11 M4×14 M4×14 Nut M4 Nut M4 tool Headless Set Headless Set Encoder Motor A 185RPM Screw M3×8 Screw M3×8 1.5mm Encoder Motor B 185RPM Back Pay attention to direction of the motor interface. Encoder Motor M4×14 185RPM Nut M4 25mm DC Motor 4×39mm Bracket Countersunk...
- Page 12 Shaft Collar 4mm Plastic Ring 4×7×3 0412-140 Shaft Collar 0824-064 M4×8 Flange Copper Sleeve Plastic Ring 4×7×3 Headless Set Screw M3×5 M4×14 Nut M4 Shaft Collar Flange Copper Sleeve Plastic Ring 4×7×3 Plastic Ring 4×7×3 Headless Set Screw M3×5 Shaft Collar 4mm You have finished building the first structure.
- Page 13 Pay attention to direction ≈4mm of the motor interface. Encoder Motor D4×88 0824-064 86RPM M4×14 25mm DC Motor Shaft Collar Bracket M4x14 Countersunk Flange Copper Sleeve Plastic Ring Screw M3×8 4×7×3 Plastic Ring 4×7×3 Encoder Motor 86RPM Headless Set Screw M3×5 Note: Assemble two as shown.
- Page 14 Shaft Collar Plastic Ring Shaft Collar 4×7×2 Headless Set Plastic Ring 4×7×3 Plastic Ring Screw M3×5 Headless screw M3×5 4×7×3 Headless screw M3×5 Plastic Ring 4×7×2 Headless Set 0412-188 Screw M3×5 0824-032 M4×8 You have finished 80% of the assembly.
Need help?
Do you have a question about the Ultimate 2.0 and is the answer not in the manual?
Questions and answers