Table of Contents

Related Manuals for Tens EV-806P


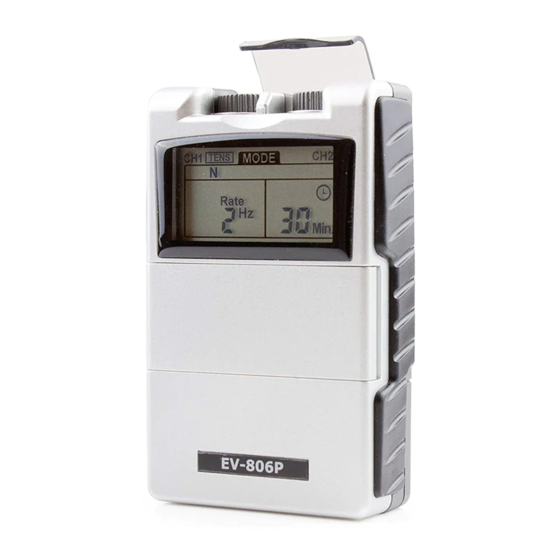
Summary of Contents for Tens EV-806P
- Page 1 The Quick and Easy User Guide for the EV-806P TENS & Neuromuscular Stimulator How to use the Pre-Set Programmes Please read this User Manual before using your Device Tel: 0800 121 4626 www.tensmachineuk.com email: sales@thetenscompany.co.uk...
- Page 2 The TENS+ Company Ltd. Unit 8 Martel Court S. Park Business Park Hamilton Road Stockport SK1 2AF. Tel: 0161 429 7330 Fax: 0161 427 0215 Email: sales@thetenscompany.co.uk www.tensmachineuk.com Company registration number 08961942 Vat registration number 184 9281 69...
-
Page 3: Table Of Contents
CONTRAINDICATIONS ADVERSE REACTIONS WARNINGS SAFETY-TECHNICAL CONTROLS WHICH PROGRAMME SHOULD I USE HOW HIGH SHOULD I TURN THE INTENSITY THE PREMIER PLUS TENS PROGRAMS P1 - P12 HELPFUL TIPS TENS ELECTRODE PLACEMENT MUSCLE STIMULATOR PROGRAMS P13 - P24 ELECTRODE PLACEMENT WARRANTY TECHNICAL SPECIFICATION www.thetenscompany.co.uk... -
Page 4: Step By Step Guide
This extremely easy to use 2 channel stimulator offers 24 medically researched pre- set programmes P1-P12 are pre-set TENS programmes. P13-P12 are pre-set muscle stimulator programmes. To access the controls, open the front cover (opens from the left hand side see Fig B) for control functions. - Page 5 This easy to use instruction manual, explains how to set up the Med-Fit EV-806P in programme mode Install the PP3 9V battery supplied into the compartment at the rear of the device. Fig A STEP BY STEP GUIDE www.thetenscompany.co.uk Telephone: 0800 121 4626...
- Page 6 Choose the desired programme by pressing the mode button located as shown in Fig B. As already described the programmes P1-P12 are TENS programmes and P13-P24 are EMS programmes. You are now ready to use your device. It is recommended to now turn off the device and connect the patient leads to the sockets as shown in Fig C.
-
Page 7: General Description
TENS does not cure any physiological problem; it only helps control the pain. TENS does not work for everyone; however, in most patients it is effective in reducing or eliminating the pain, allowing for a return to normal activity. -
Page 8: Adjusting The Controls Using The Manual Adjustment
1. Panel Cover: A lid covers the controls for selecting mode and adjusting settings. Your medical professional may wish to set these controls for you and request that you leave the cover in place. 2. Power On/Off Switch and Intensity Controls: If both controls are in the off-position, the device is switched off. - Page 9 3. Mode Control There are 5 TENS modes(B, N, M, SD1, SD2) and 2 EMS modes (S, A) available. The mode can be selected by pressing the “Mode” control. When a TENS mode is selected, the LCD shows “TENS” on the top. When EMS mode is selected, the LCD shows “EMS” on the top.
- Page 10 There are 5 modes of your option including –B(Burst), M(Normal), M (Modulation), SD1 and SD2. When a TENS mode is selected, it shows “TENS” on the top of liquid crystal display. After a mode is selected, always press “Set” to enter next setting, and press “Increment or “Decrement”...
- Page 11 “SET” control to enter this menu, then press “Increment” or “Decrement” to adjust the setting. Press “Increment” control when the timer shows 60 minutes, it will be switched to continuous stimulation. ADJUSTING THE CONTROLS FOR TENS Continuous www.thetenscompany.co.uk Telephone: 0800 121 4626...
- Page 12 10. Steps to Set a EMS Program The settings can be adjusted according to the following steps. f. Turn on the Intensity After the electrodes are placed firmly on skin and the lead wires are plugged in the socket of device, turn the on/off control clockwise. The menu will reveal on LCD.
- Page 13 i. Set On Time The On Time controls the time of stimulation. By pressing the “Set” control, the contraction time can be adjusted. Both channels’ stimulation is cycled on and off by the contraction and relaxation settings. The range is adjustable from 2 seconds to 90 seconds.
- Page 14 k. Set Pulse Width Pulse Width is adjustable from 50 us to 300 us. Press “SET” control to enter this menu, then press “Increment” or “Decrement” to adjust the setting. If no instructions regarding the pulse width are given in therapy, set the control to the suggested 70-120 us setting.
- Page 15 11. Compliance Meter This unit can store 60 sets of operation records. Total treatment time up to 999 hours can be stored. Check & Delete Individual Record Press “Mode” control and turn on the power simultaneously. The LCD will show the number of records and operation time. Press the “Increment” and “Decrement button to check each record.
-
Page 16: Ems Introduction
There is nothing “magic” about Transcutaneous Electrical Nerve Stimulation (TENS). TENS is intended to be used to relieve pain. The TENS unit sends comfortable impulses through EXPLANATION OF EMS the skin that stimulate the nerve (or nerves) in the treatment area. In many cases, this stimulation will greatly reduce or eliminate the pain sensation the patient feels. -
Page 17: Cautions
2. Do not use this device for undiagnosed pain syndromes until consulting a physician. 3. Patients with an implanted electronic device, such as a cardiac pacemaker, implanted defibrillator, or any other metallic or electronic device should not undergo TENS treatment without first consulting a doctor. -
Page 18: Contraindications
1. Safety of powered muscle stimulators for use during pregnancy has not been established. 2. Caution should be used for patients with suspected or diagnosed heart problems. 3. Caution should be used for patients with suspected or diagnosed epilepsy. 4. Caution should be used in the presence of the following: a. -
Page 19: Warnings
6. The packed TENS/ EMS device should be stored and transported under the temperature range of -20°C ~ + 60°C, relative humidity 20%~ 95%, atmosphere pressure 500 hPa~ 1060 hPa. -
Page 20: Safety-Technical Controls
- whether the LCD reveals the menu. If necessary, insert 4 new AA batteries. - for possible damage to the cable. Change the cable if any damage is detected. The EV-806 Digital TENS/EMS devices are in compliance with the following standards: EN 60601-1-2: 2007 Medical electrical equipment -... -
Page 21: Which Programme Should I Use
Increase the intensity to a sensation which is comfortable and always perceptible; never turn up to a level which is strong and uncomfortable. You may use TENS if required for long periods of time to combat long term chronic pain, however, please remember to place the electrodes in slightly different areas around the painful site, as this will help reduce skin irritation. - Page 22 Neck, Shoulder, Elbow Pain, Rheumatic Pain, Lumbago, Hip Pain, CONDITIONS Osteoarthritic Pain in the knee Burst TENS - Most effective for radiating pain if arms 180µs and legs and deep muscular pain CONDITIONS...
-
Page 23: Helpful Tips
Once you have familiarised yourself with the controls and features of your TENS device, it is important to place the TENS electrodes in a position which gives the most pain relief. This may take 3 or 4 attempts to find the most suitable position, for maximum pain relief. -
Page 24: Tens Electrode Placement
P8, P9, P10, P11, P12 P8, P9, P10, P11, P12 Degenerative Arthritis: Chronic Hip Pain Cervical and Lumbar Primary Placement Primary Placement Alternative Placement TENS ELECTRODE PLACEMENT Suggested Suggested Programmes Programmes P1, P4 P1, P4, P5 Primary Placement Primary Placement... - Page 25 Programmes Programmes P8, P9, P10, P11, P12 P1, P4, P11, P12 Phantom Limb, Lower Sciatica Extremity Primary Placement Primary Placement TENS ELECTRODE PLACEMENT Suggested Suggested Programmes Programmes P8, P9, P10, P11, P12 P2, P4, P5 Primary Placement Primary Placement Alternative Placement www.thetenscompany.co.uk...
- Page 26 P8, P9, P10, P11, P12 Degenerative Arthritis - Primary Placement Carpal Tunnel Syndrome Knee Pain Primary Placement Alternative Placement Primary Placement Alternative Placement TENS ELECTRODE PLACEMENT Elbow & Forearm Pain Suggested Suggested Programmes Programmes P2, P3, P4, P5 Primary Placement Alternative Placement...
- Page 27 Programmes P8, P9, P10, P11, P12 P2, P3, P4, P5 Cervical Placement Chronic Cervical Strain Primary Placement Primary Placement Alternative Placement Alternative Placement TENS ELECTRODE PLACEMENT Suggested Suggested Programmes Programmes P1, P5, P12 P1, P10, P12 Primary Placement Primary Placement...
-
Page 28: Muscle Stimulator Programs
Both these models have programmes P13-P24 These 12 individual electronic muscle stimulator (E.M.S) programmes have been clinically proven for the treatment of 1. Muscle Re-Education 2. Muscle Training 3. Muscle Strengthening 4. Muscle Toning Please refer to the electrode placement charts provided for recommended treatment time and suggested programmes. -
Page 29: Electrode Placement
Arms Biceps Suggested Suggested Programmes Programmes P20 - P24 P20 - P24 You men want to gain This position is useful more volume and you for muscle training and women are fed up with for gaining volume Deltoid Deltoid & Anterior Fascia this little bit of skin using the devices' that dangles under... - Page 30 Deltoid Posterior Fascia Latissimus Suggested Suggested Programmes Programmes P14, P20 - P24 P14, P20 - P24 Thigh Internal Thigh ELECTRODE PLACEMENT Suggested Suggested Programmes Programmes P14, P15, P17, P14, P15, P17, P20 - P24 P20 - P24 For you men, this But for you women, this strengthening brings area, which is very...
- Page 31 Gluteals The Trapezius Muscles and Dorsals Suggested Suggested Programmes Programmes P20 - P24 P14, P15, P18, P20 - P24 This position is ideal for shaping the gluteal muscle. The Legs and Calves The Abdominals ELECTRODE PLACEMENT Suggested Suggested Programmes Programmes P15, P16, P18, P15, P16, P18, P20 - P24...
- Page 32 The Abdominals The Pectorals Suggested Suggested Programmes Programmes P14, P15, P20 - P24 P14, P15, P19 - P24 These muscles are very BE SURE to follow the difficult and painful to positioning. work on. So, go on, the DO NOT POSITION ON electrodes positioned THE HEART AREA ! like this will allow you...
-
Page 33: Warranty
Manufacturer: All EV-806 Digital TENS/EMS models carry a warranty of one year from the date of delivery. The warranty applies to the stimulator only and covers both parts and labor relating thereto. The warranty does not apply to damage resulting from failure to follow the operating instructions, accidents, abuse, alteration or disassembly by unauthorized personnel. -
Page 34: Technical Specification
Ramp Time Adjustable, 1~8 seconds, 1 Sec./ step, The “On” time will increase and decrease in the setting value. Mode Five TENS Modes: B(Burst), N(Normal),M (Modulation),SD1( Strength Duration), SD2 Two EMS Modes: S(Synchronous), A (Alternate) TECHNICAL SPECIFICATIONS Burst Mode Burst rate: Adjustable, 0.5 – 5Hz Pulse width adjustable, 50~300µs... - Page 35 The technical specification details of Comfy Stim® are as follows: MECHANISM TECHNICAL DESCRIPTION SD2 Mode The SD2(Strength-Duration) mode consists of automatic modulation intensity and pulse width in 70% range. The intensity is always increasing while the pulse width is decreasing and vice-versa. The intensity is decreased by 70% while the pulse width is increased by 70% in 5 seconds.
- Page 36 0800 121 4626 0161 427 0215 Tel: Fax: www.tensmachineuk.com...
Need help?
Do you have a question about the EV-806P and is the answer not in the manual?
Questions and answers