Table of Contents
Advertisement
Quick Links
Advertisement
Table of Contents

Related Manuals for Kipp & Zonen RaZON+


Summary of Contents for Kipp & Zonen RaZON+
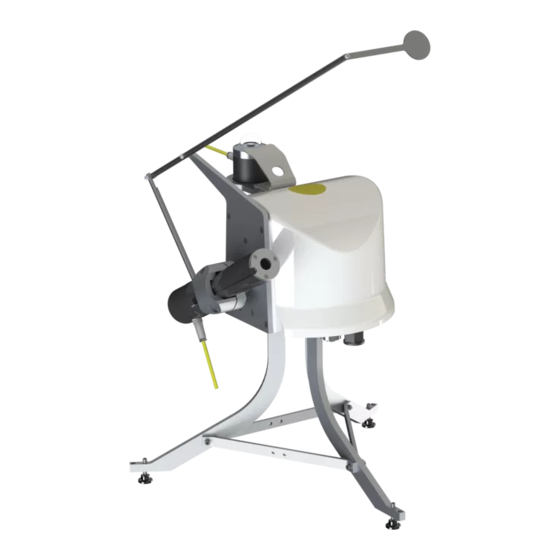
- Page 1 Instruction Manual RaZON • Solar Monitoring System...
-
Page 3: Important User Information
Important User Information Dear customer, thank you for purchasing a Kipp & Zonen instrument. Completely reading this manual is essential for understanding the proper use and safe operation of this product. Should you have any comments on this manual please send them to: Kipp &... -
Page 5: Declaration Of Conformity
Declaration of Conformity Kipp & Zonen B.V. Delftechpark 36, 2628 XH Delft P.O. Box 507, 2600 AM Delft The Netherlands declares under our sole responsibility that the product RaZON Solar Monitoring System to which this declaration relates, is in conformity with European Harmonised Standards as published in the Official Journal of the EC, based on the following standard EN 61326-2-1:2013 and EN 61326-2-3:2013 [EMC - Emissions]... -
Page 7: Table Of Contents
Table of Contents Important User Information ......................................................................Declaration of Conformity ........................................................................General information ....................................................................Intended use of the RaZON ................................................................. Introduction to the RaZON ................................................................Included with the RaZON All-IN-ONE Solar Monitoring System ..........................................Included with the RaZON Smart Solar Monitoring Base .............................................. - Page 8 RaZON PH1 Pyrheliometer ..............................................................Electrical connection PR1 and PH1 ............................................................. Internal desiccant ......................................................................Communication to the host ..............................................................Ethernet interface ......................................................................Serial interface to host ................................................................... Serial interface, AUX in port ................................................................RaZON connecting to the web interface ........................................................6.4.1 Wi-Fi conection ........................................................................
-
Page 9: General Information
1. General information Throughout this manual the following symbols are used to indicate to the user important information. Caution, refer to accompanying documents Protective conductor terminal DC, Direct Current Important, indicating a point of consideration Note Useful information for the user Useful information for the user 1.1 Intended use of the RaZON The RaZON... - Page 10 Pyrheliometer connection WiFi (optional) Pyranometer connection RS-485 to host DC Power input 20 to 30V, 15W East Ethernet 10/100 RS-232 / RS-485 Aux in Reset switch Cable mounting RaZON with tripod, bottom view...
-
Page 11: Included With The Razon + All-In-One Solar Monitoring System
1.3 Included with the RaZON All-IN-ONE Solar Monitoring System • RaZON tracker • Shading Assembly (bars and disc plus the required screws) • DC power connector • Tools for mounting shading rod and disc • The PR1 and PH1 are pre-mounted 1.4 Included with the RaZON Smart Solar Monitoring Base •... -
Page 13: Specifications
2. Specifications 2.1 Specifications of the RaZON All-IN-ONE Pointing accuracy 0.2 ° Payload Sufficient for 1 pyranometer and 1 pyrheliometer Angular velocity 30 °/s Rotation 110 ° zenith, 600° azimuth Protection against over rotation Physical limit stops Supply voltage 20 to 30 VDC, nominal 24 VDC Power 13 W Humidity... -
Page 14: Specifications Of The Pr1 Smart Pyranometer
2.2 Specifications of the PR1 Smart Pyranometer Classification to ISO 9060:1990 Second Class Response time < 0.2 s (95%) Response time < 0.1 s (63%) Spectral range 310 to 2700 nm (50% points) Zero o sets thermal radiation 1 W/m (at 200 W/m²) temperature change 1 W/m... -
Page 15: Installation
3. Installation This chapter explains the installation of the RaZON including the connection of the power cable. The installation is explained step by step in the following paragraphs. Once the mechanical mounting is finished and power is connected the fine tuning and final check can be done via Ethernet or Wi-Fi with a PC, tablet or smartphone. -
Page 16: Site Preparations
Small screwdriver for connection of power cable to the connector Flexible cable for 24 VDC power connection of the RaZON Flexible data cable for RS-485 or Ethernet Compass to find geographical East Depending on the surface where the RaZON is mounted, the material to secure the tripod or pole mount to the floor or pole is required. 3.3 Site preparations Before installation of a RaZON the site must be prepared. - Page 17 Ø 492 mm Minimal Operation Area Ø 720 mm Rotation Axis 242 mm 338 mm Minimum Operating Area (with Shading Assembly)
-
Page 18: Mounting The Tripod Stand
3.5 Mounting the tripod stand The tripod comes as a kit that needs to be assembled, all bolts and washers are provided. It is advised to mount the tripod while the RaZON is still in its box. While the RaZON bottom flange is facing up, it is easier to mount the tripod this way. - Page 19 M4x10mm flat head srews (3x) Mounting RaZON on the tripod Note From the RaZON bottom flange the E-marking and one tripod leg have to be pointed to the East! The tripod feet have 7 mm mounting holes to fix the RaZON to a firm base.
-
Page 20: Mounting The Pole Mount
3.6 Mounting the Pole Mount The pole mount can be used to install the RaZON on a small surface like an extension tube or pole. The bottom flange of the pole mount has 4 holes for M10 bolts to secure it to the pole or tube. It is advised to mount all pole mount screws while the RaZON is still in its box. - Page 21 Step 4: Add the 3 levelling screws (e) to the top flange of the pole mount. There is thread in the top flange and screwing the adjustment screws in through the flange will raise the RaZON on that side. Enabling the levelling of the RaZON Only a er finishing the levelling and azimuth adjustment the RaZON can be secured fully by tightening the screws (d) from step 3.
-
Page 22: Tracker Orientation
3.7 Tracker orientation The RaZON should be mounted in such a way that one leg of the tripod is pointing East. The pole mount should be orientated such that the E-marking on the RaZON bottom flange is pointing East. Both mounting devices allow a plus and minus 30 degree play (slit hole) to fine adjust the RaZON a er the mounting is fixed. -
Page 23: Pyranometer Mounting
3.8 Pyranometer mounting The PR1 is pre-mounted with 3 M4 bolts to the pyranometer mounting plate on top of the RaZON . If any other SMP pyranometer has to be mounted the standard supplied M5 x 80 bolts have to be used. M4 x 16 mm screw M4 locking ring M4 locking ring (3x) -
Page 24: Pyrheliometer Mounting
3.9 Pyrheliometer mounting The PH1 comes pre-fitted on the side of the RaZON . If the RaZON is ordered with a SHP1 it has to be mounted using 2 x 5 mm bolts and washers. For the SHP1 it is important to mount it with the 2 alignment target on top. The PH1 alignment target is on the (outer) side of the pyrheliometer. -
Page 25: Shading Assembly Mounting
3.10 Shading assembly mounting The shading assembly needs to be completed with the two sections of the long rod as indicated above. First mount the section with the 2 screws as indicated on the le . Then mount the top section with the shading disc. The standard RaZON with the PR1 is supplied with the short section and small shading disc. -
Page 26: Levelling
3.11 Levelling Prior to activating the RaZON , it must be levelled on its mounting surface. To help accomplish this task, the RaZON is equipped with a high accuracy bubble on top of the housing. Adjust the levelling feet on the tripod stand or the tilting bolts in the pole mount to move the bubble into the centre of the level. -
Page 27: Connecting Dc Power Cable
3.13 Connecting DC power cable This section will explain how to make and connect your power cable to power the RaZON Pyrheliometer connection USB WiFi connector RS-485 to host Reset switch Pyranometer connection DC Power input 20 to 30V, 15W East Ethernet 10/100 RS-232 / RS-485 Aux in... - Page 28 The pin numbers and ground connection for the individual wires are visible inside the connector. The ground connection is raised slightly above the other connections. Male connector (included) Hirschmann: CA 3 LS Cable connections: 1 = Red (+24 VDC) 2 = Black (24 VDC GND) = Green/Yellow (Protective Earth) 9 to 12 mm 6 to 9 mm...
-
Page 29: Set-Up Without Using Ethernet Or Wi-Fi Enabled Smart Device
3.14 Set-up without using Ethernet or Wi-Fi enabled Smart device It is possible to set-up the RaZON without any PC or communication, under the following conditions: - RaZON is in factory default mode (press reset button for 10 seconds during power on) - RaZON is levelled - One leg of the tripod is pointing East (or E-marking on the pole mount) - Page 30 Contacts at this side Mounting the Wi-Fi stick in the waterproof enclosure Re-mount the waterproof cover. A er power on the Wi-Fi connection will be available within 1 or 2 minutes. The RaZON has its own web page and acts like a hot spot, but has no real Internet connection. To connect open the Wi-Fi setting on your smart device or PC and look for the SSID of the RaZON (it is razon<serial number>).
-
Page 31: Web Interface
3.16 Web interface 3.16.1 Menu bar and Dashboard The above screen shows the menu bar and its first item, the dashboard. The menu bar on the le can be opened (and closed) with the icon on top of the page and shows all options you can choose from. The dashboard on the right gives on top an overview of its operating status. -
Page 32: Instrument Status
3.16.2 Instrument Status The second item from the menu bar shows the status of all di erent RaZON+ parts, including the connected sensors. For correct operation all item states should be green (Success). When the radiometers for Direct and Di use (Device) are not connected they do not show up, so don’t give an error. -
Page 33: Logging
3.16.3 Logging The logging menu has two options, Export or Chart. Export will download and save the data over the selected time interval. You are prompted for the start and end date of the data to be exported. You can enter the date yourself or click on the agenda for an overview. The present date is indicated in blue, the selected date will show up in orange. -
Page 34: Chart
3.16.4 Chart Chart allows you to show and save a graph. The buttons Today / Week / Month will give you a quick view over the selected interval. Or a specific start and end date can be entered. The download is done per graph by clicking on the icon in the top right hand corner. The graphs will be transferred in .png format. -
Page 35: Device Configuration
3.16.5 Device configuration Device configuration shows the connected sensors with serial number and Modbus® address and allows you to a add a new device. The Add Device button shows a list of sensors you can choose from and prompts you for an (unused) Modbus® address. A er adding the new device it should appear in the configuration list as last device. -
Page 36: Communication
3.16.6.2 Communication This page allows you to set the communication parameters of the RS-485 communication to your Host (PC, PLC or data collecting device). Also the protocol can be set to either ASCII or Modbus®. Save will store these settings. Details about the communication protocol are given in the chapter about the serial interface. -
Page 37: Installation
3.16.7 Installation The Installation menu is used to assist you during the set-up of the RaZON . It allows you to do all the required checks to set it up and align it to the sun. The menu will guide you through 5 steps. Each step can be confirmed with [Done√] when completed or return to the Installation Done menu, with [Back]. -
Page 38: Gps
3.16.7.2 GPS A proper 3D fix is required for proper operation. The RaZON needs to know where it is and have an accurate clock. Remember that indoor operation (for testing) can lead to unpredictable results when the location and clock are not synchronised. When GPS Status shows a 3D fix, your local longitude and latitude are shown below. -
Page 39: Azimuth Fine
3.16.7.5 Azimuth Fine Important: Before starting the alignment please verify the following conditions: - RaZON needs to be supplied with power (24 VDC -16%, +25%) - RaZON is sun tracking (not demo mode) - Sun with unobstructed sky (DNI >300 W/m ) is required - The RaZON is correctly levelled (RaZON... -
Page 40: Operating System / Os Overview
3.16.8 Operating System This shows a list with system information, hardware and so ware revisions and serial number. This information is good to have at hand when communicating about the RaZON with our local distributor or Kipp & Zonen o ices. 3.16.9 Contact On this page our Kipp &... -
Page 41: Razon + Pr1 Pyranometer
4. RaZON PR1 Pyranometer The RaZON standard pyranometer is the PR1. This pyranometer is equipped with a quartz di usor, spherical dome and a fast detector. It has the smart interface to communicate over RS-485, Modbus® RTU with the RaZON . -
Page 43: Razon + Ph1 Pyrheliometer
5. RaZON PH1 Pyrheliometer The RaZON standard pyrheliometer is the PH1. This pyrheliometer has a quartz di usor, fast detector and removable collimation tube. The reason the detector part and the tube can be separated it to check whether the detector is clean. The anti-soiling design of the collimation tube keeps dust and dirt from the detector. -
Page 45: Communication To The Host
6. Communication to the host The RaZON has 2 communication ports to communicate with its host. An Ethernet connection and an isolated RS-485 port. Both options are described below and how to connect the cables. The second RS-232/485 interface (AUX in) is for connecting extra smart radiometers or a compact (Modbus®) weather station. 6.1 Ethernet interface This section describes how to mount the Ethernet cable and how to communicate with the RaZON via Ethernet... - Page 46 Mounting the upper part of the Ethernet cable gland and nut A er the Ethernet connector is properly inserted the upper part of the Ethernet cable gland can be screwed in the housing. Push the cable upwards, so the connector remains in place. Please note that only the lower part (nut) of this connector needs to be unscrewed when removing the connector / cable again.
-
Page 47: Serial Interface To Host
6.2 Serial interface to host This chapter describes the physical RS-485 connection between the RaZON and the host. This can be a PC or other connected device like server or data logger. The serial communication is based on client-server architecture. The RaZON is the server, providing the information. -
Page 48: Serial Interface, Aux In Port
Pin Layout (instrument) Blue Green Yellow Grey Brown White Black Via the RaZON web interface under System configuration/communication, the communication parameters can be changed. A complete description of the serial communication protocol can be found in the Appendices. Color Signal Direction Description Host connection... -
Page 49: Razon + Connecting To The Web Interface
6.4 RaZON connecting to the web interface The RaZON needs no PC so ware. Both the Ethernet connection and the Wi-Fi connection use the RaZON web interface and your standard web brouwser. 6.4.1 Wi-Fi conection When using the optional Wi-Fi connection the Wi-Fi stick needs to mounted in the USB port, located on the bottom of the RaZON The RaZON acts as a hotspot, but is not connected to the Internet. -
Page 51: Maintenance
7. Maintenance The RaZON itself does not need any maintenance. The following things can be checked on visiting intervals: - Periodically check the condition of all cables and connectors - Check if bubble level is still within range - Check the alignment of the pyrheliometer - Check the radiometers and clean if required •... -
Page 53: Trouble Shooting
8. Trouble shooting The RaZON is designed for long periods of operation with no operator maintenance. However, if a problem occurs that cannot be corrected by using the standard operating information supplied in the preceding sections of this manual, use the information in this chapter to identify and solve the problem. -
Page 54: Faq
8.2 FAQ Q: I have a problem with the aligning the RaZON A: Proper placement of the RaZON is important when installing it, as it requires a specific amount of free space to operate. Make sure the tripod is placed on a solid base. Keep in mind that final alignment is only possible when the sun is shining. -
Page 55: So Ware Overview
9. So ware overview The so ware used in the RaZON contains open source components that is listed on our website. 9.1 Solar position algorithm The Solar Position Algorithm the RaZON is using is developed by Ibrahim Reda and Afshin Andreas from NREL. Their report (NREL/TP-560-34302) describes a procedure for a Solar Position Algorithm (SPA) to calculate the solar zenith and azimuth angle with uncertainties equal to ±0.0003°... -
Page 56: Firmware Upgrade
9.2.1 Firmware upgrade RaZON firmware update procedure Tools - Windows computer • Browser, preferably Chrome, it displays upload progress. Other browsers may be used • Standard Ethernet cable - RaZON system Perform the update - Connect the RaZON with a (straight) Ethernet cable to your LAN - Make sure the RaZON receives an IP address from your DHCP server - Browse on your PC to http://razonyynnnn:81, where yynnnn is the serial number... -
Page 57: Appendices
Appendices Modbus® RTU slave application protocol Introduction This document describes the Modbus® RTU slave application protocol of RaZON . The purpose of the protocol is to make instrument measurements, status and identification available for logging using the Modbus® protocol. The protocol does not allow configuring the instrument or interface. Configuration must be done using the instrument’s user interface. The detailed status flags and/or errors of the underlying hardware (motors, processor board, radiometers etc.) is reduced to simple ‘ok’, ‘warning’... - Page 58 Overview Input/holding registers Identification block Register Name Description Default DEVICE_TYPE Device type of RaZON+ DATAMODEL_VERSION Version of the object data model SERIAL_SYSTEM 24-character type and serial number text SERIAL_PYRANO 24-character type and serial number text SERIAL_DIRECT 24-character type and serial number text Measurement data and status block Register Name Description...
- Page 59 Description Input/holding registers Identification block The identification block holds information about system, instrument and device identification. Updating the contents is a background task, which typically happens once per minute. DEVICE_TYPE The device type identifies the type of RaZON+ system. The register address is identical across Kipp & Zonen Modbus® devices. The register values are unique w.r.t.
- Page 60 Measurement data and status block The measurement data and status block holds information which is updated atomically at a predefined interval. Register IV_LEN indicates the length of the interval. IV_DATE IV_DATE holds the date at the end of the averaging interval. The date is stored as a 32-bit unsigned integer according the format ‘YYYYMMDD’...
- Page 61 IV_AIR_PRESSURE IV_AIR_PRESSURE is the derived air pressure at the end of the averaging interval. This is the value being used by the internal sun tracking process and derived from the mean altitude. The mean altitude is a moving average over 30 seconds and only updated if deviating more than 50 m from the currently active altitude.
- Page 62 IV_SUNSHINE_DURATION IV_SUNSHINE_DURATION is the sunshine duration in hours since solar midnight or system startup. Direct irradiance samples of more than 120 W/m contribute to sunshine duration. The sample rate is 1/s. IV_GLOBAL_SUM IV_GLOBAL_SUM is the global irradiance based energy in kWh/m since solar midnight or system startup. Calculated or measured global irradiance samples are being used to calculate the global sum.
- Page 63 Discrete inputs/coils PYRANO_DIFFUSE PYRANO_DIFFUSE indicates whether the di use irradiance is being calculated or measured. Value Description Di use irradiance calculated, global irradiance measured using the pyranometer Global irradiance calculated, di use irradiance measured using the pyranometer...
-
Page 64: Modbus Tcp Slave Application Protocol
MODBUS TCP Slave Application Protocol Introduction This section describes the MODBUS TCP slave application protocol of the RaZON . The protocol is a subset of the MODBUS RTU slave application protocol. The di erences are highlighted. Supported commands The MODBUS TCP slave application protocol supports the following MODBUS function codes: (0x01) Read Coils (0x02) Read Discrete Inputs (0x03) Read Holding Registers... -
Page 65: Ascii Serial Communication Protocol
ASCII Serial Communication Protocol Description Introduction This appendix describes the serial communication protocol between the RaZON and the HOST. • The RaZON is referred to as the instrument. • Data provided by the instrument is collected and processed by the HOST. •... - Page 66 Client server protocol The instrument provides the information and will send a response on every command from the HOST. Every request from the HOST is acknowledged by 0, 1 or more responses and a prompt. See examples 1 to 3. The instruments transmit a status message periodically.
- Page 67 Description of the messages This chapter describes the definition of the status messages. Each di erent record type has a unique record ID to specify the selected type. Message types The following message types are defined: Message type Simple status message Reserved for future expansion Status messages Status messages are sent automatically every minute when an averaging interval ends or more o en when instrument or system...
- Page 68 Simple status message Description Message Type 0 Simple status message Pos Field name Description Message type Device type Hostname Instrument hostname Serial number pyranometer Pyranometer identification Serial number pyrheliometer Pyrheliometer identification Date Date at end of averaging interval, YYYY-MM-DD Time Time at end of averaging interval, HH:MM:SS Solar angle azimuth Calculated solar angles in degrees at end of averaging interval...
-
Page 69: Ascii Tcp Communication Protocol
ASCII TCP communication protocol description Introduction The ASCII TCP protocol is a subset of the serial communication protocol. This document highlights the di erences. Communication parameters TCP port : 15001 Number of connections : 10 When the server has 10 socket connections and receives a new connection request it will accept the new connection and drop the oldest connection. -
Page 70: Logging File Examples
Logging file examples Example of a logged ASCII data file over RS-485 and terminal program: .status=0;700;RaZON150002;SMP10 130004;SHP1110001;2016-08-01;13:00:00;208.99;36.94;51.997000;4.386300;1013.25;-0.40;-0.20; -0.50;27.8;25.9;0.000;0.002;60;0;0;0;0;1;0xD0B3; .status=0;700;RaZON150002;SMP10 130004;SHP1110001;2016-08-01;13:01:00;209.36;37.01;51.997000;4.386300;1013.25;-0.00;-0.10; -0.10;27.8;26.0;0.000;0.002;60;0;0;0;0;1;0x6D06; .status=0;700;RaZON150002;SMP10 130004;SHP1110001;2016-08-01;13:02:00;209.74;37.09;51.997000;4.386300;1013.25;-0.50;-0.20; -0.60;27.9;26.0;0.000;0.002;60;0;0;0;0;1;0x3FAC; .status=0;700;RaZON150002;SMP10 130004;SHP1110001;2016-08-01;13:03:00;210.11;37.16;51.997000;4.386300;1013.25;-0.50;-0.10; -0.60;27.9;26.0;0.000;0.002;60;0;0;0;0;1;0xB55C; Example of a log information as downloaded over the web interface. sep=, SystemName: RaZON150002 Serialnumber: 150002 Date (dd-mm-yyyy), Time (hh:mm:ss), SolarAzimuth (Degrees), SolarZenith (Degrees), Latitude (Degrees), Longitude (Degrees), AirPressure (mBar), IrrDi use (W/m2),TempDi use (Degrees celcius), IrrDirect (W/m2), TempDirect (Degrees celcius), IrrGlobal (W/m2), Sunshine... - Page 71 Example of a logged ASCII data file via Wi-Fi (Logging / Eport Log File)
- Page 72 Kipp & Zonen B.V. Delftechpark 36 2628 XH Delft T: +31 15 2755 210 info@kippzonen.com www.kippzonen.com Meteorology Division of...
Need help?
Do you have a question about the RaZON+ and is the answer not in the manual?
Questions and answers