AERMEC FCW Series Installation And User Manual
Wall-mounted fan coil unit
Hide thumbs
Also See for FCW Series:
- Installation and user manual (23 pages) ,
- Installation booklet (19 pages) ,
- Installation and user manual (116 pages)
Advertisement
Available languages
Available languages
Quick Links
M A N UA L E
I N S T A L L A T I O N
MANUEL D'UTILISATION ET D'INSTALLATION
BEDIENUNGS- UND INSTALLATIONSANLEITUNG
M A N UA L D E U S O E I N S TA L AC I Ó N
VENTILCONVETTORE PER INSTALLAZIONE A PARETE
WALL-MOUNTED FAN COIL UNIT
VENTILO-CONVECTEUR POUR INSTALLATION MURALE
GEBLÄSEKONVEKTOR FÜR WANDINSTALLATION
ENTILOCONVECTOR PARA INSTALACIÓN DE PARED
FCW
FCW 212V
FCW 312V
FCW 412V
FCW 213V
FCW 313V
FCW 413V
FCW 21VL
FCW 31VL
FCW 41VL
D ' U S O
A N D
FCW 212VN
FCW 312VN
FCW 412VN
FCW 213VN
FCW 313VN
FCW 413VN
FCW 21VLN
FCW 31VLN
FCW 41VLN
IFCW3LJ 1207 - 5375700_00
E
I N S TA L L A Z I O N E
U S E R
M A N U A L
Advertisement

Subscribe to Our Youtube Channel
Related Manuals for AERMEC FCW Series


Summary of Contents for AERMEC FCW Series
- Page 1 M A N UA L E D ’ U S O I N S TA L L A Z I O N E I N S T A L L A T I O N A N D U S E R M A N U A L MANUEL D’UTILISATION ET D’INSTALLATION BEDIENUNGS- UND INSTALLATIONSANLEITUNG...
- Page 3 INDICE • CONTENTS • INDEX • INHALT • ÍNDICE Trasporto • Transport • Transport • Transport • Transporte Dichiarazione di conformità • Declaration of Conformity • Déclaration de conformité • Konformitätserklärung • Declaración de conformidad Italiano English Français Deutsch Español TRASPORTO •...
- Page 4 Il est interdit de faire fonctionner l'appareil avec des accessoires qui ne Falls das Gerät mit Zubehörteilen ausgerüstet wird, die nicht von sont pas fournis de Aermec. Aermec geliefert werden, ist dessen Inbetriebnahme solange untersagt. DECLARACIÓN DE CONFORMIDAD Los que suscriben la presente declaran bajo la propia y exclusiva responsabilidad que el conjunto en objeto, defi...
- Page 5 Il nostro Servizio di Assistenza più vicino, se non conosciuto, può essere richiesto al negozio presso cui l’apparecchio è stato acquistato. Su internet all’indirizzo www . aermec . com potrete trovare la documentazione tecnica di tutti i nostri prodotti e gli indiriz- zi delle reti di vendita e di assistenza.
- Page 6 L e g g e r e a t t e n t a m e n t e tempestivamente il Servizio AERMEC S.p.A. declina ogni c o m p l e t a m e n t e t u t t e Assistenza di zona.
- Page 7 La manutenzione ordinaria, può essere eseguita anche La manutenzione straordinaria deve essere eseguita solo dall’utente, consiste in una serie di operazioni semplici, dai Servizi Assistenza Aermec oppure da soggetti in grazie alle quali il ventilconvettore può operare alla possesso dei requisiti tecnico-professionali di abilitazione massima efficienza.
- Page 8 FCW - VENTILCONVETTORE Il ventilconvettore FCW Aermec è realizzato con materiali di qualità superiore, nel rigoroso rispetto delle normative di sicurezza, "FCW" è di facile utilizzo e vi accompagnerà a lungo nell'uso. Il ventilconvettore è un terminale per il refrigeratore d’acqua.
- Page 9 COMPONENTI PRINCIPALI 1 Pannello frontale 6 Interruttore ausiliario di emergenza 2 Deflettore orizzontale mandata aria 7 Morsettiera collegamenti elettrici 3 Deflettore verticale mandata aria 8 Elemento frontale 4 Filtro aria 9 Telaio 5 Batteria di scambio termico 10 Display TLW2 PFW2 DESCRIZIONE DEI COMPONENTI PANNELLO FRONTALE...
- Page 10 INFORMAZIONI GENERALI • Versioni senza Controllo con scheda • Versioni con Controllo con scheda elettronica a microprocessore: elettronica a microprocessore: Controllo di una rete di fan- Con e senza valvole dell'acqua. Con e senza valvole dell'acqua. coil, più la gestione della pompa di Le versioni senza Controllo con sche- Le versioni con Controllo con sche- calore (se compatibile con il sistema...
- Page 11 INFORMAZIONI IMPORTANTI ATTENZIONE: il ventilconvettore è N O N I N F I L A R E O G G E T T I verticali. collegato alla rete elettrica ed al SULL’USCITA DELL’ARIA Nelle versioni con Controllo con circuito idraulico, un intervento da scheda elettronica a microprocessore Non inserire oggetti di nessun tipo parte di personale non provvisto di...
- Page 12 IMPORTANTE Nota per i ventilconvettori serie FCW dotati di Controllo con scheda elettronica a microprocessore a bordo. - I due modelli di comando, pannello a filo (PFW2) e telecomando (TLW2), non possono essere usati contemporaneamen- te sullo stesso ventilconvettore. – Se il ventilconvettore viene spento tutte le impostazioni precedentemente effettuate vengono mantenute in memoria eccetto che le funzioni SLEEP e TIMER.
- Page 13 FCW CON CONTROLLO CON SCHEDA ELETTRONICA A MICROPROCESSORE - SEGNALAZIONI Quando il ventilconvettore riceve tensione emette un Quando il ventilconvettore è alimentato, ma non è acceso, segnale acustico. tutti i led sono spenti. 1 - DISPLAY TEMPERATURA / CODICE ERRORE - Nel funzionamento normale indica la temperatura.
- Page 14 TLW2 - TELECOMANDO A RAGGI INFRAROSSI IMPORTANTE Nota per i ventilconvettori serie FCW dotati di Controllo con scheda elettronica a microprocessore a bordo. - I due modelli di comando, pannello a filo (PFW2) e telecomando (TLW2), non possono essere usati contemporaneamen- te sullo stesso ventilconvettore.
- Page 15 DISPLAY A CRISTALLI LIQUIDI Con telecomando acceso (ON) il display visualizza le impostazioni date all’unità, con telecomando spento (OFF) il display è spento o visualizza solo il timer per l’accensione programmata (se attivato). 1 - MODALITA’ DI FUNZIONAMENTO Mostra la modalità di funzionamento: ➀...
- Page 16 PFW2 - PANNELLO COMANDI REMOTO A FILO IMPORTANTE Nota per i ventilconvettori serie FCW dotati di Controllo con scheda elettronica a microprocessore a bordo. - I due modelli di comando, pannello a filo (PFW2) e telecomando (TLW2), non possono essere usati contemporaneamen- te sullo stesso ventilconvettore.
- Page 17 PROGRAMMA AUTOMATICO (“AUTO”) Il programma richiede che nell’impianto circoli acqua refrigerata o acqua calda. 1) PREMERE IL TASTO ACCESO-SPENTO Il ventilconvettore entra in funzione. Il ventilconvettore automaticamente si attiva in modo Raffrescamento, Riscaldamento o in banda morta (attesa) in funzione della temperatura dell'acqua.
- Page 18 PROGRAMMA RAFFREDDAMENTO (COOL) Il programma richiede che nell’impianto circoli acqua refrigerata. 1) PREMERE IL TASTO ACCESO-SPENTO Il ventilconvettore entra in funzione. Il ventilconvettore automaticamente si attiva in modo Raffrescamento. 2) REMERE IL TASTO MODE Premere il tasto MODE ripetutamente finchè compare sul display la scritta COOL (TLW2) o il led indica COOL (PFW2).
- Page 19 PROGRAMMA DEUMIDIFICAZIONE (DRY) Il programma richiede che nell’impianto circoli acqua refrigerata. 1) PREMERE IL TASTO ACCESO-SPENTO Il ventilconvettore entra in funzione e si accende il display sull’unità. 2) REMERE IL TASTO MODE Premere il tasto MODE ripetutamente finchè compare sul display la scritta DRY (TLW2) o il led indica DRY (PFW2).
- Page 20 ACCENSIONE PROGRAMMATA TRAMITE TIMER 1) ACCENDERE CON I TASTI – impostare sul telecomando le condizioni (MODE, FAN, TEMP) che desideriamo siano attive al riavvio – spegnere con i tasti 2) ATTIVARE TIMER ON CON I TASTI 3) REGOLARE IL TIMER DI ACCENSIONE CON I TASTI –...
- Page 21 DATI DIMENSIONALI [mm] FCW21 FCW31 FCW41 1172 FCW21 Ø70 FCW31 Ø70 FCW41 1172 Ø70 INSTALLAZIONE DELL’UNITÀ ATTENZIONE: prima di effettuare In particolare per i collegamenti elettrici ventilatore in funzione, la temperatura qualsiasi intervento munirsi di opportuni si richiedono le verifiche relative a: media dell’acqua non deve essere dispositivi di protezione individuale.
- Page 22 dilatazioni termiche degli elementi essere opportunamente dimensionata, (plastici e metallici), ciò comunque non qualora lo scarico condensa sia provoca danni all’unità se non si supera collegato alla rete fognaria, per la massima temperatura di esercizio. evitare ingresso di odori sgradevoli, si Vengono qui riportate le indicazioni consiglia di effettuare un sifone.
- Page 23 s t a t e u l t i m a t e ( c o l l e g a m e n t i elettrici e idraulici, fissaggio del ventilconvettore e collegamento dello scarico condensa) chiudere il foro nel muro con materiale di riempimento.
- Page 24 Collegamenti elettrici Pannello frontale Morsettiera alimentazione elettrica Basamento ATTENZIONE: prima di effettuare onnipolare magnetotermico max. 2A gli schemi elettrici a corredo qualsiasi intervento, assicurarsi che 250V (CIRCUIT BREAKER) con distanza dell’apparecchio. l’alimentazione elettrica sia disinserita. minima di apertura dei contatti di 3mm. Assicurarsi che il cablaggio sia L’...
- Page 25 - INSTALLAZIONE PANNELLO A FILO Per installare il pannello a filo è neces- PFW2 (ACCESSORIO) sario: Accessorio indispensabile al funziona- - scollegare dalla scheda elettronica mento del ventilconvettore, in alter- interna del ventilconvettore il connet- nativa al telecomando TLW2, i due tore (A) del ricevitore IR.
- Page 26 SCHEMI ELETTRICI LEGENDA Interruttore ausiliario di emergenza Componenti forniti optional CAPACITOR = Condensatore COMMON Comune Componenti non forniti Pannello led Collegamento di terra Collegamenti da eseguire in loco ID/OD Sonda temperatura acqua LOW SPEED = Velocità minima (nero) Motore ventilatore MED SPEED = Velocità...
- Page 27 SCHEMI ELETTRICI Gli schemi elettrici sono soggetti ad un continuo aggiornamento, è obbligatorio quindi fare riferimento a quelli a bordo macchina. IFCW3LJ 1207 - 5375700_00...
- Page 28 SCHEMI ELETTRICI Gli schemi elettrici sono soggetti ad un continuo aggiornamento, è obbligatorio quindi fare riferimento a quelli a bordo macchina. IFCW3LJ 1207 - 5375700_00...
- Page 29 Dear customer, Thank you for choosing an AERMEC product. It is the fruit of many years of experience and special design studies and has been made of the highest grade materials and with cutting edge technology. The CE marking indicates that the products comply with the essential requirements of the applicable European Community directives.
- Page 30 OBSERVATIONS Keep the manuals in a dry place For any irregularities not foreseen AERMEC S.p.A. accepts no liability to prevent deterioration for any by this manual, promptly contact for any damage due to improper future reference needs and at your local After Sales Service.
- Page 31 ORDINARY MAINTENANCE SPECIAL MAINTENANCE The ordinary maintenance can be carried out by the user Special maintenance can only be performed by Aermec and consists of a series of simple operations, which will After-Sales Services or by people with the technical ensure that the fan coil unit operates at full efficiency.
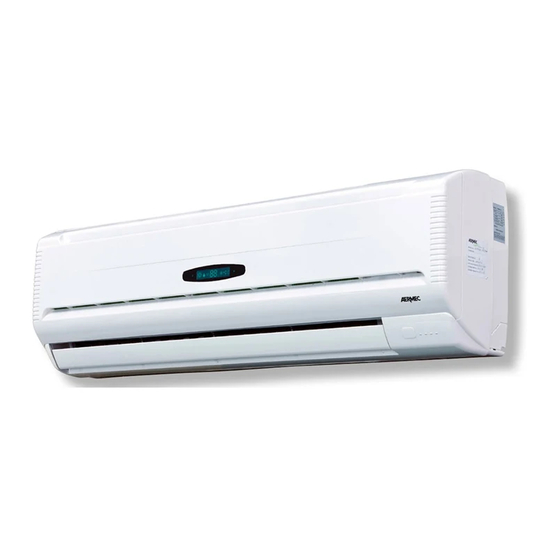
- Page 32 FCW WALL-MOUNTED FAN COIL UNIT The Aermec FCW fan coil unit is made with materials of superior quality in strict compliance with safety regu- lations. The "FCW" is easy to use and will have a long life. The fan coil unit is a terminal unit for...
- Page 33 MAIN COMPONENTS 1 Front panel 6 Auxiliary emergency switch 2 Horizontal air discharge blades 7 Electric terminal connections 3 Vertical air discharge blades 8 Front case 4 Air filter 9 Frame 5 Heat exchanger coil 10 Display TLW2 PFW2 DESCRIPTION OF COMPONENTS FRONT PANEL ating PFW2 WIRED CONTROL PANEL...
- Page 34 GENERAL INFORMATION • Versions without microprocessor unit and a maximum of 5 SLAVE fa • Simple installation of the fan coil controller: coil units for each zone). unit system through the SELF- Control of a fan coil unit sys- MONITORING function of the With or without water valve.
- Page 35 IMPORTANT INFORMATION WARNING: The fan coil unit is connected to the power CORRECTLY CONTROLLING THE TEMPERATURE supply and a water circuit. Operations performed by per- The room temperature should be controlled in order to sons without the required technical skills can lead to provide maximum comfort to the people in the room, personal injury to the operator or damage to the unit and especially if they are elderly, children or ill, avoiding sud-...
- Page 36 IMPORTANT Note for FCW series with microprocessor controller: - The two control types, wired control panel (PFW2) and remote control (TLW2), cannot be used at the same time on the same fan coil unit. – If the fan coil is off, all the previous settings made are kept in the memory except for the TIMER setting and SLEEP mode.
- Page 37 FCW WITH MICROPROCESSOR CONTROLLER - FRONT PANEL DISPLAY When the fan coil unit is powered up it emits a beep. When the fan coil unit is powered but not on, all the LEDs are off. 1 - TEMPERATURE DISPLAY / ERROR CODES - In normal operation shows the room temperature - If the set point temperature is changed the new value in °C will blink for 5 seconds...
- Page 38 TLW2 - INFRA-RED REMOTE CONTROL IMPORTANT Note for FCW series with microprocessor controller: - The two control types, wired control panel (PFW2) and remote control (TLW2), cannot be used at the same time on the same fan coil unit. – If the fan coil is off, all the previous settings made are kept in the memory except for the TIMER setting and SLEEP mode.
- Page 39 LIQUID CRYSTAL DISPLAY With the remote control on (ON), the display shows the settings of the unit, with the remote control off (OFF) the display is off and only displays the timer for the programmed activation (if active). 1 - OPERATING MODE Shows the operating mode: ➀...
- Page 40 PFW2 - WIRED CONTROL PANEL IMPORTANT Note for FCW series with microprocessor controller: - The two control types, wired control panel (PFW2) and remote control (TLW2), cannot be used at the same time on the same fan coil unit. – If the fan coil is off, all the previous settings made are kept in the memory except for the TIMER setting and SLEEP mode.
- Page 41 AUTOMATIC PROGRAMME (AUTO) The programme requires the system to circulate chilled or hot water. 1) PRESS THE ON/OFF KEYS The fan coil unit comes on. The fan coil unit will automatically switch on in Cool mode, Heat mode or in the dead band (waiting) depending on the water temperature. 2) PRESS THE MODE KEY Press the MODE key repeatedly until the word AUTO appears on the display (TLW2) or the LEDs on wired control panel (PFW2) turns on HEAT and COOL.
- Page 42 COOLING PROGRAMME (COOL) The programme requires the system to circulate chilled water. 1) PRESS THE ON/OFF KEYS The fan coil unit comes on. The fan coil unit automatically starts in cooling mode. 2) PRESS THE MODE KEY Press the MODE key repeatedly until the word COOL appears on the display (TLW2) or the LEDs on wired control panel (PFW2) turns on COOL.
- Page 43 DEHUMIDIFICATION PROGRAMME (DRY) The programme requires the system to circulate chilled water. 1) PRESS THE ON/OFF TURN ON WITH KEYS The fan coil comes on and the display is switched on. 2) PRESS THE KEY MODE Press the MODE key repeatedly until the word DRY appears on the display (TLW2) or the LEDs on wired control panel (PFW2) turns on DRY.
- Page 44 TURN ON PROGRAMMED BY THE TIMER 1) TURN ON WITH KEYS – Set the required conditions (MODE, FAN, TEMP) on the remote control that you want active when starting the unit. – Turn off with keys 2) ACTIVATE THE TIMER ON WITH KEYS 3) SET THE TIMER ON WITH KEYS...
- Page 45 DIMENSIONS [mm] FCW21 FCW31 FCW41 1172 FCW21 Ø70 FCW31 Ø70 FCW41 1172 Ø70 INSTALLATION OF THE UNIT WARNING: before carrying out any correct operation. To prevent the formation of condensa- work ensure the individual has the In the specific case of electrical tion on the exterior of the unit while appropriate personal protection.
- Page 46 ing due to the thermal expansion of the fan coil unit. the different components (plastics and The condensate drainage system must metals). This does not cause damage be correctly sized. To avoid unpleasant to the unit if the maximum operating smells a trap is recommended if the temperature is not exceeded.
- Page 47 completed (electrical and hydraulic connections, fan coil unit fixing and condensate drain connection) close the hole in the wall with a suitable filler. - Vent the coil using the air valve pro- vided. - Complete the refitting of the com- ponents of the unit paying attention that the debris from the materials used for the installation do not block...
- Page 48 ELECTRICAL WIRING Front panel Power supply terminal block Base WARNING: check that the power sup- minimum contact opening distance document when making the connec- ply is disconnected before perform- of 3 mm. tions. ing operations on the unit. The electrical power cable must be of Ensure that the installation is wired in The unit must be connected directly the H07 V-K or N07 V-K type with...
- Page 49 INSTALLATION OF PFW2 WIRED infrared receiver from the circuit board CONTROL PANEL (ACCESSORY) inside the fan coil unit. Accessory indispensable for the func- - connect connector (B) of the wired tioning of the fan coil unit. Alternative control panel to the circuit board con- to the remote control TLW2.
- Page 50 WIRING DIAGRAMS LEGEND Auxiliary emergency switch Optional supplied items CAPACITOR = Capacitor COMMON Common Items not supplied LED panel Connections to be made on site Earth connection ID/OD Water temperature sensor LOW SPEED = Minimum speed (black) Fan motor MED SPEED = Medium speed (green) CIRCUIT BREAKER = Circuit breaker HI SPEED = Maximum speed (yellow)
- Page 51 WIRING DIAGRAMS Wi r i n g d i a g ra m s a r e s u b j e c t t o c o n t i n u o u s u p d a t e s . A l way s r e f e r t o t h e w i r i n g d i a g ra m i n s i d e t h e u n i t . . IFCW3LJ 1207 - 5375700_00...
- Page 52 WIRING DIAGRAMS Wi r i n g d i a g r a m s a r e s u b j e c t t o c o n t i n u o u s u p d a t e s . A l way s r e f e r t o t h e w i r i n g d i a g r a m i n s i d e t h e u n i t . IFCW3LJ 1207 - 5375700_00...
- Page 53 Cher client, Nous vous remercions pour avoir choisi un produit AERMEC. Ce dernier est le fruit de plusieurs années d’expérience et d’études de conception particulières. Il a été fabriqué à l’aide de matériaux de tout premier choix et grâce à des technolo- gies de pointe.
- Page 54 Service d’Assistance La société AERMEC S.p.A. décline Lire attentivement l'ensemble des local. toutes responsabilités pour tout informations contenues dans ce dommage dérivant d’un usage L'appareil doit être installé...
- Page 55 La maintenance ordinaire peut être effectuée aussi par La maintenance extraordinaire doit être effectuée seulement l'utilisateur ; elle consiste en une série d'opérations par les Services d'Assistance Aermec ou bien par simples grâce auxquelles le ventilo-convecteur peut un personnel en possession de la formation technico- fonctionner au maximum de son efficacité.
- Page 56 FCW - VENTILO-CONVECTEUR Fabriqué avec des matériaux de qualité supérieure, dans le respect rigoureux des normes de sécurité, le ventilo-convecteur FCW Aermec est facile à utiliser et il vous accompagnera longtemps. Le ventilo-convecteur est un terminal d'eau. l'assortiment à un panneau de pour le traitement de l'air dans un contrôle accessoire PFW2 ou à...
- Page 57 COMPOSANTS PRINCIPAUX 1 Panneau frontal 6 Interrupteur de secours auxiliaire 2 Déflecteur horizontal refoulement de l'air 7 Boîte à bornes des branchements électriques 3 Déflecteur vertical refoulement de l'air 8 Elément frontal 4 Filtre à air 9 Cadre 5 Batterie d'échange thermique 10 Affichage TLW2 PFW2...
- Page 58 INFORMATIONS GÉNÉRALES • Versions sans Contrôle avec carte • Versions avec Contrôle avec carte électronique à microprocesseur : électronique à microprocesseur : Contrôle d'un réseau de ven- Avec et sans les vannes de l'eau. Avec et sans les vannes de l'eau. tilo-convecteur plus la gestion de la Les versions sans Contrôle avec carte Les versions avec Contrôle avec carte...
- Page 59 INFORMATIONS IMPORTANTES ATTENTION : le ventilo-convecteur est NE PAS INTRODUIRE D'OBJETS DANS Orienter les ailettes verticales à la main. branché au réseau électrique et au LA SORTIE DE L'AIR Dans les versions avec Contrôle avec carte circuit hydraulique ; une intervention électronique à...
- Page 60 IMPORTANT : Remarque pour les ventilo-convecteurs série FCW équipés de Contrôle avec carte électronique à microprocesseur. - Les deux modèles de commande, panneau câblé (PFW2) et télécommande (TLW2), ne peuvent être utilisés simultané- ment sur le même ventilo-convecteur. – Si le ventilo-convecteur est éteint, tous les paramètres effectués précédemment sont conservés en mémoire sauf les fonctions SLEEP et TIMER.
- Page 61 FCW AVECCONTRÔLE AVEC CARTE ÉLECTRONIQUE À MICROPROCESSEUR- SIGNALISATIONS Lorsque le ventilo-convecteur est alimenté, il émet un signal Lorsque le ventilo-convecteur est alimenté mais qu'il n'est acoustique. pas allumé, toutes les leds sont éteintes. 1 - ECRAN TEMPERATURE/CODE ERREUR - Durant le fonctionnement normal, il indique la température.
- Page 62 TLW2 - TÉLÉCOMMANDE À RAYONS INFRAROUGES IMPORTANT : Remarque pour les ventilo-convecteurs série FCW équipés de Contrôle avec carte électronique à microprocesseur. - Les deux modèles de commande, panneau câblé (PFW2) et télécommande (TLW2), ne peuvent être utilisés simultané- ment sur le même ventilo-convecteur. –...
- Page 63 ECRAN À CRISTAUX LIQUIDES Avec la télécommande allumée (ON), l'écran visualise les configurations données à l'unité. Avec la télécommande éteinte (OFF), l'écran est éteint ou il visualise seulement le timer pour l'allumage programmé (si activé). 1 - MODES DE FONCTIONNEMENT Montre le mode de fonctionnement ➀...
- Page 64 PFW2 - PANNEAU DE CONTRÔLE À DISTANCE CÂBLÉ IMPORTANT : Remarque pour les ventilo-convecteurs série FCW équipés de Contrôle avec carte électronique à microprocesseur. - Les deux modèles de commande, panneau câblé (PFW2) et télécommande (TLW2), ne peuvent être utilisés simultané- ment sur le même ventilo-convecteur.
- Page 65 PROGRAMME AUTOMATIQUE ("AUTO") Le programme demande que de l'eau réfrigérée ou de l'eau chaude circule dans l'installation. 1) APPUYER SUR LA TOUCHE ALLUMÉ-ÉTEINT Le ventilo-convecteur entre en fonction. Le ventilo-convecteur s'active automatiquement en mode rafraichissement, chauffage ou en bande morte (attente) en fonction de la température de l'eau. 2) APPUYER SUR LA TOUCHE MODE Appuyer plusieurs fois sur la touche MODE jusqu'à...
- Page 66 PROGRAMME REFROIDISSEMENT (COOL) Le programme demande que de l'eau réfrigérée circule dans l'installation. 1) APPUYER SUR LA TOUCHE ALLUMÉ-ÉTEINT Le ventilo-convecteur entre en fonction. Le ventilo-convecteur s'active automatiquement en mode Rafraîchissement 2) APPUYER SUR LA TOUCHE MODE Appuyer plusieurs fois sur la touche MODE jusqu'à tant que le mot COOL (TLW2) n'appa- raisse sur l'écran ou que la led n'indique COOL (PFW2).
- Page 67 PROGRAMME DÉSHUMIDIFICATION (DRY) Le programme demande que de l'eau réfrigérée circule dans l'installation. 1) APPUYER SUR LA TOUCHE ALLUMÉ-ÉTEINT Le ventilo-convecteur se met en marche et l'écran de l'unité s'allume. 2) APPUYER SUR LA TOUCHE MODE Appuyer plusieurs fois sur la touche MODE jusqu'à tant que le mot DRY (TLW2) n'appa- raisse sur l'écran ou que la led n'indique DRY (PFW2).
- Page 68 ALLUMAGE PROGRAMMÉ AU MOYEN DU TIMER 1) ALLUMER AVEC LES TOUCHES – sur la télécommande, configurer les conditions (MODE, FAN, TEMP) que vous souhaitez voir activées au rallumage. – éteindre avec les touches 2) ACTIVER TIMER AVEC LES TOUCHES 3) RÉGLER LE TIMER D'ALLUMAGE AVEC LES TOUCHES –...
- Page 69 DONNÉES DIMENSIONNELLES [mm] FCW21 FCW31 FCW41 1172 FCW21 Ø70 FCW31 Ø70 FCW41 1172 Ø70 INSTALLATION DE L'UNITE ATTENTION : avant d’effectuer toute fonctionnement. condensation sur la structure extérieure intervention, se munir d'équipements de Les connexions électriques requièrent les du ventilo-convecteur lorsque l'appareil protection individuelle adéquats.
- Page 70 L'utilisation d'une eau à des températures convecteur. élevées pourrait provoquer des L e s y s t è m e d ' é va c u a t i o n d e l a craquements dus aux diversesdilatations condensation doit être dimensionné thermiques des éléments (plastiques de façon appropriée.
- Page 71 à la verticale qu'à l'horizontale. - Lorsque toutes les opérations ont été achevées (raccordements électriques et hydraulques, fixation du ventilo- convecteur et raccordement de l'évacuation de la condensation ), reboucher le trou dans le mur avec un matériau de remplissage. - Eventer l'échangeur au moyen de la vanne prévue à...
- Page 72 Branchements électriques Panneau frontal Boîte à bornes de l'alimentation électrique Base AT T E N T I O N : ava n t d ’ e f f e c t u e r magnétothermique max. sur la ligne H5VV-F. toute intervention, s’assurer que d'alimentation.
- Page 73 - INSTALLATION PANNEAU CÂBLÉ Pour installer le panneau câblé, il faut : PFW2 (ACCESSOIRE) - débrancher le connecteur (A) du récep- Accessoire indispensable au fonctionne- teur IR de la carte électronique intérieure ment du ventilo-convecteur, en alter- du ventilo-convecteur. native à la télécommande TLW2, les - raccorder le connecteur (B) du panneau deux modèles de commande ne peuvent câblé...
- Page 74 SCHÉMAS ÉLECTRIQUES LEGENDE interrupteur auxiliaire de secours Composants fournis en option CAPACITOR = Condenseur COMMON Commun Composants non fournis Panneau led Raccordement prise de terre Connexions à effectuer in situ. ID/OD Sonde de température de l'eau LOW SPEED = Vitesse minimale (noir) Moteur du ventilateur MED SPEED = Vitesse moyenne (vert)
- Page 75 SCHÉMAS ÉLECTRIQUES Les schémas électriques sont sujets à une mise à jour constante, il est donc obligatoire de faire référence à ceux qui se trouvent sur la machine. IFCW3LJ 1207 - 5375700_00...
- Page 76 SCHÉMAS ÉLECTRIQUES Les schémas électriques sont sujets à une mise à jour constante, il est donc obligatoire de faire référence à ceux qui se trouvent sur la machine. IFCW3LJ 1207 - 5375700_00...
- Page 77 Unser nächstgelegener Kundendienst kann, wenn nicht bekannt, beim Händler erfragt werden, bei dem das Gerät erwor- ben wurde. Im Internet finden Sie unter der Adresse www . aermec . com die Technische Dokumentation aller unserer Produkte sowie die Adressen des Vertriebs- und Kundendienstnetzes.
- Page 78 Sachen führen kann. fallenden Leistungen zu erbringen. zum eventuellen Nachschlagen an Bei Störungen, die in dieser Anleitung AERMEC S.p.A. lehnt jede Haftung für einem trockenen Ort aufbewahren, nicht genannt sind, wenden Sie sich Schäden in Folge unsachgemäßer um ihre Beschädigung zu vermeiden.
- Page 79 ORDENTLICHE WARTUNG AUSSERORDENTLICHE WARTUNG Die ordentliche Wartung kann auch durch den Benutzer Die außerordentliche Wartung darf nur durch den Aermec ausgeführt werden. Sie besteht aus einer Reihe einfacher Kundendienst oder Personen ausgeführt werden, die Arbeiten, die den Betrieb des Gebläsekonvektors mit im Besitz der fachtechnischen Voraussetzungen für die...
- Page 80 FCW - GEBLÄSEKONVEKTOR Der Aermec Gebläsekonvektor FCW wurde aus hochwertigen Materialien unter strenger Beachtung der Sicherheitsbestimmungen gefertigt, ist einfach zu bedienen und wird Ihnen lange Freude bereiten. Der Gebläsekonvektor ist ein Endgerät Anlage mit einem Kaltwassersatz Zubehör Fernbedienung TLW2). für die Aufbereitung der Luft in einem ausgestattet ist.
- Page 81 HAUPTKOMPONENTEN 1 Frontplatte 6 Not-Zusatzschalter 2 Horizontales Leitblech für Luftaustritt 7 Klemmleiste für Elektroanschlüsse 3 Vertikales Leitblech für Luftaustritt 8 Frontales Element 4 Luftfilter 9 Rahmen 5 Wärmetauscherregister 10 Display TLW2 PFW2 BESCHREIBUNG DER KOMPONENTEN FRONTPLATTE NOT-ZUSATZSCHALTER als Alternative zur kabelgebundenen Die Luft wird über die Schlitze angesaugt.
- Page 82 ALLGEMEINE HINWEISE • Ve r s i o n e n o h n e S t e u e r u n g m i t • Ve r s i o n e n m i t S t e u e r u n g m i t Mikroprozessor-Steuerkarte: Steuerung eines Netzes von Mikroprozessor-Steuerkarte:...
- Page 83 WICHTIGE HINWEISE ACHTUNG: Der Gebläsekonvektor ist an Keine Gegenstände gleich welcher Art in die Ausrichten des horizontalen Luftleitblechs das Stromversorgungsnetz und an die Luftaustrittsschlitze einführen. Es besteht die Tasten LOUVER oder SWING auf der Wasserversorgung angeschlossen. Arbeiten, Verletzungsgefahr und das Gebläse könnte Fernbedienung oder der kabelgebundenen die durch nicht über die erforderlichen beschädigt werden.
- Page 84 WICHTIG Anmerkung für die Gebläsekonvektoren der Serie FCW mit eingebauter Steuerung mit Mikroprozessor-Steuerkarte. - Die beiden Steuerungsmodelle, die kabelgebundene Bedientafel (PFW2) und die Fernbedienung (TLW2) dürfen nicht gleich- zeitig am selben Gebläsekonvektor eingesetzt werden. – Wenn der Gebläsekonvektor ausgeschaltet wird, werden alle vorher vorgenommenen Einstellungen gespeichert, außer den Funktionen SLEEP und TIMER.
- Page 85 FCW MIT STEUERUNG MIT MIKROPROZESSOR-STEUERKARTE - ANZEIGEN Wenn der Gebläsekonvektor Spannung erhält, gibt er einen Wenn der Gebläsekonvektor mit Strom versorgt wird, aber Signalton aus. nicht eingeschaltet ist, sind alle LEDs aus. 1 - ANZEIGE FÜR TEMPERATUR / FEHLERCODE - Zeigt im normalen Betrieb die Temperatur an. - Wenn der Temperatur-Sollwert sich ändert, blinkt der Wert in °C 5 Sekunden lang.
- Page 86 TLW2 - INFRAROT-FERNBEDIENUNG WICHTIG Anmerkung für die Gebläsekonvektoren der Serie FCW mit eingebauter Steuerung mit Mikroprozessor-Steuerkarte. - Die beiden Steuerungsmodelle, die kabelgebundene Bedientafel (PFW2) und die Fernbedienung (TLW2) dürfen nicht gleichzeitig am selben Gebläsekonvektor eingesetzt werden. – Wenn der Gebläsekonvektor ausgeschaltet wird, werden alle vorher vorgenommenen Einstellungen gespeichert, außer den Funktionen SLEEP und TIMER.
- Page 87 FLÜSSIGKRISTALL-DISPLAY Bei eingeschalteter Fernbedienung (ON) werden auf dem Display die an die Einheit gesendeten Einstellungen angezeigt, bei ausge- schalteter Fernbedienung (OFF) ist auch das Display ausgeschaltet bzw. zeigt nur den Timer für das programmierte Einschalten an (wenn aktiviert). 1 - BETRIEBSARTEN ➀...
- Page 88 PFW2 - KABELGEBUNDENE FERNSTEUERUNGSTAFEL WICHTIG Anmerkung für die Gebläsekonvektoren der Serie FCW mit eingebauter Steuerung mit Mikroprozessor-Steuerkarte. - Die beiden Steuerungsmodelle, die kabelgebundene Bedientafel (PFW2) und die Fernbedienung (TLW2) dürfen nicht gleich- zeitig am selben Gebläsekonvektor eingesetzt werden. – Wenn der Gebläsekonvektor ausgeschaltet wird, werden alle vorher vorgenommenen Einstellungen gespeichert, außer den Funktionen SLEEP und TIMER.
- Page 89 AUTOMATIKPROGRAMM ("AUTO") Für das Programm muss in der Anlage gekühltes oder warmes Wasser zirkulieren. 1) EIN-/AUS-TASTE DRÜCKEN ( BZW. Der Gebläsekonvektor geht in Betrieb. Der Gebläsekonvektor schaltet automatisch auf die Betriebsart Kühlung, Heizung oder Totbereich (Warten), je nach Wassertemperatur. 2) MODE-TASTE DRÜCKEN ( BZW.
- Page 90 PROGRAMM KÜHLUNG (COOL) Für das Programm muss in der Anlage gekühltes Wasser zirkulieren. 1) EIN-/AUS-TASTE DRÜCKEN ( BZW. Der Gebläsekonvektor geht in Betrieb. Der Gebläsekonvektor wird automatisch im Kühlbetrieb aktiviert. 2) MODE-TASTE DRÜCKEN ( BZW. MODE-Taste mehrmals drücken, bis auf dem Display die Anzeige COOL (TLW2) erscheint bzw.
- Page 91 PROGRAMM ENTFEUCHTUNG (DRY) Für das Programm muss in der Anlage gekühltes Wasser zirkulieren. 1) EIN-/AUS-TASTE DRÜCKEN ( BZW. Der Gebläsekonvektor geht in Betrieb und an der Einheit schaltet sich das Display ein. 2) MODE-TASTE DRÜCKEN ( BZW. MODE-Taste mehrmals drücken, bis auf dem Display die Anzeige DRY (TLW2) erscheint bzw.
- Page 92 PROGRAMMIERTES EINSCHALTEN MITTELS TIMER 1) MIT DEN TASTEN ODER EINSCHALTEN. – Auf der Fernbedienung die Betriebsbedingungen einstellen, die beim Wiederanlauf aktiv sein sollen (MODE, FAN, TEMP). – Mit den Tasten oder ausschalten. 2) TIMER ON SCHALTEN MIT DEN TASTEN ODER 3) TIMER FÜR DIE EINSCHALTZEIT MIT DEN TASTEN ODER EINSTELLEN.
- Page 93 ABMESSUNGEN [mm] FCW21 FCW31 FCW41 1172 FCW21 Ø70 FCW31 Ø70 FCW41 1172 Ø70 INSTALLATION DER EINHEIT ACHTUNG: Vor jedem Eingriff ist Insbesondere für die elektrischen vermeiden, darf die durchschnittliche geeignete persönliche Schutzausrüstung Anschlüsse sind die folgenden Prüfungen Wassertemperatur nicht unter den anzulegen.
- Page 94 Ausdehnung der Materialien (Kunststoffe werden kann. und Metalle) führen, was jedoch nicht Der Kondenswasserabflussleitung muss zu Schäden führt, wenn die maximale ausreichend dimensioniert sein, wenn der Betriebstemperatur nicht überschritten Kondenswasserabfl uss an die Kanalisation wird. angeschlossen wird, sollte ein Siphon Hier sind die grundlegenden Hinweise ausgeführt werden, um unangenehme zur richtigen Installation der Geräte...
- Page 95 sowohl vertikal als auch horizontal "in Waage" ist. - Wenn alle Arbeiten beendet sind (Elektro- und Wasseranschlüsse, Befestigung des Gebläsekonvektors und Anschluss des Kondenswasserabflusses), das Loch in der Wand mit Füllmaterial schließen. - Wärmetauscher mit dem entsprechenden Ventil entlüften. - Alle Bauteile der Einheit wieder einbauen und dabei darauf achten, dass die Reste der für des Installation benutzten Materials nicht den Lüfter blockieren oder...
- Page 96 Elektroanschlüsse Frontplatte Klemmleiste der Stromversorgung Unterbau A C H T U N G : Vo r j e d e m E i n g r i f f ein allpoliger Leitungsschutzschalter vom Typ H5VV-F zu verwenden. i s t s i c h e r z u s t e l l e n , d a s s d i e (CIRCUIT BREAKER) max.
- Page 97 - INSTALLATION KABELGEBUNDENE Zur Installation der kabelgebundenen BEDIENTAFEL PFW2 (ZUBEHÖR) Bedientafel: Für den Betrieb des Gebläsekonvektors - Steckverbinder (A) des IR-Empfängers unbedingt erforderliches Zubehör, als von der Steuerkarte im Innern des Alternative zur Fernbedienung TLW2, Gebläsekonvektors abtrennen. die beiden Steuerungsmodelle können - Steckverbinder (B) der kabelgebun- nicht gleichzeitig verwendet werden.
- Page 98 SCHALTPLÄNE LEGENDE Not-Zusatzschalter Mitgelieferte optionale Bauteile CAPACITOR = Kondensator COMMON Gemeinsamer Leiter Nicht mitgelieferte Bauteile LED-Tafel Erdung Vor Ort auszuführende Anschlüsse ID/OD Wassertemperatursonde Gebläsemotor LOW SPEED = Minimale Drehzahl (schwarz) CIRCUIT BREAKER = Schutzschalter MED SPEED = Mittlere Drehzahl (grün) Leitung HI SPEED Maximale Drehzahl (gelb)
- Page 99 SCHALTPLÄNE Die Schaltpläne werden ständig aktualisiert, es ist daher Vorschrift, sich an die zu halten, die sich jeweils am Gerät befinden. IFCW3LJ 1207 - 5375700_00...
- Page 100 SCHALTPLÄNE Die Schaltpläne werden ständig aktualisiert, es ist daher Vorschrift, sich an die zu halten, die sich jeweils am Gerät befinden. IFCW3LJ 1207 - 5375700_00...
- Page 101 Estimado cliente: Le agradecemos por haber elegido un producto AERMEC. Este es fruto de una experiencia de varios años en el sector y de estudios específicos de planificación, y ha sido realizado con materiales de primera calidad y con tecnologías altamente avanzadas.
- Page 102 AERMEC S.p.A. declina toda durante por lo menos 10 años contacte inmediatamente con el r e s p o n s a b i l i d a d p o r d a ñ o s para futuras consultas.
- Page 103 MANTENIMIENTO ORDINARIO MANTENIMIENTO EXTRAORDINARIO El usuario puede llevar a cabo el mantenimiento ordinario; Solamente los Servicios de Asistencia Aermec pueden llevar éste consiste en una serie de operaciones simples, gracias a cabo el mantenimiento extraordinario; también pueden a las cuales el ventiloconvector puede trabajar con la realizarlo los sujetos que poseen los requisitos técnico...
- Page 104 FCW - VENTILOCONVECTOR El ventiloconvector FCW Aermec está realizado con materiales de calidad superior, respetando rigurosamente las normativas de seguridad. "FCX" es de fácil utilización y le acompañará por largo tiempo. El ventiloconvector es un terminal enfriadora de agua. de mandos PFW2 o a un accesorio...
- Page 105 COMPONENTES PRINCIPALES 1 Panel frontal 6 Interruptor auxiliar de emergencia 2 Deflector horizontal de impulsión del aire 7 Bornero de conexiones eléctricas 3 Deflector vertical de impulsión del aire 8 Elemento frontal 4 Filtro aire 9 Chasis 5 Batería de intercambio térmico 10 Pantalla TLW2 PFW2...
- Page 106 INFORMACIÓN GENERAL • Versiones sin Control con tarjeta tiloconvector MASTER y como máxi- • Versiones con Control con tarjeta electrónica de microprocesador: mo 5 ventiloconvectores SLAVE por electrónica de microprocesador: cada zona) Con y sin válvulas del agua. Con y sin válvulas del agua. Control de una red de venti- Las versiones sin Control con tarjeta Las versiones con Control con tarjeta...
- Page 107 INFORMACIONES IMPORTANTES ATENCIÓN: el ventiloconvector está NO INTRODUCIR OBJETOS EN LA Oriente manualmente las aletas verticales. conectado con la red eléctrica y con SALIDA DEL AIRE En las versiones con Control con tarjeta el circuito hidráulico; una intervención electrónica de microprocesador para No introducir objetos de ningún tipo en por parte del personal sin competencia orientar el deflector horizontal use la...
- Page 108 IMPORTANTE Nota para los ventiloconvectores serie FCW con Control con tarjeta electrónica de microprocesador. - Los dos modelos de mando, panel de cable (PFW2) y mando a distancia (TLW2), no se pueden usar a la misma vez en el mismo ventiloconvector. –...
- Page 109 FCW CON CONTROL CON TARJETA ELECTRÓNICA DE MICROPROCESADOR - INDICACIONES Cuando el ventiloconvector recibe tensión emite una señal Cuando el ventiloconvector recibe corriente pero no está acústica. encendido, todos los ledes están apagados. 1 - PANTALLA TEMPERATURA / CÓDIGO DE ERROR - En el funcionamiento normal indica la temperatura.
- Page 110 TLW2 - MANDO A DISTANCIA DE RAYOS INFRARROJOS IMPORTANTE Nota para los ventiloconvectores serie FCW con Control con tarjeta electrónica de microprocesador. - Los dos modelos de mando, panel de cable (PFW2) y mando a distancia (TLW2), no se pueden usar a la misma vez en el mismo ventiloconvector.
- Page 111 PANTALLA DE CRISTALES LÍQUIDOS Con el mando a distancia encendido (ON), la pantalla visualiza las configuraciones dadas a la unidad; con el mando a distancia apagado (OFF), la pantalla está apagada o visualiza solo el timer para el encendido programado (si está activado). 1 - MODALIDAD DE FUNCIONAMIENTO Muestra la modalidad de funcionamiento: ➀...
- Page 112 PFW2 - PANEL DE MANDOS REMOTO CON CABLE IMPORTANTE Nota para los ventiloconvectores serie FCW con Control con tarjeta electrónica de microprocesador. - Los dos modelos de mando, panel de cable (PFW2) y mando a distancia (TLW2), no se pueden usar a la misma vez en el mismo ventiloconvector.
- Page 113 PROGRAMA AUTOMÁTICO (“AUTO”) El programa requiere que en la instalación circule agua refrigerada o agua caliente. 1) PRESIONE LA TECLA ENCENDIDO - APAGADO El ventiloconvector entra en funcionamiento. El ventiloconvector se activa automáticamente en modo Enfriamiento, Calefacción o en banda muerta (espera), en función de la temperatura del agua.
- Page 114 PROGRAMA DE ENFRIAMIENTO (COOL) El programa requiere que en la instalación circule agua refrigerada. 1) PRESIONE LA TECLA ENCENDIDO - APAGADO El ventiloconvector entra en funcionamiento. El ventiloconvector se activa automática- mente en modo Enfriamiento. 2) PRESIONE LA TECLA MODE Presione la tecla MODE varias veces hasta que en la pantalla aparezca el mensaje COOL (TLW2) o el led indique COOL (PFW2).
- Page 115 PROGRAMA DESHUMIDIFICACIÓN (DRY) El programa requiere que en la instalación circule agua refrigerada. 1) PRESIONE LA TECLA ENCENDIDO - APAGADO El ventiloconvector entra en funcionamiento y se enciende la pantalla de la uni- dad. 2) PRESIONE LA TECLA MODE Presione la tecla MODE varias veces hasta que en la pantalla aparezca el mensaje DRY (TLW2) o el led indique DRY (PFW2).
- Page 116 ENCENDIDO PROGRAMADO MEDIANTE TIMER 1) ENCENDER CON LAS TECLAS – configure en el mando a distancia las condiciones (MODE, FAN, TEMP) que se quiere que estén activas con el reinicio – apague con las teclas 2) ACTIVE EL TIMER ON CON LAS TECLAS 3) REGULE EL TIMER DE ENCENDIDO CON LAS TECLAS –...
- Page 117 DATOS DIMENSIONALES [mm] FCW21 FCW31 FCW41 1172 FCW21 Ø70 FCW31 Ø70 FCW41 1172 Ø70 INSTALACIÓN DE LA UNIDAD ATENCIÓN: antes de llevar a cabo accesorios; deben ser capaces también el suelo y sobre los objetos que se cualquier tipo de intervención, de verificar los mismos a los fines de la encuentren en una posición baja.
- Page 118 una mejor mezcla, se recomienda adecuada (mín.1%), que asegure la no alimentar el ventiloconvector con evacuación del condensado producido agua que supere los 65 °C. El uso de en el funcionamiento en frío del agua con temperaturas elevadas podría ventiloconvector. provocar chasquidos debidos a las Si la red de descarga del condensado está...
- Page 119 horizontal. - Cuando se hayan terminado todas las operaciones (conexiones eléctricas e hidráulicas, fijación del ventiloconvector y conexión de la descarga de condensado), cierre el agujero en el muro con un material de relleno. - Purgue mediante el respectivo purgador. - Termine de volver a montar los c o m p o n e n t e s u n i d a d...
- Page 120 Conexiones eléctricas Panel frontal Bornero alimentación eléctrica Base ATENCIÓN: antes de llevar a cabo cualquier alimentación un interruptor omnipolar H5VV-F. tipo de intervención, hay que asegurarse magnetotérmico máx. 2 A 250 V (CIRCUIT Para todas las conexiones, hay que seguir los de que la alimentación eléctrica no esté...
- Page 121 - INSTALACIÓN DEL PANEL DE Para instalar el panel de cable es nece- CABLE PFW2 (ACCESORIO) sario: Accesorio indispensable para el funcio- - desconectar de la tarjeta electrónica namiento del ventiloconvector, como interior del ventiloconvector el conec- alternativa del mando a distancia tor (A) del receptor IR.
- Page 122 ESQUEMAS ELÉCTRICOS LEYENDA Interruptor auxiliar de emergencia Componentes suministrados como CAPACITOR = Condensador accesorios opcionales COMMON Común Panel led Componentes no suministrados Conexión a tierra ID/OD Sonda de temperatura del agua Conexiones que hay que realizar Motor ventilador en el lugar de la instalación CIRCUIT BREAKER = Interruptor magnetotérmico Línea LOW SPEED =...
- Page 123 ESQUEMAS ELÉCTRICOS Los esquemas eléctricos se actualizan continuamente; por lo tanto, es obligatorio consultar los que se encuentran en la máquina. IFCW3LJ 1207 - 5375700_00...
- Page 124 ESQUEMAS ELÉCTRICOS Los esquemas eléctricos se actualizan continuamente; por lo tanto, es obligatorio consultar los que se encuentran en la máquina. IFCW3LJ 1207 - 5375700_00...
- Page 125 AERMEC S.p.A. si riserva la facoltà di apportare in qualsiasi momento tutte le modifiche ritenute necessarie per il miglioramento del prodotto. Les données mentionnées dans ce manuel ne constituent aucun engagement de notre part. Aermec S.p.A. se réserve le droit de modifier à tous moments les données considérées nécessaires à...
Need help?
Do you have a question about the FCW Series and is the answer not in the manual?
Questions and answers