Advertisement
Quick Links
GUIDE TO ASSEMBLY OF ERICA SYNTHS POLIVOKS-INSPIRED VCO
If you are reading this, most probably, you are about to build Erica
Synths DIY Polivoks-inspired Oscillator. This VCO is 35mm deep,
skiff friendly, has solid mechanical construction and doesn't require
wiring. The core of the VCO is borrowed from famous Russian synth
Polivoks VCO and in exponential converter we use the original
matched transistor IC that was used in Polivoks. But we significantly
updated schematics:
1) we introduced +-10V regulators for greater stability of operation,
2) we adjusted signal amplitudes to match requirements of
contemporary modular synths and made all output signals available
simultaneously,
3) we redesigned CV inputs to accept positive CV signals,
4) we introduced PWM circuit with manual and voltage controlled
pulse width,
5) we introduced synchronization input, so you can sync the VCO to
other VCOs.
The Oscillator kit comes in three versions:
1) Set of 2 PCBs + matched transistor IC + mechanical parts (PCB
connectors and spacer) + 5 position rotary switch,
2) Set of 2 PCBs + matched transistor IC + mechanical parts (PCB
connectors and spacer) + 5 position rotary switch + panel,
3) Full kit.
FEATURES:
• Triangle, saw and pulse wave outputs
• Manually adjustable and CV controlled pulse width
• Great tracking across 8 octaves
• Exponential FM input with attenuator
• Synchronization input
• Octave switch – 5 octaves
• Skiff-friendly design
SPECIFICATIONS:
• Audio output amplitude
• Octave range
• Panel width
• Module depth
• Power consumption
10Vptp
C0 – C8
12HP
35mm
34mA@+12V, 36mA@-12V
1
3
4
6
7
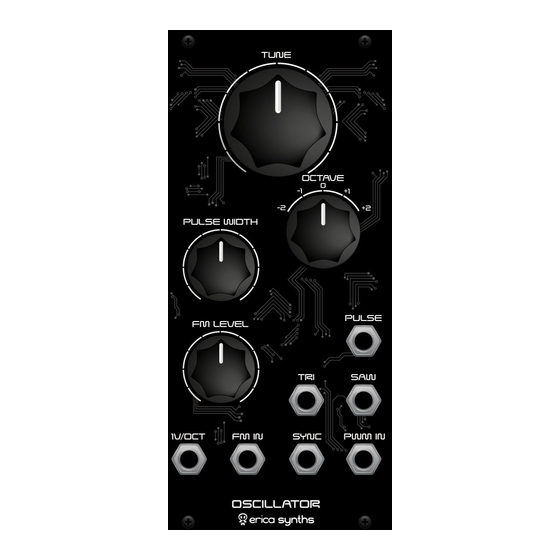
The TUNE knob allows you to set the tune of
1
the VCO across two octaves
Use Octave switch to set octave the VCO tune
2
octaves up or down instantly
3
Adjust pulse width manually!
4
This is FM CV attenuator
These are VCO outputs. All three waves are
5
available simultaneously
Patch 1V/oct CV source here. The VCO tracks
6
well across 8 octaves
7
Patch FM CV source here for vibrato effects!
This is VCO Sync input. Patch another VCO
8
output here to reset VCO circle. This gives you
new, interesting waveforms
Patch PWM CV source here! 10Vptp CV signal
9
affects pulse width form 1% to 99%
2
5
8
9
Advertisement

Subscribe to Our Youtube Channel
Related Manuals for Erica Synths POLIVOKS-INSPIRED VCO


Summary of Contents for Erica Synths POLIVOKS-INSPIRED VCO
- Page 1 GUIDE TO ASSEMBLY OF ERICA SYNTHS POLIVOKS-INSPIRED VCO If you are reading this, most probably, you are about to build Erica Synths DIY Polivoks-inspired Oscillator. This VCO is 35mm deep, skiff friendly, has solid mechanical construction and doesn’t require wiring. The core of the VCO is borrowed from famous Russian synth Polivoks VCO and in exponential converter we use the original matched transistor IC that was used in Polivoks.
- Page 2 GUIDE TO ASSEMBLY OF ERICA SYNTHS POLIVOKS-INSPIRED VCO ASSEMBLY Take precautions with regard to electrostatic discharge (ESD) safety. Handling components should be done in electrostatically safe environment. Use personal and workplace grounding. Any discharge (even a minor one) from body to a component may permanently damage it.
- Page 3 GUIDE TO ASSEMBLY OF ERICA SYNTHS POLIVOKS-INSPIRED VCO Solder electrolytic capacitors, transistors and Turn the Main board around and trimpots on the Main board! Mind polarity of solder 1x8 male connectors! electrolytic capacitors and orientation of transistors! Don’t mix up NPN and PNP transistors!
- Page 4 GUIDE TO ASSEMBLY OF ERICA SYNTHS POLIVOKS-INSPIRED VCO Now it’s time to make some Use M3x6 screw to install 11mm header on the measurements! Connect a PSU to controls controls PCB! PCB and measure, if you get +-12V and +-...
- Page 5 GUIDE TO ASSEMBLY OF ERICA SYNTHS POLIVOKS-INSPIRED VCO CALIBRATION 1) Connect the VCO to the PSU. Let it "heat up" for ~15mins. 2) Set octave switch to 0 and Tune pot somewhere around 12:00 3) Set Octave switch to +2! Connect multimeter to the TP1 and adjust OCTAVE trimpot (bottom one on the front panel) until you get +5V on TP1! Switch across all octaves and adjust OCTAVE trimpot, until you have exactly 1V intervals between octaves.
Need help?
Do you have a question about the POLIVOKS-INSPIRED VCO and is the answer not in the manual?
Questions and answers