Advertisement
Table of Contents
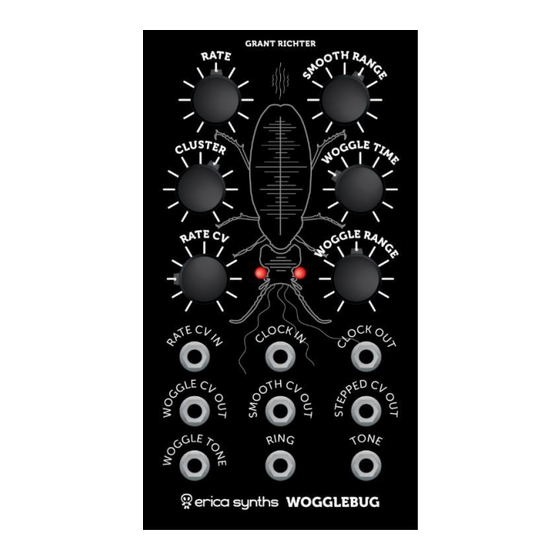
GUIDE TO ASSEMBLY OF ERICA SYNTHS WOGGLEBUG
If you are reading this, most probably, you are about to build Erica Synths Wogglebug. A Wogglebug has nostalgic
value for us, because in the beginning of 2014 a Wogglebug panel with a bug design was the first Erica Synths
project we offered for DIY community and it actually started a company. On August 2015 Scott Deyo from
Brideschamber
dropped us a mail asking, if we plan to make another run of Wogglebug panels, as we took it
serious.
The Wogglebug features 3 random audio outputs – Woggle tone, Tone, and Ring, a ringmodulated version of both
above , 3 random CV outputs with a wide range of randomness control, as well as Rate CV input, External Clock
input to sync a module to the external clock, and Clock Output to use a Wogglebug as a clock source.
We adapted Wogglebug for eurorack standard – recalculated component values to make it work properly from
12V PSU, added clock rate and stepped CV indicator LEDs, developed skiff friendly PCB and squeezed all parts on
a single PCB and made a new panel. The module doesn't need wiring and calibration, and it's comparably easy to
build – almost as easy as to draw an owl.
Technical characteristics
Audio output amplitude.....................8V ptp
CV output amplitude.........................15V ptp
Power consumption................30mA@+12V
.................18mA@-12V
Module width.........................................14HP
Module depth.......................................25mm
Advertisement
Table of Contents

Subscribe to Our Youtube Channel
Related Manuals for Erica Synths WOGGLEBUG


Summary of Contents for Erica Synths WOGGLEBUG
- Page 1 If you are reading this, most probably, you are about to build Erica Synths Wogglebug. A Wogglebug has nostalgic value for us, because in the beginning of 2014 a Wogglebug panel with a bug design was the first Erica Synths project we offered for DIY community and it actually started a company.
- Page 2 GUIDE TO ASSEMBLY OF ERICA SYNTHS WOGGLEBUG Links are from Farnell.lv, but you can use the part number for local Farnell CAPACITORS C2-C14 100n 13 SMD 1206 100n 1 Ceramic, 2,5mm spacing Film, 5mm spacing 1 Ceramic, 5mm spacing C23 - C25...
- Page 3 Let’s start with drawing an owl! First solder SMD decoupling capacitors! Erica Synths Wogglebug PCB V2 has some errors on silkscreen – resistor values have to be changed according to the BOM! Start populating the PCB with these resistors! R38-R39...
- Page 4 GUIDE TO ASSEMBLY OF ERICA SYNTHS WOGGLEBUG Step by step solder all passive components! Take tongs and cut off positioning lugs of the Solder IC sockets and active components! potentiometers!
- Page 5 GUIDE TO ASSEMBLY OF ERICA SYNTHS WOGGLEBUG Insert Jacks, but do not solder then yet! Turn the PCB around and solder potentiometers! Same goes with LEDs – insert them in relevant Put the front panel on, and position jacks in holes (mind the polarity), position them in holes relevant places! Now you can solder them.
- Page 6 CV and Clock signals on knobs of your choice! relevant outputs! The Wogglebug should work straight away. Use the module for unpredictable, random patches, sonic experiments, as a clock source and as a great decoration in your modular setup! Erica Synths Wogglebug demo on Youtube.
Need help?
Do you have a question about the WOGGLEBUG and is the answer not in the manual?
Questions and answers