Advertisement
Advertisement
Table of Contents

Related Manuals for Erica Synths Black Sequencer


Summary of Contents for Erica Synths Black Sequencer
- Page 1 USER MANUAL...
- Page 2 Black Series ideal for live performances. Enjoy! The Erica Synths Black Sequencer takes classical modular sequencing to the next level by adding tons of features required for contemporary modular synthesisers. The Black Sequencer...
-
Page 3: Specifications
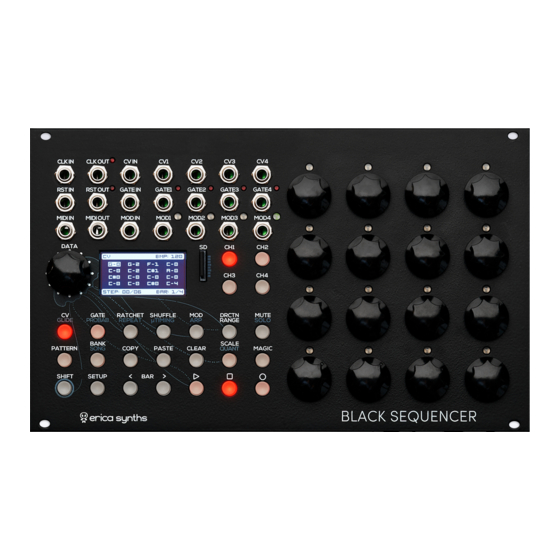
CLEAR MAGIC PROJECT SONG QUANT SHIFT SETUP BLACK SEQUENCER FEATURES > 4 CV/GATE/Modulation tracks > CV/GATE/MOD recording > MIDI IN and MIDI OUT > Clock and Reset In/Out > 16 encoders for easy data input > Up to 64 steps per pattern >... - Page 4 THE INTERFACE THE BLACK SEQUENCER CONSISTS OF 5 MAJOR PARTS: 1. Inputs and Outputs. The Black Sequencer has 4 CV outputs, 4 Gate outputs, 4 configurable Modulation outputs, a configurable CV, Gate and Modulation inputs, configurable Clock input and output, configurable Reset input and output and configurable MIDI input and output.
-
Page 5: Operation
OPERATION The Black Sequencer features four CHANNELS (CH1 – CH4) – each outputs CV, Gate and Modulation signals, and each channel has configurable TRACK length from 2 to 64 steps, and all 4 tracks are played back simultaneously. All 4 CHANNELS are saved in PATTERNS. - Page 6 In order to set the PLAY DIRECTION per channel, select a channel from CH1-CH4 and push the DRCTN/RANGE button! The DIRECTION/RANGE screen will appear, showing the current DIRECTION, the current RANGE of steps and the visualization of the active steps divided in to 4 bars. “Hints”...
- Page 7 Rotate the DATA encoder and make your selection by pushing the encoder! If you choose to design a NEW scale, a new scale design screen will appear. Now you can enter notes in the scale by pushing the first 12 encoders that correspond to the notes.
- Page 8 DESIGNING A GATE TRACK Now, let’s set the GATE LENGTH per step! Select a channel from CH1-CH4 and push the GATE button! Now you can rotate any of the 16 encoders to set the gate length per step. The default gate length is 50%, but you can select your preferred default gate length in the SETUP menu.
- Page 9 For a more dynamic performance, you can also set RACHETING per step, meaning that each gate will be played back multiple times in the selected step length. To do so, select a channel from CH1-CH4 and push the RATCHET button! Rotate any of the 16 encoders to set the RATCHET rate: 2, 3, 4, 5, 6, 7, 8.
- Page 10 If the SHUFFLE is applied to the track, it will automatically appear in the microtiming screen. DESIGNING A MODULATION TRACK Each channel of the Black Sequencer has a dedicated MODULATION OUTPUT. This means that you can design a modulation track for controlling filters and other modules.
- Page 11 In the STEPPED MODULATION (CV) mode, rotate any of the 16 encoders to set the desired output voltage. Maximum output voltage range is from -10V – +10V; you can customize the range in the settings menu. The step grid on the OLED will indicate modulation voltage settings.
- Page 12 BPM), encoder 2 sets the waveshape (available shapes are sine, triangle, ramp up, ramp down, square, random and noise (yes, noise – you can use the Black Sequencer as pitched noise generator)), encoder 3 – the LFO signal level (-5V –...
- Page 13 MANAGING PATTERNS, BANKS AND SONGS The memory of the sequencer is structured in several layers: PROJECTS, BANKS, PATTERNS and TRACKS. A PROJECT is saved on the SD card and contains 16 BANKS of 16 PATTERNS, each PATTERN consisting of 4 TRACKS (CH1-CH4) with all parameter settings.
- Page 14 Push the BANK button to select the BANK! The OLED shows the grid of 16 BANKS and the numbers in the BANKS indicate the number of patterns saved in each bank (3 and 2 correspondingly in the example shown on the OLED). The LEDs above the step encoders indicate BANKS with patterns –...
- Page 15 If you choose to design a NEW SONG, simply push the step encoders to design a chain of PATTERNS. The red LEDs above the step encoders will indicate saved PATTERNS that are available for a SONG design. You can push the same encoder several times to repeat the PATTERN.
- Page 16 The same goes for clearing GATES, PROBABILITIES, RATCHETS, etc. for a specific track (CH1, for example). In order to clear GATES, push the GATE button to select the GATE menu, then push and hold the SHIFT button and the CLEAR button and push the CH1 button. All GATE information for CH1 will be reset to the default setting (50%, for example).
- Page 17 CHANNEL MUTING You can MUTE channels during a performance. Push the MUTE button and push one or several CH buttons to mute relevant the channels. Mute means – all GATES and MODULATIONS will be turned off, but the sequencer will continue running and output CVs You can SOLO the channel.
-
Page 18: Performance Mode
You can adjust randomization settings, for example the octave range for CV randomization. To do so, push and hold the SETUP button and push the MAGIC button. Use the DATA encoder to navigate through parameters and the first and the second encoders to adjust settings. Here you also can define, what parameters will be randomized, when one of CH1-CH4 buttons is pressed. - Page 19 You can also select pre-designed step patterns. To do so push and hold the SHIFT button and push the DATA encoder. Now you can rotate the DATA encoder to choose a step selection pattern. Push the encoder to confirm and the pattern is applied to the steps and you can alter them all at once.
- Page 20 5) THROUGH – the incoming CV and GATE is passed directly to the relevant CV and GATE output, and the sequence, running on this channel, is ignored. This is particularly nice feature for MIDI keyboard/ controller, because it turns the Black Sequencer into MIDI-CV converter. NB! The Black Sequencer acts as monophonic MIDI-CV converter with the last note priority.
- Page 21 CLOCK OUT from the Black Sequencer into Gate IN. In this case the note voltage is recorded exactly at the moment, when...
- Page 22 (you can also use the CV value mode too). When in analogue mode, you can record any CV (basically the Black Sequencer works as a CV sampler), and it will be synced to the sequence automatically. Basically the MOD input is sampled on every each new step of the sequence as it advances.
- Page 23 4ppq. If you want other module reset to the initial step when the Black Sequencer is stopped, connect RST OUT on the Black Sequencer to the RST IN of the slave module (the Drums Sequencer in this case) and in General Settings menu (see below) set the RESET OUT to STOP.
- Page 24 Sequencer. The Drum Sequencer doesn’t have a dedicated reset output, but you can configure the TR16 output to output reset signal, so, when you push STOP button on the Drum Sequencer, the Black Sequencer will reset to the first step. Same goes with any other module, you wish to use as a master clock.
-
Page 25: Settings Menu
SETTINGS MENU The SETUP menu provides basic information about the device status, as well as providing access to default settings and the calibration of the sequencer. Rotate the DATA encoder to navigate through the setup icons and push it to confirm the selection! The Info menu indicates information about the firmware and bootloader versions. - Page 26 2) Adjust the note velocity. All notes in the channel will have a fixed velocity, and the Black Sequencer does not have per step velocity setting. 3) Set the pitch bend range that corresponds to the pitch bend wheel range on your synthesizer.
-
Page 27: Firmware Update
CV, GATE, MOD and MIDI INPUTS chapter above! FIRMWARE UPDATE In order to update the firmware of the Black Sequencer, power off your modular case, remove the SD card from the Sequencer, copy the latest firmware file on the root... -
Page 28: Safety Instructions
SAFETY INSTRUCTIONS Please follow the instructions for the use of the Erica Synths module below, because only this will guarantee the proper operation of the module and ensure your warranty from Erica Synths. Water is lethal for most electric devices, unless they are waterproof.
Need help?
Do you have a question about the Black Sequencer and is the answer not in the manual?
Questions and answers