Table of Contents
Advertisement
Advertisement
Table of Contents

Related Manuals for Bowflex LateralX LX5


Summary of Contents for Bowflex LateralX LX5
- Page 1 ™ ™ ™ ASSEMBLY / OWNER’S MANUAL...
-
Page 2: Table Of Contents
Welcome to the Bowflex LateralX LX5 fitness machine! ™ ™ You’re about to experience an incredible workout that can help you lose weight and reshape your entire body so you’ll look and feel better than ever workouts and for tips to keep your machine well maintained. -
Page 3: Important Safety Instructions
Important Safety Instructions When using an electrical appliance, basic precautions should always be followed, including the following: This icon means a potentially hazardous situation which, if not avoided, could result in death or serious injury. Obey the following warnings: Read and understand all Warnings on this machine. Carefully read and understand the Assembly/Owner’s Manual. - Page 4 Before using this equipment, obey the following warnings: Read and understand the complete Manual. Keep the Manual for future reference. Read and understand all Warnings on this machine. If at any time the Warning stickers become loose, unreadable or dislodged, replace the labels.
-
Page 5: Safety Warning Labels And Serial Number
Safety Warning Labels and Serial Number WARNING! used while using this machine. • Not intended for children under 14 yrs. of age. • Keep children & pets away. warnings and safety information. • Heart rate displayed, if applicable, is an approximation and should be used for reference only. - Page 6 Specifications / Before Assembly Maximum User Weight: Maximum Pedal Height: Machine Weight: Total Surface Area (footprint) of equipment: 16,007 cm 159.8 cm Power Requirements: (62.9”) 117.7 cm (46.3”) recycled. For proper disposal of this product, please follow the pre 136 cm (53.5”) scribed methods at an approved waste center.
-
Page 7: Parts
Parts Item Description Item Description Item Description Foot Pad, Left Lateral Link Pivot Cover, Left Leveler Foot Pivot Cover, Inside, Left Static Handlebar Console Mast Console Upper Shroud, Left Parallel Link Handlebar Link Chest Strap Media Cable Pedal Shroud, Left Assembly / Owner’s Manual... - Page 8 Hardware / Tools Item Description Item Description Screw, Pan Head Phillips M6x8 Flat Washer, M8 Narrow Spring Washer, M8 Push Fastener, 10mm x 50mm Screw, M4x40 Wave Washer, M20 Flat Washer, M8 Wide Note: after the proper assembly of your machine. Tools Included Not Included...
-
Page 9: Unboxing Your Machine
Unboxing Your Machine that involve heavy lifting or awkward movements on your own. Note: smaller parts. 1. Carefully Turn Box 2 on Long Side and Cut the Packing Tape on the Bottom of the Box This step requires two people. 2. - Page 10 4. Remove the Packaging Material Around the Parts Note: parts are embedded in the foam packaging. 5. Cut the Zipties that Attach the Engine Assembly to the Shipping Platform NOTICE: Ziptie Assembly / Owner’s Manual...
- Page 11 Assembly Some components of the machine can be heavy or awkward. Use a second person when doing the assembly steps involving these parts. Do not do steps that involve heavy lifting or awkward movements on your own. 1. Install Levelers on the Base Assemblies and Install Base Assemblies to the Engine Assembly Note: Be sure to FULLY and set it safely aside.
- Page 12 2. Install Console Mast to Frame Assembly Note: Do not fully tighten until all hardware has been installed. NOTICE: the cable connections are reversed, the Console will not turn on or the Static Handlebar buttons will not work. Do not crimp the Cables.
- Page 13 3. Attach the Shrouds and Mast Gasket to Frame Assembly Insert the Push Fasteners (F) in the mount holes in the Left Shroud. Put the Left Shroud in position. Align the Right Shroud with the Push Fasteners and move the Right Shroud into position. Push the Shrouds together so that the Push Fasteners are fully seated.
- Page 14 5. Attach Pivot Covers to Handlebar Arms, and Install Handlebar Arms NOTICE: detail 5a. G (X2) Be aware that the Handlebars are top heavy, and will want to pivot when attached onto the Pivot Rod. Be sure to stay out of the path of the Handlebar and to gently allow it to pivot to a rest. FULLY tighten the screws (H1) from Step 4.
- Page 15 6. Attach Pedal Arms to Crank Arms Note: being caught or pinched. Be sure to install hardware and parts in the correct order to ensure smooth, quiet operation of the machine. other washers at this time. Note: Assembly / Owner’s Manual...
- Page 16 C (X2) 6. Fully tighten screw C. 7. Fully tighten screws Q. Assembly / Owner’s Manual...
- Page 17 7. Attach the Parallel Links to Pedal Arms and Crank Arms Note: 8. Attach the Pedal Shrouds and Footpads to Pedal Arms Note: Fully tighten the hardware. Assembly / Owner’s Manual...
- Page 18 9. Attach Lateral Links to Crank Arms and then Pedal Arms NOTICE: 1. 3. Fully tighten the hardware. Assembly / Owner’s Manual...
- Page 19 10. Install Static Handlebar to Console Mast NOTICE: Do not crimp the Cables. Note: the Mast cable connectors. Slide the Static Handlebar onto the mount tube and install the hardware. 11. Remove the Hardware from the Console NOTICE: Do not crimp the Cables. Assembly / Owner’s Manual...
- Page 20 12. Route Console Cables through Mounting Plate and Attach the Console NOTICE: Do not crimp the Cables. If the Mast Cables are routed through the Mounting Plate on the Console Mast, pull them back through the opening. Make sure the Mast Cable connectors do not fall into the Console Mast. 13.
- Page 21 14. Connect the Power Adapter to the Power Cord, and Connect to Frame Assembly NOTICE: 15. Final Inspection Suspension option is set to the same position for both Pedals. Note: Do not use until the machine has been fully assembled and inspected for correct performance in accordance with the Owner’s Manual.
-
Page 22: Moving Your Machine
Adjustments Moving Your Machine NOTICE: Always disconnect the power cord and power adapter from the wall outlet and the machine before attempting to move the machine. Do not use the handlebars, Console Mast, or the Console to lift or move the machine. Injury to you or damage to the machine can occur. The machine may be moved by one or more persons depending on their physical abilities and capacities. -
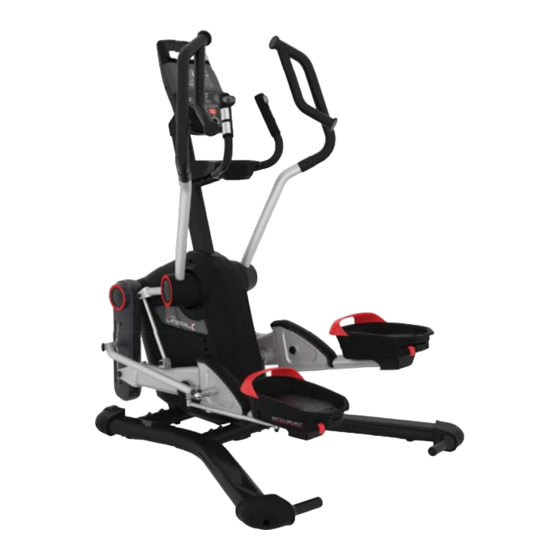
Page 23: Features
Features Console MP3 Input Lateral Stride Controls e Controls Upper Handlebar Contact Heart Media Cable Fully Shrouded Flywheel Static Handlebar Speaker Cupholder Pedal Power Inlet Leveler Switch Select™ Pedal Suspension Lever Use the values calculated or measured by the machine’s computer for reference purposes only. The heart rate Assembly / Owner’s Manual... - Page 24 Console ® display program ™ Program buttons Fan button button Bluetooth App Connected display ® Active User display User button X-mode button ™ 16 minute interval program. ™ Increase ( ) / Decrease ( ) buttons Assembly / Owner’s Manual...
- Page 25 ENTER button Left ( ) / Right ( ) buttons Program buttons always selected. START button Push to start the currently selected workout Program, or resume a paused workout. STOP/PAUSE button Volume button It does not affect the output from the headphone jack. Fan button Console Display Interval progress...
- Page 26 Interval Time displays during the workout. Intervals Progress display Calories display Sprint display Recover display Benefit Zone display Coa ching Card display Upper Body display Total Body display Lower Body display Forward/Reverse display Lateral Stride display Heart Rate display shown as solid. Workout Segment (Brickyard) display location in the workout.
- Page 27 Resistance display Remote Resistance and Lateral Stride Controls – Do not push these buttons when grabbing onto the Static Handlebar. Bluetooth Connectivity with the “Bowflex LateralX™” Fitness App ® ® Note: Workout with Other Fitness Apps connectivity which allows it to work with a number of digital partners. For our latest list of supported ®...
- Page 28 Remote Heart Rate Monitor Note: compatible model. ® OwnCode ® ® ® If you have a pacemaker or other implanted electronic device, consult your doctor before using a wireless chest strap or other telemetric heart rate monitor. Chest Strap Using the provided heart rate transmitter chest strap lets you monitor your heart rate at any time during your workout.
- Page 29 • Calluses and hand lotion may act as an insulating layer to reduce the signal strength. • • If your heart rate signal ever seems erratic after validation, wipe off your hands and the sensors and try again. Assembly / Owner’s Manual...
-
Page 30: Operations
Operations What to Wear How Often Should You Exercise of breath, or feel faint. Contact your doctor before you use the machine again. Use the values calculated or measured by the for reference only. • 3 times a week for 30 minutes each day. •... - Page 31 4. Step off of the machine and release your grip from the Static Handlebars. Power Up / Idle Mode program. ™ Shut Off (Sleep Mode) Note: 1. From the value. Note: Use the Increase ( Assembly / Owner’s Manual...
-
Page 32: Workout Programs
Programs Getting Started ™ get used to it. ™ ™ ™ X-mode 16 Minute Interval Program (initial default program) ™ mode™ workout that you can start with the simple touch of the button. ™ minutes for each interval. 2. Mount the machine. ™... - Page 33 mum number of workouts is reached, the oldest workout will be erased. Interval Workout Programs X-mode 16 Minute Interval ™ Lateral Stride Interval 00Walking0interval000 00LATERAL0STRIDE0int0 Thigh Toner Interval 00Walking0interval000 0THIGH0TONER0interval • Lateral Stride buttons disabled Quad Power Interval 00Walking0interval000 0QUAD0POWER0interval0 30 secs Total Body 00Walking0interval000...
- Page 34 Stand Squat 00Walking0interval000 00000STAND0SQUAT00000 Dual Direction 00Walking0interval000 000DUAL0DIRECTION0000 Steady State Programs Fat Burn 00Walking0interval000 000000FAT0BURN0000000 Calorie Goal 00Walking0interval000 00o00CALORIE0GOAL0000 Note: 50 calories is the minimum, 9950 calories is the maximum. Manual Note: 00Walking0interval000 0000000MANUAL00000000 Starting a Workout 2. Mount the machine. Be sure that the workout space you are utilizing has adequate height clearance, taking into consideration the height of the user and Assembly / Owner’s Manual...
-
Page 35: Pausing Or Stopping
Your workout will begin after the three second, audible beep countdown. stride width can occur during workouts, and be attentive in order to avoid loss of balance and possible injury. pared for changes in Resistance and Lateral Stride width with each segment change. If the Sound has been muted, the Console will display the “AUDIO OFF”... -
Page 36: Celebrations
Workout Complete / Results workout results. If the Console does not receive any further input after 5 minutes, the Console will shut off. Customize the Goal for the Calorie Goal Program calories the maximum value. Celebrations When a Celebration is earned the Console will make an audible sound, display the name of the achievement, and animate the lights in a certain sequence. -
Page 37: Machine Settings Mode
Machine Settings Mode Mode. Note: Note: ® Note: Assembly / Owner’s Manual... -
Page 38: Maintenance
Maintenance done. Worn or damaged components must be repaired or replaced immediately. Only manufacturer supplied components can be used to maintain and repair the equipment. If at any time the Warning labels become loose, unreadable or dislodged, replace the labels. If purchased in US/Canada, contact Customer Service for replacement labels. - Page 39 Replace Batteries in Chest Strap Do not perform this procedure outdoors or in moist or wet locations. Note: Discard the old battery. Dispose of in accordance with local CR2032 Inspect your chest strap to ensure function. Do not use until the equipment has been fully assembled and inspected for correct performance in accordance with the Owner’s Manual.
-
Page 40: Maintenance Parts
Maintenance Parts Item Description Item Description Item Description Item Description Console Static Handlebar Data Cable, Lower Lateral Console Mast Cupholder Crank Pulley, Second Stage Crank Leveler Foot Pedal Shroud, Left Foot Pad, Left Data Cable, Upper Lateral Upper Shroud, Left Parallel Link Speed Sensor Magnet Wire... - Page 41 Troubleshooting Condition/Problem Things to Check Solution Make sure unit is plugged into a functioning wall outlet. will not turn on Check connection at front of unit tion at unit if either are damaged. Check data cable integrity cable. orientation connector should line up and snap into place. Check console display for Check for visual sign that console display is cracked or otherwise damaged.
- Page 42 Condition/Problem Things to Check Solution Check Speed Sensor (requires Speed sensors should be aligned with magnet and connected to data cable. the connecting wire. Fan will not turn on or will not Check data cable integrity turn off orientation connector should line up and snap into place. Fan will not turn on, but Console Check for blockage of fan operates...
- Page 43 Bowflex™ Body Weight Loss Guide Introduction and Overview ™ • Lose weight and get lean • Improve your health and wellness • Increase your energy and vitality in your chest, become short of breath, or feel faint. Contact your doctor before you use the machine again. Use the values calcu- mation and should be used for reference only.
- Page 44 • • • Cooked vegetables instead of salad • Eat your calories • If you’re still hungry after or in between meals: and sometimes it will pass. If your goal is muscle gain or strength: • Use the same meal plan but increase portion sizes in the same ratios to increase the total number of calories you eat every day. For example, needs in order to gain muscle and strength.
- Page 45 Breakfast Snack #1 smart rich fruit protein carb carbs smart protein carb veggies protein/fat Lunch Snack #2 healthy smart protein carb smart protein carb veggies Dinner healthy smart protein carb veggies Assembly / Owner’s Manual...
- Page 46 Breakfast Options Fruit Smart Carb Protein/Fat Fruit and Nut Oatmeal Cook Plain oats Nuts and milk nuts, milk, cinnamon, and honey. bread and top with 1 slice of cheese, 1 slice of ham, and tomato. Yogurt Power Parfait Chopped fruit of your choice Oats, wheat germ, and ground with fruit.
- Page 47 Snack Options Smart Carb Protein 1 medium apple 2 tbsp hummus 1 serving of crackers* 1 string cheese Optional Treats • ½ cup lowfat ice cream • 1 small bag of baked potato chips • 4oz of wine or 12oz light beer •...
- Page 48 Portion Size Guide MALE FEMALE PROTEIN 2 eggs 1 egg 1 cup greek yogurt* 1.5oz cheese* 1.5oz cheese* HEALTHY FAT 1 tblspn peanut or nut butter* SMART CARB = golf ball quinoa, pasta 1 medium sweet or regular potato regular potato 2 corn tortillas 2 corn tortillas 1 slice of bread (or 2 light slices equaling 120 calories...
- Page 49 Grocery List BREAD & GRAINS 100% whole wheat bread Sprouted grain breads less than 100 calories per slice. Sandwich or bagel thins DAIRY & DAIRY ALTERNATIVES CRACKERS, SNACKS & ENERGY BARS Crackers Hummus string cheese, or single serving packages energy bars with less than 200 calories and 20g of sugar and at least 3g MEAT, FISH, POULTRY &...
- Page 50 Keep It Going Tips for continued weight loss and maintaining changes • Keep weighing yourself weekly, even after you’ve reached your goal weight • Continue keeping a food log. feel like you have to do it every day. • Prepare for plateaus. and changes, and mix up your workouts to help overcome the plateau.
- Page 51 Warranty ( If purchased in US/Canada ) Who Is Covered This warranty is valid only to the original purchaser and is not transferable or applicable to any other person(s). What Is Covered Nautilus, Inc. warrants that this product is free from defects in materials and workmanship, when used for the purpose intended, under normal conditions, and provided it receives proper care and maintenance as described in the Product’s Assembly and Owner’s manual.
- Page 52 ™ ™ ™ ™ ™ 8020250.070119.B...
Need help?
Do you have a question about the LateralX LX5 and is the answer not in the manual?
Questions and answers