
Related Manuals for Bowflex 2


Summary of Contents for Bowflex 2
-
Page 1: Fitness Guide
Owner’ s Manual & Fitness Guide Written By: Tom Purvis RPT, RTS Registered Physical Therapist and founder of the Resistance Training Specialist Program Special Edition Includes: Dr. Ellington Darden’ s Six Week Fast Fat Loss — Body Leanness Program OWFLEX ®... -
Page 2: Table Of Contents
Seated (straight Leg) Calf Raise Standing Leg Kickback Kneeling Leg Kickback Standing Hip Abduction Seated Hip Adduction Seated Hip Abduction Ankle Inversion Ankle Eversion Deadlift Stiff-Leg Deadlift Fast Fat Loss Now The Bowflex Body Leanness Program By Dr. Ellington Darden... -
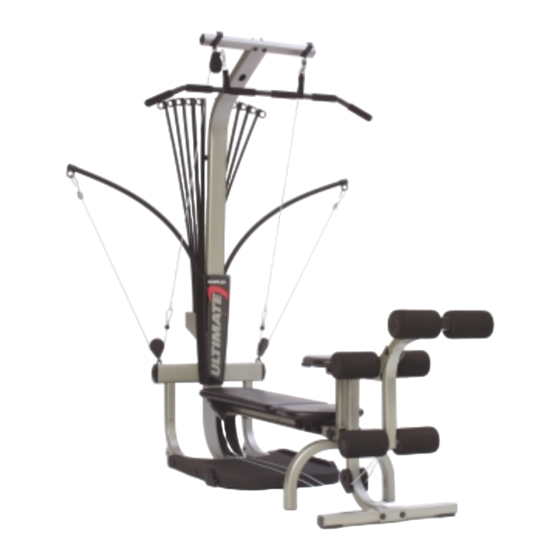
Page 3: Getting To Know Your Machine
Everyone at Bowflex, Inc. would like to thank you for your trust and your confidence in our product. Bowflex is as good as we say it is, and you’re just about to prove it to yourself. Again, thank you for choosing Bowflex. -
Page 4: Using Your Machine
Each rod is marked with its weight rating on the rod cap. Adjusting And Understanding The Resistance The Bowflex Ultimate comes with 310 pounds of resistance (one pair of 5-pound rods, two pairs of 10- pound rods, one pair of 30-pound rods, and two pairs of 50-pound rods). -
Page 5: The Workout Bench
Flat Position 1 & 2: Along the side of the seat rail there are three holes for the spring lock seat pin. Pull out on the pin and slide the entire bench forward until the spring lock seat pin locks into a hole. - Page 6 Leg Press Belt The Leg Press Belt is used exclusively for the Leg Press and the Seated Hamstring Curl exercises. • With the Bowflex seat adjusted to the “free sliding” position (spring lock seat pin unlocked), the hand grips removed, and the...
- Page 7 Rod resistance to the pulley. Exercises in the wide position may require a The Bowflex Ultimate adjustable pulley system allows you to work the same muscles from different angles, depending on the width of the pulley angle. Using the Bowflex...
- Page 8 The leg extension/leg curl attachment attachment to the end of uses two knobs to attach to the Bowflex, at the end of the sliding seat rail. the sliding seat rail. Remove the knobs from the attachment and place the attachment over the end of the seat rail.
- Page 9 1. Remove the leg attachment from the Bowflex, if attached. 2. Lock the seat and bench into place using the spring lock seat pin. 3. Hook cables into cable storage loops.
-
Page 10: About Your Bowflex Attachments
About Your Bowflex Attachments The Bowflex Leg Extension / Leg Curl Attachment This attachment is designed to add more effectiveness to all exercise routines where “leg work” is required. Safety • Before using the attachment, make sure all fasteners are in place and tightened. - Page 11 Please Follow These Instructions • Keep your body weight centered on the machine, bench, or standing platform while exercising. • When using the Bowflex for standing leg exercises, always grasp the Power Rods for stability. ®...
-
Page 12: Defining Your Goals
It comes into play when you jog a mile or ride a bike. It is a critical component of overall fitness and health. Any exercise program must be supplemented with cardiovascular training, such as rowing on the Bowflex. -
Page 13: Reaching Your Goals
So complement your resistance training with aerobic exercise such as walking, running, bicycling or rowing on the Bowflex. Training variables: When designing your own program there are several variables that, when mixed properly, will equal the right fitness formula for you. -
Page 14: Exercising Properly
DO NOT hold your breath. Do not exaggerate breathing. Depth of inhalation and exhalation should be natural for the situation. 2) Allow breathing to occur naturally. Don’t force it. ®. Performing Your Routine The workout portion of your fitness routine is the series of exercises devoted to your particular goals. -
Page 15: The Workouts
Use a pace that will allow you to stop the movement instantly at any point in the rep. Count three seconds up and three seconds down and work to fatigue during each set. Day 1 & 3 Body Part Chest Shoulders Arms Legs Day 2 & 4 Body Part Back Shoulders Arms Trunk The Workouts TIME: ABOUT 20 MINUTES... -
Page 16: Minute Upper / Lower Body
This program provides you with a quick and effective workout that combines muscle conditioning with some cardiovascular benefits. Do this routine when you are limited in time or just want a variation to your normal routine. Perform this program training 2 days, resting 1 to 2. Perform all exercises to near failure, stopping at the point that your technique starts to deteriorate. -
Page 17: Body Building
Move slowly on each rep. Use a pace that will allow you to stop the movement instantly at any point in the rep. Count three seconds up and three seconds down and work to fatigue during each set. DAY 1 Body Part Chest Shoulders DAY 2 Body Part Back Arms DAY 3 Body Part... -
Page 18: Circuit Training Anaerobic / Cardiovascular
Initially, start with completing one round of Circuit 1. Then add an additional round of the same circuit. Once you reach three rounds of Circuit 1, add one round of Circuit 2. Add additional rounds of Circuit 2 as your fitness level increases. Repeat process with Circuit 3. Do not let your heart rate exceed 220 minus your age. -
Page 19: True Aerobic Circuit Training
Initially, start with completing one round of Circuit 1. Then add an additional round of the same circuit. Once you reach three rounds of Circuit 1, add one round of Circuit 2. Add additional rounds of Circuit 2 as your fitness level increases. Repeat process with Circuit 3. Do not let your heart rate exceed 220 minus your age. -
Page 20: Strength Training
Move slowly on each rep. Use a pace that will allow you to stop the movement instantly at any point in the rep. Count two seconds up and four seconds down and work to fatigue during each set. Day 1 Body Part Chest Shoulders Day 2 Body Part Back Arms Body Part Day 3... -
Page 21: Chest Exercises
BENCH PRESS Shoulder Horizontal Adduction (and elbow extension) — Muscles worked: This exercise emphasizes the chest muscles (pectoralis major). It also involves the front shoulder muscles (anterior deltoid, a portion of the middle deltoid) and the triceps, which are located on the back of the upper arm. Pulley position: Wide or narrow (Wide offers a greater challenge throughout the entire range on specific movements, especially at the top of... -
Page 22: Incline Bench Press
• You may also utilize the alternate incline bench press position by placing your feet on the forward leg of the Bowflex and using your legs to slide the torso upward on the bench so that your head is near the lat tower. -
Page 23: Decline Bench Press
DECLINE BENCH PRESS - Shoulder Horizontal Adduction (with elbow extension) Muscles worked: The entire chest muscle (pectoralis major) is emphasized. It also involves the front shoulder muscles (anterior deltoid, a portion of the middle deltoid) and the triceps, which are located on the back of the upper arms. Pulley position: Wide or narrow (Wide offers a greater challenge throughout the entire range on specific movements, especially at the top of... -
Page 24: Lying Cable Crossover
LYING CABLE CROSSOVER — Shoulder extension/adduction (elbow stabilized near extension) Muscles worked: This exercise emphasizes the chest (the pectoralis major muscles). The triceps muscles, located on the back of the upper arms, are also involved in maintaining the elbow position and also help with shoulder motion. -
Page 25: Shoulder Exercises
Shoulder Exercises SEATED SHOULDER PRESS — Shoulder Abduction (with elbow extension) Muscles worked: This exercise emphasizes the front portion of the shoulder muscles (front deltoids as well as the front part of the middle deltoids), the rotator cuff muscles, the upper back muscles (trapezius), and the triceps muscles located on the back of the upper arms. -
Page 26: Rear Deltoid Rows
Shoulder Exercises REAR DELTOID ROWS — Shoulder Horizontal Abduction (with elbow flexion) Muscles worked: This exercise emphasizes the back portion of the shoulder muscles (the rear deltoids, as well as the rear portion of the middle deltoids, the posterior rotator cuff, upper lat and teres major) as well as the trapezius and rhomboids. -
Page 27: Seated Lateral Shoulder Raise
Shoulder Exercises SEATED LATERAL SHOULDER RAISE Muscles worked: This exercise emphasizes the side shoulder muscles (middle deltoids), the top muscle of the rotator cuff (supraspinatus) and the trapezius muscles. Pulley position: Narrow. Starting position: • Sit on the bench facing the Power Rods, knees bent and your feet on the platform. -
Page 28: Scapular Depression
Shoulder Exercises SCAPULAR DEPRESSION Muscles worked: This exercise involves your lower trapezius muscles, and latissimus dorsi muscles. Both act as stabilizers and movers of your shoulder blades. This motion of scapula depression is very important in posture as well as when using the arms to raise from a chair. It is also involved in overhead pulling exercises. -
Page 29: Shoulder Rotator Cuff
Shoulder Exercises SHOULDER ROTATOR CUFF Muscles worked: This exercise emphasizes the rear portion of the rotator cuff (infraspinatus and teres minor muscles). This area generally gets very weak as we age and needs to be addressed by almost everyone. Pulley position: Wide or narrow. Starting position: •... -
Page 30: Shoulder Shrug
Shoulder Exercises SHOULDER SHRUG — Scapular Elevation Muscles worked: The primary muscles emphasized are the upper trapezius and associated smaller muscles of the region. Pulley position: Narrow or wide. Starting position: • Stand on the platform facing the Power Rods. Reach down and grasp the handles with the palms facing each other or facing backward, as comfort dictates. -
Page 31: Lying Front Shoulder Raise
Shoulder Exercises LYING FRONT SHOULDER RAISE Muscles worked: This exercise emphasizes the front portion of the shoulder muscles (front deltoids as well as the front part of the middle deltoids). Pulley position: Narrow only. Starting position: • Sit on the bench facing the Power Rods, knees bent and feet flat on the platform. -
Page 32: Military Press
Shoulder Exercises MILITARY PRESS Muscles worked: This exercise emphasizes the front portion of the shoulder muscles (front deltoids and the front part of the middle deltoids), the rotator cuff muscles, the upper back muscles (trapezius), and the triceps muscles located on the back of the upper arms. -
Page 33: Back Exercises
LYING SHOULDER PULLOVER Muscles worked: This exercise emphasizes the upper back (the latissimus dorsi, teres major, and rear deltoid muscles). It also involves the chest (the pectoralis major muscles). The triceps muscles, located on the back of the upper arms, are involved in maintaining the elbow position and also help with shoulder motion. -
Page 34: Narrow Pulldowns
NARROW PULLDOWNS — Shoulder Extension (with elbow flexion) Muscles worked: This exercise emphasizes the latissimus dorsi, teres major and rear deltoid which make up the large pulling muscles of your upper back. It also involves the muscles on the front of your upper arms (the biceps group) which are responsible for bending your elbows. -
Page 35: Lying Narrow Lat Pulldowns
LYING NARROW LAT PULLDOWNS Muscles worked: This exercise emphasizes the latissimus dorsi, teres major and rear deltoid which make up the large pulling muscles of your upper back and eliminates the biceps from the movement. Pulley position: Narrow only. Starting position: •... -
Page 36: Seated Lat Rows
SEATED LAT ROWS — Shoulder Extension (with elbow flexion) Muscles worked: This exercise emphasizes the latissimus dorsi, teres major and rear deltoid muscles which make up the large pulling muscles of your upper back as well as the trapezius and rhomboids. The biceps muscles on the front of the upper arms are also involved in this movement. -
Page 37: Reverse Grip Pulldowns
REVERSE GRIP PULLDOWNS Muscles worked: This exercise emphasizes the latissimus dorsi, teres major and rear deltoid which make up the large pulling muscles of your upper back. It also involves the muscles on the front of your upper arms (the biceps group) which are responsible for bending your elbows. -
Page 38: Stiff Arm Pulldown
STIFF-ARM PULLDOWN — Shoulder Extension (elbow stabilized near extension) Muscles worked: This exercise emphasizes your upper back (the latissimus dorsi, teres major and rear deltoid muscles), as well as the muscles between the lower part of your shoulder blades (lower trapezius muscles). The triceps muscles, located on the back of the upper arms, will also be involved. -
Page 39: Arm Exercises
FRENCH PRESS — Elbow Extension Overhead Muscles worked: This exercise emphasizes the triceps muscles located on the back of the upper arms. Pulley position: Narrow only. Starting position: • Sit on the bench facing away from the Power Rods. Bend the knees and place your feet flat on the floor. -
Page 40: Lying 45 Degree Triceps Extension
LYING 45 DEGREE TRICEPS EXTENSION Muscles worked: This exercise emphasizes the triceps muscles located on the back of the upper arms. Pulley position: Narrow only. Starting position: • Lie on your back with your head toward the Power Rods, knees bent and your feet flat on the floor. -
Page 41: Rope" Pushdowns
“ROPE” PUSHDOWNS — Elbow Extension Muscles worked: This exercise emphasizes the triceps muscles located on the back of the upper arms. These muscles are responsible for straightening your arms and assist in any upper body pushing or pressing motion. Pulley position: Lat tower. Starting position: •... -
Page 42: Cross Triceps Extension
CROSS TRICEPS EXTENSION Muscles worked: This exercise develops the triceps muscle located on the back of the upper arms. Pulley position: Wide only. Starting position: • Seated in the 45 degree position, reach across and straight behind your body, grasp a handle, and bend your elbow until your hand is near your chest. -
Page 43: Seated Triceps Extension
SEATED TRICEPS EXTENSION Muscles worked: This exercise emphasizes the triceps muscles located on the back of the upper arms. Pulley position: Narrow only. Starting position: • Seated in the 45 degree position, reach straight behind your body, grasp the handles, and bend your elbows until your hands are near your chest and your palms are facing toward the floor. -
Page 44: Seated Biceps Curl
SEATED BICEPS CURL — Elbow Flexion (in supination) Muscles worked: This exercise emphasizes and develops the biceps muscles, which are located on the front of your upper arms and are primarily responsible for bending your elbows, as well as the brachialis and brachioradialis. -
Page 45: Standing Wrist Extension
STANDING WRIST EXTENSION Muscles worked: This exercise emphasizes the back and top parts of your forearms. It also isometrically challenges your elbow flexors, located on the front part of your upper arms. Pulley position: Narrow. Starting position: • Remove the bench and stand on the platform facing the Power Rods. -
Page 46: Standing Wrist Curl
STANDING WRIST CURL Muscles worked: This exercise emphasizes the front part of your forearms as well as increases the strength of your grip. It also isometrically challenges your elbow flexors, located on the front part of your upper arms. Pulley position: Narrow. Starting position: •... -
Page 47: Lying Biceps Curl
LYING BICEPS CURL — Elbow Flexion (in supination) Muscles worked: This exercise emphasizes and develops the biceps muscles, which are located on the front of your upper arms and are primarily responsible for bending your elbows, as well as the brachialis and brachioradialis. -
Page 48: Barbell Curls
BARBELL CURLS — Elbow Flexion (in supination) Muscles worked: This exercise emphasizes and develops the biceps muscles, which are located on the front of your upper arms and are primarily responsible for bending your elbows. The brachialis and brachioradialis are also involved. -
Page 49: Abdominal Exercises
Abdominal Exercises SEATED (RESISTED) ABDOMINAL CRUNCH Muscles worked: This exercise emphasizes the abdominal area including the upper and lower front abs (rectus abdominus) and the side abs (obliques). Pulley position: Wide or narrow. Starting position: • While seated in the 45 degree position, spread the cuffs from the handles and put the arms through, positioning each cuff around the front of the respective shoulder. -
Page 50: Reverse Crunch
Abdominal Exercises REVERSE CRUNCH — Spinal Flexion Muscles worked: This exercise works your entire abdominal area including your upper and lower front abs (rectus abdominus) and your side abs (obliques). Pulley position: None. Starting position: • With the bench in the flat position, lie on your back with your head toward the Power Rods. -
Page 51: Trunk Rotation
Abdominal Exercises TRUNK ROTATION Muscles worked: This exercise involves most of the trunk and deep spinal muscles. It does not “spot reduce” or eliminate “love handles.” It should be noted that rotation is more limited in the spine than most people realize and should be performed with minimal resistance, and always in proper erect alignment. -
Page 52: Leg Exercises
LEG EXTENSION Muscles worked: This exercise emphasizes the muscles on the front of the upper thigh (quadriceps muscle group) which are responsible for straightening your leg against resistance. This powerful muscle group helps provide stability for the knee joint and is essential for producing power in running, jumping and lifting activities. -
Page 53: The Squat
THE SQUAT — Knee Extension, Hip Extension, Ankle Plantarflexion Muscles worked: Although the squat is often considered a total body exercise, the glutes, adductors, hamstrings and quads are primary movers and the spinal erectors are key to stabilization. Pulley position: Low pulley. Starting position: •... -
Page 54: Lying (Prone) Leg Curl
LYING (PRONE) LEG CURL Muscles worked: This exercise emphasizes the hamstring muscle group (biceps femoris, semimembranosus, semitendinosus) on the back of the thigh as well as the back of the calf (gastrocnemius). Pulley position: Narrow. Starting position: • Seated on the flat bench, attach the cuffs to the respective ankles. -
Page 55: Standing Hip Flexion
STANDING HIP FLEXION — With knee flexion Muscles worked: This exercise primarily develops and strengthens the muscles on the front of your hips (iliopsoas and rectus femoris) that are primarily responsible for bending or flexing your hips. Pulley position: Narrow. Starting position: •... -
Page 56: Lying Leg Extension
LYING LEG EXTENSION — Knee Flexion with Hip Flexion Muscles worked: This exercise allows you to strengthen and develop the front part of your upper thighs (quadriceps muscle groups), helping to increase your muscular stability at the knee joints. Pulley position: Narrow. Starting position: •... -
Page 57: Standing Leg Kickback
STANDING LEG KICKBACK — Hip extension and knee extension Muscles worked: This exercise strengthens and develops the muscles of your buttocks area (gluteus maximus). Remember, there is no such thing as “spot reduction.” Do not do this exercise because you believe it will remove fat from this area —... -
Page 58: Standing Hip Abduction
STANDING HIP ABDUCTION Muscles worked: This exercise will not burn off fat from your hips or outer thigh! There is no exercise that will burn fat from a specific area. This exercise will, however, strengthen the muscles on the sides of your hips (gluteus medius), especially on the standing/support side. -
Page 59: Seated Hip Abduction
SEATED HIP ABDUCTION Muscles worked: This exercise will not burn off fat from your outer thighs or make them smaller! There is no exercise that will burn fat from a specific area. This exercise will, however, strengthen the muscles on the sides of your hips, which in the seated (hip flexed) position includes the piriformis and gluteus maximus. -
Page 60: Ankle Eversion
ANKLE EVERSION Muscles worked: This exercise strengthens and develops the muscles on the outside of your lower legs (peroneals). These muscles are essential for standing balance and lateral agility of the ankle. Pulley position: Narrow. Starting position: • Sit on the bench with one side of your body facing toward the Power Rods. -
Page 61: Stiff-Leg Deadlift
STIFF-LEG DEADLIFT – Hip extension Muscles worked: This exercise emphasizes and develops the hamstrings and glutes, while requiring the spinal erectors to stabilize. Pulley position: Low pulley Starting position: • Remove the bench and stand on the platform facing the Power Rods. •... -
Page 62: Fast Fat Loss Now
Fast Fat Loss Now! The Bowflex Body Leanness Program By Ellington Darden, Ph.D. The following program was created by Dr. Ellington Darden. It contains a rigorous fitness and dietary program. Please consult your physician before beginning any fitness or dietary program. - Page 63 Before starting the exercise routine you must be familiar with your Bowflex. You should experiment with finding the proper amount of resistance to use on each exercise. You should be able to perform 8 repetitions, but not more than 12 repetitions, for each exercise.
- Page 64 That’s right. Similar results can be accomplished by you in six short weeks, which include just 18 workouts (3 per week) on the Bowflex machine. Bowflex was a significant part of the results. The exercises performed on it allowed the participants to build muscle, which accelerated their metabolisms, and produced faster and greater fat losses.
- Page 65 Use a plastic tape to measure the following: 1) Upper arms — hanging and relaxed, midway between the shoulder and elbow. 2) Two inches above navel — belly relaxed. 3) At navel — belly relaxed. 4) Two inches below navel — belly relaxed.
- Page 66 Skinfold Measurements To accurately track your progress through this six-week program, it is necessary to take skinfold measurements. By measuring yourself in this way, you will be able to determine your lean-body mass and your body-fat percentage. The goal of this program is to increase your lean-body mass and decrease your body-fat percentage. Please read this section carefully.
- Page 67 1) Keep everything the same. Wear the same outfit, a snug solid color is best, and have the person taking the picture stand in the same place, with the same setting behind you. 2) Make sure you stand against an uncluttered, light background. Measurements Chest...
-
Page 68: Determining Your Body Fat
1) Locate the sum of your three skinfolds in the right column and mark it. 2) Locate your age in years on the far left column and mark it. 3) Connect the two marks with a straightedge. Where the straightedge intersects the line in the middle column appropriate to you, you will find your body-fat percentage. - Page 69 Calculating Lean Body Mass Now that you know your body-fat percentage, you can calculate your lean-body percentage. This will eventually show you how many pounds of muscle were added to your body, after completing the program. For Example: Before the program, Joe weighs 200 pounds and measures 30% fat, which amounts to 60 pounds. Thus, his lean-body mass is 70% or 140 pounds.
- Page 70 Percent Body Fat If you wish to send in your results to Bowflex, please send to: Bowflex Results, 1400 N.E. 136th Ave., Vancouver, WA. 98684. Or you may fax this sheet to Bowflex Results at 1-360-694-7755. Please include your name, address, and phone number.
- Page 71 GUIDELINES Week 1&2 All exercises should be practiced with one set of 8 to 12 repetitions. The style of performance is very important. The movement for each repetition should be 4 seconds in the positive phase and 4 seconds in the negative. Keep the motion slow and smooth.
- Page 72 Eating Guidelines You will be following a reduced-calorie nutrition program, which is divided into three two-week segments. The program is a proven method for achieving maximal fat loss over a six-week period. It consists of a carbohydrate-rich, descending-calorie eating plan, and a superhydration routine. Follow a Carbohydrate-Rich, Descending-Calorie Eating Plan: Approximately 60 percent of the daily calories should be from carbohydrates.
- Page 73 Week 1 = drink 4 32-oz. bottles of ice-cold water per day. Week 2 = drink 4.5 32-oz. bottles of ice-cold water per day. Week 3 = drink 5 32-oz. bottles of ice-cold water per day.
- Page 74 Begin Week 1 on Monday and continue through Sunday. Week 2 is a repeat of Week 1. Calories for each food are noted in parentheses. A shopping list follows on page 74. The eating plan for the next six weeks descends: Week 1 &...
- Page 75 1 slice whole wheat bread (70) Noncaloric beverage Mid-Afternoon Snack Men = 200 calories for Weeks 1&2; 150 calories for Weeks 3&4; 100 calories for Weeks 5&6. Women = 150 calories for Weeks 1&2; 100 calories for Weeks 3&4; 50 calories for Weeks 5&6.
- Page 76 2 teaspoons Promise Ultra Vegetable Oil Spread (24) 1/2 cup skim milk (45) Late-Night Snack Men = 200 calories for Weeks 1&2; 150 calories for Weeks 3&4; 100 calories for Weeks 5&6. Women = 150 calories for Weeks 1&2; 100 calories for Weeks 3&4;...
-
Page 77: Shopping List
Quantities needed for listed items will depend on your specific selections. Review your choices and adjust the shopping list accordingly. It may be helpful for you to photocopy this list each week before doing your shopping. Staples Orange juice, skim milk, whole-wheat bread, Promise Ultra Vegetable Oil Spread, Italian fat-free dressing, Dijon mustard, safflower oil, noncaloric beverages (tea, decaffeinated coffee, diet soft drinks, water). - Page 78 Your teenage son and daughter, however, could follow the Bowflex exercise routines. Q. I’m afraid that I might get large, unfeminine muscles from some of the Bowflex exercises you recommend in this course. What can I do to prevent this from happening? A.
- Page 79 Q. Why is it so important I perform the Bowflex exercises with a 4-second count on the lifting and lowering? A. Because a slow, smooth 4-second lifting followed by a 4-second lowering involves more muscle fibers more thoroughly than faster speeds of movement. The more completely each involved muscle fiber works simply means you’ll get better muscle-building results.
- Page 80 That level is your daily calorie requirement. Naturally, you’ll be able to consume other foods than those listed in the Bowflex eating plan. By then, however, you should know the value of being a smart shopper and a wise eater. Read labels. Compare nutritional information.
-
Page 81: Exercise Log
Please feel free to make copies of this chart to continue your exercise log. EXERCISE Sets Bench Press Reps Resistance Sets Reps Resistance Sets Reps Resistance Sets Reps Resistance Sets Reps Resistance Sets Reps Resistance Sets Reps Resistance Sets Reps Resistance Sets Reps... -
Page 82: Muscle Chart
Sternocleidomastoid Pectoralis Major Anterior Deltoid Medial Deltoid Biceps Brachialis External Obliques Brachioradialis Pronator Teres Flexor Carpi Radialis Tensor Fasciae Latae Iliopsoas Pectineus Rectus Femoris Vastus Lateralis Vastus Medialis Peroneus Longus Extensor Digitorum Longus Tibialis Anterior Muscle Chart Trapezious Serratus Anterior Rectus Abdominus Flexor Digitorum Superficials... - Page 83 1-800-269-3539 for assistance. ©2001 Direct Focus, Inc., 1400 NE 136th Ave. Vancouver, WA, 98684. U.S. Patent numbers 4620704, 4725057, and 4756527. Other foreign and domestic patents pending. Bowflex and the Bowflex logo are registered trademarks of Direct Focus, Inc.
Need help?
Do you have a question about the 2 and is the answer not in the manual?
Questions and answers