Garmin FORCE Installation Instructions Manual
Trolling motor
Hide thumbs
Also See for FORCE:
- Installation manual ,
- Field service manual (84 pages) ,
- User & maintenance manual (26 pages)
Table of Contents
Advertisement
Quick Links
FORCE
TROLLING MOTOR
®
INSTALLATION
INSTRUCTIONS
Getting Started
Do not run the motor when the propeller is out of the water.
Contact with the rotating propeller may result in severe injury.
Do not use the motor in areas where you or other people in the
water may come into contact with the rotating propeller.
Always disconnect the motor from the battery before cleaning or
servicing the propeller to avoid injury.
When stowing or deploying the motor, be aware of the risk of
entrapment or pinching from moving parts, which can result in
injury.
When stowing or deploying the motor, be aware of slick surfaces
around the motor. Slipping when stowing or deploying the motor
may result in injury.
Always wear safety goggles, ear protection, and a dust mask
when drilling, cutting, or sanding.
When drilling or cutting, always check what is on the opposite
side of the surface.
To avoid damage to your boat, this device should be installed by
a qualified marine installer. Specific knowledge of marine
electrical systems is required for proper installation.
After using the motor in salt water or brackish water, you must
rinse off the entire motor with fresh water, and apply a water-
based silicone spray using a soft cloth. You should avoid
spraying jets of water at the cap on the top of the shaft when
rinsing the motor.
Tools and Supplies Needed
5
• Drill and a
/
in. (8 mm) drill bit
16
• #1 and #2 Phillips screwdrivers
• 3 mm and 4 mm hex bits or wrenches (two 4 mm
recommended)
9
•
/
in. (14 mm) socket
16
• Torque wrench
• Circuit breaker rated for continuous 60 A
• Trolling motor plug and receptacle rated for 60 A or greater
(optional)
• 6, 4, or 2 AWG (16, 25, or 35 mm
the power cable
• Solder and heat-shrink tubing, if extending the power cable
• Stainless steel pan head
bolts are not long enough to mount the motor to the deck)
February 2020
WARNING
CAUTION
NOTICE
2
) wire for extended runs of
1
/
-20 (M6x1) bolts (if the included
4
Installation Preparation
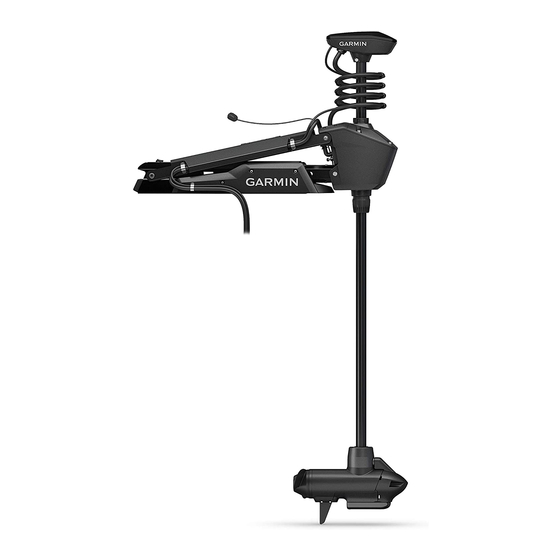
Device Overview
Shaft cap
Power and transducer cables
Steering system
Mount
Depth-adjustment collar
Shaft
Propeller drive motor
Mounting Considerations
When selecting a mounting location, observe these
considerations.
• You must install the motor on the bow of your boat.
• It is recommended to install the motor on the port side of the
bow, but you can install it on the starboard side if necessary.
• You should install the mount so the deployed motor is as
close to the center of the boat
• You must install the mount with the bumper
the gunwale of the boat.
GUID-6360FBE3-F330-46AA-85ED-65D27799C5BC v4
as possible.
overhanging
Advertisement
Table of Contents

Related Manuals for Garmin FORCE


Summary of Contents for Garmin FORCE
- Page 1 Installation Preparation Device Overview FORCE TROLLING MOTOR ® INSTALLATION INSTRUCTIONS Getting Started WARNING Do not run the motor when the propeller is out of the water. Contact with the rotating propeller may result in severe injury. Do not use the motor in areas where you or other people in the water may come into contact with the rotating propeller.
- Page 2 provided. Using power tools to assemble the motor may damage the components, and voids the warranty. Installing the Mount on the Deck Label identifying the parts bag required for this procedure: NOTE: If the supplied bolts are not long enough for the mounting surface, you must obtain the appropriate length stainless steel pan head -20 (M6x1) bolts.
- Page 3 From the inside out, insert the bushings into the lower holes on the steering servo housing. Securing the Upper Gas Spring Label identifying the parts bag required for this procedure: Push the safety rod toward the steering servo housing as far as possible to lock the lower pivot pin in place.
- Page 4 NOTE: The connector is keyed to fit into the port one way only, and will fit easily when aligned correctly. Do not force the connector into the port. Pivot the upper link of the mount forward.
- Page 5 Measure approximately 40 cm (16 in.) on the power cable against the mount, aligning the holes on the bracket with the from where it connects to the steering servo housing, and holes on the mount. look for the mark on the cable applied at the factory. Using a 3 mm hex bit or wrench, secure the bracket to the mount using two screws Hold the cables against the bottom of the mount where they...
- Page 6 Force Trolling Motor Foot Pedal Installation Instructions, in the horizontally so it is less likely to fall out during installation. foot pedal box. Operation instructions are included in the Force Trolling Motor Quick Start Manual. Align the channel on the inside of the propeller with the pin, and slide the propeller onto the motor shaft.
- Page 7 • Check the mount rails, and replace them if necessary Go to my.garmin.com/registration. • Check the mount bumper, and replace it if necessary Sign in to your Garmin account. • Clean or replace the anodes in the propeller drive motor Contacting Garmin Support Motor Information •...
- Page 8 Garmin Ltd. or its subsidiaries, registered in the USA and other countries. These trademarks may not be used without the express permission of Garmin. You should reference United States Code of Federal Regulations: 33 CFR 183 - Boats and Associated Equipment and ABYC E-11: AC and DC Electrical Systems on Boats when installing this trolling motor.
Need help?
Do you have a question about the FORCE and is the answer not in the manual?
Questions and answers