Table of Contents
Advertisement
Quick Links
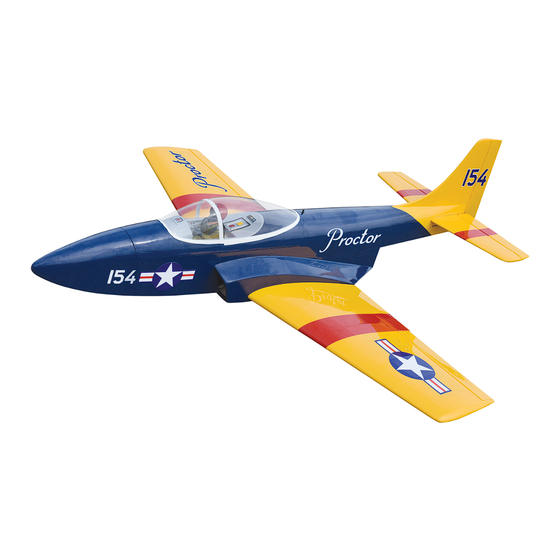
PROCTOR
ALL BALSA - PLY WOOD CONSTRUCTION.
COVERED WITH ORACOVER
95% ALMOST READY TO FLY
SPECIFICATION
Wingspan: 1,360 mm (53.54 in).
Length: 1,480 mm(58.27 in).
Weight: 3.6 kg (7.92 lbs).
Wing area: 40.6 dm
Wing loading: 88.6 g/dm
Wing type: Naca airfoils.
Gear type: Electric retract gear,
size: (73.5 x 44 x 28)mm (not included).
CNC Suspension Metal Struts (included).
Instruction Manual Book
.
2
2
Parts listing required (not included):
Radio: 06 channels.
Servo: 07 standard high torque servos,
size: (29 x 13 x 30) mm.
EDF 90mm.
Battery: Battery: 6S LIPO 22.2V 5,000mAh.
Speed control: 90A.
Recommended EDF
and Battery set up (not included):
EDF: 90mm, Minimum thrust 3.7kg.
Midi-fan evo/ HET 650-68-1500 WeMoTec.
Lipo cell: 6cells/5000mAh 55C.
ESC: 90A Phoenix Castle.
Item code: BH154.
Made in Vietnam.
Advertisement
Table of Contents

Subscribe to Our Youtube Channel
Related Manuals for Black Horse Model Proctor


Summary of Contents for Black Horse Model Proctor
- Page 1 Instruction Manual Book Item code: BH154. PROCTOR ALL BALSA - PLY WOOD CONSTRUCTION. COVERED WITH ORACOVER 95% ALMOST READY TO FLY SPECIFICATION Parts listing required (not included): Wingspan: 1,360 mm (53.54 in). Radio: 06 channels. Length: 1,480 mm(58.27 in).
-
Page 2: Tools And Supplies Needed
Instruction Manual This instruction manual is designed to help you build a great flying aeroplane. Please read this manual thoroughly before starting assembly of your PROCTOR. Use the parts listing below to identify all parts. WARNING Please be aware that this aeroplane is not a toy and if assembled or used incorrectly it is capable of causing injury to people or property. -
Page 3: Safety Precaution
PROCTOR Item code: BH154. Instruction Manual Caution: Wing warp: Hold the panel twisted gently in This model is not a toy! the opposite direction to the warp, If you are a beginner to this type of powered model, and apply warm air to remove the please ask an experienced model flyer for help and creases from the covering. -
Page 4: Installing The Aileron Servos
PROCTOR Item code: BH154. Instruction Manual REPLACEMENT SMALL PARTS 3x4mm 5x30mm 3x15mm 3x12mm 2x10mm I. AILERON Assemble then apply drops of thin C/A to center of hinge,on both sides. See pictures below: Bottom side. Aileron Flap 2. INSTALLING THE AILERON SERVOS ... -
Page 5: Installing The Aileron Linkages
PROCTOR Item code: BH154. Instruction Manual Drill a hole 1.5mm Secure 2x10mm 5) Repeat the procedure to install the aileron servos in the opposite wing half. Secure 3. INSTALLING THE AILERON CONTROL HORN 1) Remove the covering from the slot on the bot- tom of the aileron. - Page 6 PROCTOR Item code: BH154. Instruction Manual III. INSTALLING ELECTRIC GEAR Silicone Tube RETRACTS PARTS REQUIRED Bend and cut. Electric not included. 73.5mm 21mm Insert the 90 degree bend down through the hole in the control horn. Install one nylon snap keeper over the wire to secure it to the control horn.
- Page 7 PROCTOR Item code: BH154. Instruction Manual Secure Main gear Nose gear Repeat the procedure for the other Gear. Secure IV. INSTALLING THE EDF Secure (ELECTRIC DUCTED FAN SYSTEM) Drill 3 holes from the air outlet for the wires of EDF.
-
Page 8: Installing Horizontal Stabilizer
PROCTOR Item code: BH154. Instruction Manual V. SERVOS INSTALLATION INSTALLING THE FUSELAGE SERVOS 1) Install the rubber grommets and brass collets into the elevator, rudder and throttle servos. Test fit the servos into the servo tray. Trim the tray if neces- sary to fit your servos. -
Page 9: Elevator Control Horn Installation
PROCTOR Item code: BH154. Instruction Manual 6) Remove the stabilizer. Using a modeling knife and ruler CAREFULLY cut 1mm inside the marked lines. Remove the covering from the top and the Center line bottom of the tail plane. Make sure you only cut with enough pressure to only cut through the film and not the wood. -
Page 10: Elevator Pushrod Installation
PROCTOR Item code: BH154. Instruction Manual When you are sure that everything is aligned correctly, mix up a generous amount of 30 minute epoxy. Apply a thin layer to the top and bottom of the stabilizer mounting area and to the stabilizer mounting platform sides in the fuselage. - Page 11 PROCTOR Item code: BH154. Instruction Manual Rudder servo Rudder pushrod Snap keeper Flaslink Servo arm Pushrod wire VIII. INSTALLING NOSE GEAR See picture below: RUDDER CONTROL HORN INSTALLATION 2. Secure Rudder control horn install as same as method of 3x4mm elevator control horn.
- Page 12 Secure the EDF. PROCTOR Item code: BH154. Instruction Manual 1) Plug the servo leads and the switch lead into the receiver. You may want to plug an aileron extension into the receiver to make plugging in the aileron servo lead easier when you are installing the wing.
-
Page 13: Wing Attachment
PROCTOR Item code: BH154. Instruction Manual Receiver Push in Insert the wing panel as pictures below. Push in Push in Bottom side. Top side Close XI. WING ATTACHMENT Screw the wing panel in position. Locate the aluminium wing dihedral brace. -
Page 14: Installing Cockpit Fuselage
PROCTOR Item code: BH154. Instruction Manual Installing the fuselage hatch as same as picture below. Adhesive tape. Open and C/A glue Close BALANCING 1) It is critical that your airplane be balanced correctly. Improper balance will cause your plane to lose control and crash. -
Page 15: Pre-Flight Check
PROCTOR Item code: BH154. Instruction Manual model is “tail heavy” and you must add weigh* to the nose. If the nose drops, it is “nose heavy” and 10mm you must add weight* to the tail to balance. 10mm *If possible, first attempt to balance the model by... - Page 16 PROCTOR Item code: BH154. Instruction Manual I/C FLINGT WARNINGS Keep all onlookers (especially small Always operate in open areas, away children and animals) well back from factories, hospitals, schools, from the area of operation. This is NEVER fly near power lines, aeri- buildings and houses etc.
Need help?
Do you have a question about the Proctor and is the answer not in the manual?
Questions and answers